Logtape (https://logtape.org/) is a JavaScript library to manage logs. By default Logtape is only available for backend Javascript but you can use with moderne browser.
<script type="module"> import { configure, getLogger, getConsoleSink } from "https://esm.sh/@logtape/logtape";
Download Zip version of VScode https://code.visualstudio.com/download according your internal processor (Windows usually x64, Mac usually universal) and unzip the file somewhere you usually install program (on the desktop in my case)
With Git, there are several ways to do the similar thing…
The default branch could be main but it was common to have main.
Github is not the only website for Git: Gitlab, Sourcesup (Renater), Bitbucket, Amazon, etc. but Github is the most famous
VScode is different from Visual Studio from Microsoft
Very simple configuration on Github Website
On the GitHub account opens by click on the top right circle icon, then choose « Settings »
Then at the bottom, choose « Developper settings » at the bottom end :
Then Personal access tokens > Tokens (classic) or just follow https://github.com/settings/tokens , then « Generate a personal access token » :
Then you can provide a name of this token, give an expiration date (not perpetual), give right at least on repo rights and press the bottom button « Generate token » :
Then you have to copy the generated token, please be sure to copy the token because there is no way to give you back this one. If you lost it, you have just to create a new one.
You have to preserve somewhere those three informations from Github:
The email account used to create the github account
The account name used, you can find by clicking again of the top right small circle
The tokens key just generated
Github website provides the basic start we need on the first page you see after login creation or you can return with the Github icon or the « Dashboard » link :
At first, create a new private repository to practice call hello1 :
Then you have the quick look on commands that we will learn bellow:
Also, you need to keep the URL address like just the username of your account and the name of the repository for later as :
https://github.com/pierre-jean-dhm/hello1.git
If you need to change public/private settings or delete the repository, just click « Settings » and top bottom, you will find « Change repository visibility » and « Delete this repository« .
VScode and your folder
We will imagine, we will work into a folder on the desktop call Hello1 that could be empty of not. So create this Hello1 folder where we will work and you can see the full path into the Windows explorer address bar : C:\Users\pierre.jean\Desktop\Hello1\
Open the VScode folder and click on the code program to start it, choose « Open Folder… » and choose C:\Users\pierre.jean\Desktop\Hello1\
You can confirm, you trust the folder content (empty in my demonstration) :
Then, you can close the « welcome tab », open the terminal (Menu View > Terminal) and switch to « Source control » button on the left vertical bar.
So now into this terminal, just enter the following command but replace with the email address from the Github website :
Enter this command to use the main branch name instead of historical master branch name for all your project (so –global) :
git config --global init.defaultBranch main
But we need to rename the branc from master to main with :
git branch -m master main
Now, let’s start on a first project’s file.
NOTE: if a command ouput will not fit into the terminal area missing some place, you will see double dots:
So press SPACE key to see one more page until message END is shows then press Q key to quit.
NOTE2: if you close by mistake terminal, just open it again, Menu View >
Let’s start with versions control (Global Information Tracket)
1/ One new file, add and commit
Into the Hello1 folder, create a file equipe1.txt with menu File > New Text file
On the right, begin to enter text to remove the advice text « Select a language… », so enter :
Pierre
Save the file with equipe1.txt name :
Then we need to ask Git to follow this file equipe1.txt, inside the terminal enter :
git add equipe1.txt
We can also just click into the small + symbol to add this file « Stage Changes »:
Then create a first commit of this version of file with :
git commit -a -m "Initial version"
-a : for all file added previously
-m : to provide a message in this example « Initial version »
The « git commit » action is really to say « All those files are at the same point of development »
F&Q
Why to use git add : because some files could be into the folder and you do not want to include them into the version control
How to add several files and folders : with git add . or git add :/ to add everything into the current folder or everything into where you execute git init.
How to undo git add equipe1.txt : with git reset equipe1.txt
Why two command to add and commit : Several raisons, but I like to say: when I create a new file for a project, I add it at this moment into GIT with git add then later, I will include this file and more into the commit « package » with git commit.
Git and folders: GIT only manage files, if there is an empty folder, GIT will not manage it, so place a README.md file into and git add :/
Editor : You can use any editor as Notepad, UltraEdit, Matlab, etc. to create files but some editors will be updated by Git some other not, later it could be complex to close and reopen file each time to avoid troubles.
You can use arrow up to find a previous command
You can clear the terminal with cls or clear commands
We want to know what append into GIT so the previous command git lg will show us (or the short version git log –oneline –graph –all –decorate) :
We can display the status of our first commit with git log or git lg :
Each element is very important :
* : symbol for the active branch actually the main branch is call « main »
727ce9e: short version of ID of the commit number, each commit will have a different version
HEAD : the position of the folder content files at present, the most important element
-> : very important symbol HEAD state is link to main state of the main branch
main : name of the first branch of commits (It could be master also)
Initial commit : the message of this version
The git lg command add more information, date of the commit and user name.
3/ Second version of our file
Edit the equipe1.txt file with this additional content and save it (CTRL+S):
Pierre
Gérard
Then commit this new version with the classical :
git commit -a -m "Team of 2 players"
Display the log via git lg (or git log –oneline –graph –all –decorate) :
We have 2 commits so we have two versions of our group of one file (equipe1.txt), the first version 727ce9e and the second is 939516a.
4/ Time machine
Suppose we can to go back to the first or previous version, you can either:
go to the version 727ce9e: with git checkout 727ce9e
go to the actual position (HEAD) minus one with : git checkout HEAD^
go to the actual position (HEAD) minus a number (here one) with : git checkout HEAD~1 or git checkout HEAD^1
git checkout HEAD^
We see the equipe1.txt file content change to display the previous content. So we move back in time, the content of our file change to display the previous version :
We return to the last commit with git checkout main.
F&Q
Version number of position: you should avoid to use version number all the time. There are HEAD~number, and there are branch name and tag and so much
How to go back into the future: git checkout main or git switch main
Detach HEAD, a HEAD is normally supposed to point on the last element of a branch, without a branch name HEAD is just a flag on the history of commits version.
Why you should not do git checkout baf9c8d : the situation is called a detached HEAD, in fact the version control of GIT will keep main branch pointing on the baf9c8d version. So if you created a new commit version you will have the following situation :
* e04c5e7 - (HEAD) version detach of branch (3 seconds ago)
* 939516a - (main) Team of 2 players (63 minutes ago)
* 727ce9e - First commit (2 hours ago)
So the HEAD moves with the new version, but the branch name stayed on 939516a.
5/ VScode
You can use VScode to avoid most of the command, for example add a new file equipe2.txt into the folder Hello1. We don’t need to add a new file and a new commit, just a way to understand where are the buttons:
But VScode allow only to do git checkout with branch so …
6/ Branches
To avoid mix into the development, you have to think that your work will be share with someone. You should have 3 branches, your main/master branch, a develop/temporary/feature/test branch and the remote main/master branch.
First of all, where are in this situation :
* 939516a - (HEAD -> main) Team of 2 players (63 minutes ago)
* 727ce9e - First commit (2 hours ago)
One file equipe1.txt with the following content :
Pierre
Gérard
We want to simulate a different way to develop our file. So we go back to the initial commit and we create a develop branch and try to work on :
git checkout HEAD~1
git branch develop
But we have to display the situation with git lg (of git log –oneline –graph –all –decorate) :
* 939516a - (main) Team of 2 players (2 hours ago)
* 727ce9e - (HEAD, develop) First commit (4 hours ago)
There is a problem, HEAD is not linked to develop, HEAD is linked to 727ce9e and develop is linked alos on 727ce9e .
git checkout develop
Then git lg display :
* 939516a - (main) Team of 2 players (2 hours ago)
* 727ce9e - (HEAD -> develop) First commit (4 hours ago)
Alternative, to avoid the detach HEAD, you could just, but don’t now :
git switch -c develop
To simulate this situation, we want to delete develop branch to recreate, so we have this situation :
* 939516a - (main) Team of 2 players (2 hours ago)
* 727ce9e - (HEAD -> develop) First commit (4 hours ago)
Detach the HEAD with git checkout 727ce9e :
* 939516a - (main) Team of 2 players (2 hours ago)
* 727ce9e - (HEAD, develop) First commit (4 hours ago)
Then delete the develop branch with :
git branch -d develop
Then we can create the new branch with :
git switch -c develop
Now we will update the file to create a new branch, edit equipe1.txt file as :
EQUIPE
##########
Pierre
Then commit this version and display situation ( -am is equivalent as -a -m) :
git commit -am "Nice version"
Then display:
* 8c63cc4 - (HEAD -> develop) Nice version (22 seconds ago)
| * 939516a - (main) Team of 2 players (31 minutes ago)
|/
* 727ce9e - Initial version (53 minutes ago)
Two branches : main to the main software development and develop to try some stuffs
VScode now allows to choose to checkout on a branch easily :
7/ Merge
Suppose we want to simulate some one who works on the main branch adding person to the list :
git checkout main
Then edit the file and save it with a third person as :
Pierre
Gérard
Killian
Then commit this new version with Vscode for example (note the dialog to ask to include -a or always) :
Or from the command line with :
git commit -am "Team of 3"
This is the situation :
* b123fa0 - (HEAD -> main) Team of 3 (3 seconds ago)
* 939516a - Team of 2 players (39 minutes ago)
| * 8c63cc4 - (develop) Nice version (9 minutes ago)
|/
* 727ce9e - Initial version (62 minutes ago) <pierre-jean-dhm>
Then now return on the develop branch with :
git checkout develop
We want to merge the nice version of develop branch into the main branch with :
Or the command
git merge main
It could be possible the fusion is OK because there is no conflict really with this final result :
*  8c63cc4 - (HEAD -> develop) Merge branch 'main' into develop (71 minutes ago)
|\
| * b123fa0- (main) Team of 3 (74 minutes ago)
| * 939516a - Team of 2 players (4 hours ago)
* | 8c63cc4 - Nice version (78 minutes ago)
|/
* 727ce9e - First commit (5 hours ago)
Often, you will have a conflict with this interface :
Ok a bizarre and historical way to display content is sotred into equipe1.txt file, top a part from develop branch and bottom the part from main branch. You can have common part before and later the series of <<<<< and >>>>>>. But swith to « Merge editor with the nice button » :
Ok on the top left the part from main branch call incoming, on the top right, the part from the HEAD (current) develop branch and bellow, the final combinaison of the merge of content. Of course you can edit this final result content as you wish and then press « Complete Merge » to validate the merge.
BUT, is onlyj ust like we create a new content into the equipe1.txt file, we need to commit this new situation with:
git commit -am "Merge branch 'main' into develop"
What is our situation :
*   36bd9a0 - (HEAD -> develop) Merge branch 'main' into develop (81 seconds ago)
|\
| * b123fa0 - (main) Team of 3 (31 minutes ago)
| * 939516a - Team of 2 players (71 minutes ago)
* | 8c63cc4 - Nice version (40 minutes ago)
|/
* 727ce9e - Initial version (2 hours ago)
Next step a special case of merge
8/ Merge fast-forward
We are in a situation of the develop branch is one step forward the main branch. We can also now merge the develop branch into the main branch to simulate the preparation to share the main branch with other paople.
git checkout main
git merge develop
In this specific situation, Git succed to combine the content from develop branch equipe1.txt into main branch equipe1.txt.
To display difference, you can enter use this command (and yes we use ~1 as HEAD~1) :
git difftool -y -x sdiff develop main~1
Side by side :
EQUIPE                                           EQUIPE
##########                                       ##########
Pierre                                         / Pierre
Gérard                                         <
Killian                                        <
In this particular case, we do not have to commit because the merge succed without conflict.
So suppose we want to cancel this situation and just move the main branch label on the previsous commit identified by b123fa0 – Team of 3, we can have two solutions :
First option just move the branch on a spécific commit with :
git branch -f main b123fa0
Second option move the HEAD with the main branch and return the HEAD on the develop branch:
git checkout main
git reset --hard b123fa0
git checkout develop
This initial situation at the end will be :
*   36bd9a0 - (HEAD -> develop) Merge branch 'main' into develop (40 minutes ago)
|\
| * b123fa0 - (main) Team of 3 (70 minutes ago)
| * 939516a - Team of 2 players (2 hours ago)
* | 8c63cc4 - Nice version (79 minutes ago)
|/
* 727ce9e - Initial version (2 hours ago)
This a way to cancel movement of the branch, but be aware that the main branch will be syncrhonise with a remote repository call remote origin/main.
Remote
Ok now everything we done is only local. We need to link to Github, so we need information keep at the begining as the git token (symbolise by ghp_XXXXXXXXX later) and the url :
https://github.com/pierre-jean-dhm/hello1.git
We need to create this termnal command with you information :
In fac this will create a short name « origin » to your hello1.git repository. You can choose something other than origin as github but origin is really commun.
or we can use the Vscode menu insert at first the link https://ghp_XXXXXXXXX@github.com/pierre-jean-dhm/hello1.git then the name of the link origin as usual:
Please, do not accept Vscode to periodicaly fetch content, we do not need it at first.
We forget something, we want to push main branch and we are at present on develop branch. Think about it all the time please!
So option 1 just with this command line :
git push -u origin main
Or option 2, change to main branch then push :
or the command line :
git checkout main
Then git push to the remote repository with branch publish also:
The purpose at this moment is to have always main branch update and link to the remote branch.
You can go online to reresh the page and find everything:
Top left: the main branch
Top right: 3 commits from your computer
Center: our unique equipe1.txt file
You can open the file to see the last content and you can list all the commit to find history of commit or you can open the equipe1.txt file to see history also.
You can see the commit comments and unique number but only the main branch is uploaded.
In local you can see now there is a new remote origin/main branch with git lg command (or the short version git log –oneline –graph –all –decorate) :
* 36bd9a0 - (develop) Merge branch 'main' into develop (23 hours ago)
|\
| * b123fa0 - (HEAD -> main, origin/main) Team of 3 (23 hours ago)
| * 939516a - Team of 2 players (24 hours ago)
* | 8c63cc4 - Nice version (23 hours ago)
|/
* 727ce9e - Initial version (24 hours ago)
Now it is time to simulate a conflict with an external user.
Remote conflict
We will simulate a conflict between the origin/main branch and your local branch, on the main repository file you can click on the equipe1.txt file :
Then on the right, the pen button or the short menu then « Edit online » let you edit the file :
Change the content Equipe as bellow:
TEAM
##########
Pierre
Gérard
Killian
Then you have to « Commit » this new version with the top right button, this will open a dialog box to enter the messsage :
At this point, the online origin/main is updated but NOT your local version. There are two solutions from here BUT before please backup (see below) :
Download the remote origin/main branch to look what it could happen with : git fetch
Download the remote origin/main branch to stray away merge to your HEAD: git pull
How to backup this situation for training purpose
Just duplicate (copy/paste) the Hello1 folder somewhere to preserve the local situation. Git stores everything into the .git folder inside Hello1 folder, so backup this folder is equal to backup the local git folder. We can even imagine to delete the Github respository and recreate it (exception the last operation to edit online equipe1.txt will not be backup, because it still only exist online)
We can say « git fetch » and « git merge » is equivalent as « git pull ». Git fetch is the light version, you can download from Github but your ane not sure to use it. Git pull is you will download from Github but you use it at present.
This is the situation with git lg before git fetch:
*   36bd9a0 - (develop) Merge branch 'main' into develop
|\
| * b123fa0 - (HEAD -> main, origin/main) Team of 3
| * 939516a - Team of 2 players
* | 8c63cc4 - Nice version
|/
* 727ce9e - Initial version
after git fetch as a command on via menu
And again git lg to display :
* 327e940 - (origin/main) Add Team title
| *   36bd9a0 - (develop) Merge branch 'main' into develop
| |\
| |/
|/|
* | b123fa0 - (HEAD -> main) Team of 3
* | 939516a - Team of 2 players
| * 8c63cc4 - Nice version
|/
* 727ce9e - Initial version
So we have a potentiel conflict display by Vscode betwen the main branch and the remote origin/main branch :
NOTE A optionnal compare with develop : We can also checkout the develop branch to try to merge with the origin/main branch to try to see what inspact it will be on the develop branch. Just try to merge, open the « Resolve into the Merge Editor » then to cancel enter command git merge –abort. Byt the way, how I know the command, just git status to display information. Just think to return on the main branch : git checkout main.
So option 1 : git merge will update directly the equipe1.txt content and the final situation will be main branch is identifical at origin/main branch :
* 327e940 - (HEAD -> main, origin/main) Add Team title
| *   36bd9a0 - (develop) Merge branch 'main' into develop
| |\
| |/
|/|
* | b123fa0 - Team of 3
* | 939516a - Team of 2 players
| * 8c63cc4 - Nice version
|/
* 727ce9e - Initial version
And we also know a futur conflict will be with develop branch, but we will see that later.
Now go back to test option 2, close VScode, rename Hello1 folder into Hello1-Option1, copy the backup Hello1 into Hello1, restart Vscode, menu View Terminal and button on the top left bar « Source control » :
You can also open the equipe1.txt file (Menu File > Open File … ) Then git lg command :
*   36bd9a0 (develop) Merge branch 'main' into develop
|\
| * b123fa0 (HEAD -> main, origin/main) Team of 3
| * 939516a Team of 2 players
* | 8c63cc4 Nice version
|/
* 727ce9e Initial version
Ok now we wand to download the remote origin/main branch to stray away merge to your HEAD. We know online the last version is the best, we just want this version to be update with the main branch so go on.
At this point, because Git find a way to avoid conflict between the online version and the actual versio, juste equipe1.txt will work perfect and merge. We see on the screen, on the right, lines in yellow are copy to the left so everything is fine :
But suppose we merge with develop that for sure will create a conflict try with git merge develop then use the menu to create your combinaison of setting (Use CTRL+Z to cancel o Menu Edit > Undo)
I choose to create this content with « accept incomming » and edit the last line with ######:
EQUIPE
##########
Pierre
Gérard
Killian
########
Then press « Complete Merge » to finalise the conflict from main and develop, then create the new commit 36bd9a0 with this result from git lg output :
*   eefe254 - (HEAD -> main) Merge branch 'develop' (4 seconds ago) <pierre-jean-dhm>
|\
| *   36bd9a0 - (develop) Merge branch 'main' into develop (29 hours ago) <pierre-jean-dhm>
| |\
| * | 8c63cc4 - Nice version (30 hours ago) <pierre-jean-dhm>
* | | 327e940 - (origin/main) Add Team title (5 hours ago) <pierre-jean-dhm>
| |/
|/|
* | b123fa0 - Team of 3 (29 hours ago) <pierre-jean-dhm>
* | 939516a - Team of 2 players (30 hours ago) <pierre-jean-dhm>
|/
* 727ce9e - Initial version (30 hours ago) <pierre-jean-dhm>
We need to push to update origin/main as we always say to check main equal to origin/main
Ok now we have this situation with git lg :
*   eefe254 - (HEAD -> main, origin/main) Merge branch 'develop'
|\
| *   36bd9a0 - (develop) Merge branch 'main' into develop
| |\
| * | 8c63cc4 - Nice version
* | | 327e940 - Add Team title
| |/
|/|
* | b123fa0 - Team of 3
* | 939516a - Team of 2 players
|/
* 727ce9e - Initial version
At this point, about develop branch, we could create a new develop branch for a new feature.
Delete develop branch and recreate it later
Merge develop branch with main branch to start later with this branch
Move the flag develop from 36bd9a0 to eefe254 and tag the commit with git tag develop-pretty-title
Rename develop branch as develop-pretty-title branch to keep this feature in mind
I recommand to keep the branch attach so rename a develop branch into an explicit name to keep in mind is the best. We will create later a develop-new-feature branch as needed. We don’t push this kind of branch on GitHub is just a way to work on side features instead have too much change on the main branch.
Simulate an other user
Create a new terminal independant of the first one, press ALT key and click to open a parallel terminal :
Enter the following command to go top folder, create a new folder, go insite this folder and then create a git account :
cd    ..
mkdir Hello1-other-user
cd Hello1-other-user
git init
We will create another account just my case swap family name and first name :
We are suppose now to image a large contribution from this new user, open the file equipe1.txt in parallel with this combinaison :
Open the menu File > Open files … then move to one up folder, then choose the other sub folder called Hello1-other-user then open equipe1.txt file :
Then you can displays both file, right click on the tab to choose « Split Right » menu
And after close this tab because Split Right duplicate
Now we can display at the left equipe1.txt file from Hello1 and its console and at the right equipe1.txt file from Hello1-other-user and its console :
This exercice suppose to work on this specific situation:
The right user will create a new developer-complex-feature branch and create one commit on the files, for example add email for the first person
But the left user will works on the main branch and add two more commits with more peoples on the list
The right user knows there are update but he needs more time to work on his file but he can wait to receive update
With the right user
git branch developer-complex-feature
git checkout developer-complex-feature
# edit the file adding an email
git commit -am "Update email first person"
With the left user
# edit the file adding one more people
git commit -am "Teams of 4 peoples"
# edit the file adding one more people
git commit -am "Teams of 5 peoples"
git push origin main
With the right user need to receive update
git pull origin main
git checkout main
git merge origin/main
Now we have this situation :
* 629b770 - (HEAD -> main, origin/main) Teams of 5 peoples (4 minutes ago)
| * 19eb774 - (developer-complex-feature) Update email first person (7 minutes ago)
|/
*   eefe254 - Merge branch 'develop' (3 days ago)
|\
| *   36bd9a0 - Merge branch 'main' into develop (4 days ago)
| |\
| * | 8c63cc4 - Nice version (4 days ago)
So developer-complex-feature is link to eefe254 commit and it is « too early » we need more time, so we can move the branch (call rebase) from eefe254 to a more recent commit into the timeline, so :
git checkout developer-complex-feature
git rebase main
So the new situation will be :
* d5338af - (HEAD -> developer-complex-feature) Update email first person (5 seconds ago)
* 629b770 - (origin/main, main) Teams of 5 peoples (5 minutes ago)
*   eefe254 - Merge branch 'develop' (3 days ago)
|\
| *   36bd9a0 - Merge branch 'main' into develop (4 days ago)
| |\
| * | 8c63cc4 - Nice version (4 days ago)
And right user can work on more updated content from equipe1.txt file and the content is :
EQUIPE
##########
Pierre p.j@mine_ales.com
Gérard
Killian
Simon
Stéphane
########
A very important information : never rebase a online branches like main branch.
You can simulate more commits for the left user and rebase for the right user until right user finish and push modifications on Github main branch.
At the end, change everything on the developer-new-feature branch, save file and commit the change into a new commit :
git commit -am "Update emails"
We can merge from developer-new-feature branch, we need to move on the main branch and merge and push :
git checkout main
git merge developer-new-feature
git push origin main
You can go online to find the Github commit page and display commit from the right user and commit from the left user :
Ok of course, you can now git pull origin main for the left user and go on simulate conflict and development. We can see also with the classic git lg command :
* 7551fa3 - (HEAD -> main, origin/main) Update emails <JEAN Pierre>
* d5338af - Update email first person <JEAN Pierre>
* 629b770 - Teams of 5 peoples  <pierre-jean-dhm>
*   eefe254 - Merge branch 'develop'  <pierre-jean-dhm>
|\
| *   36bd9a0 - (develop) Merge branch 'main' into develop <pierre-jean-dhm>
| |/
|/|
* | b123fa0 - Team of 3 <pierre-jean-dhm>
* | 939516a - Team of 2 players <pierre-jean-dhm>
|/
* 727ce9e - Initial version (4 days ago) <pierre-jean-dhm>
Additionnals operations
Hide files from Git
Put a word document into the folder, you will see it all the time not « added » (not tracked) by Git :
So you can create a .gitignore file with the following content and save it into the same folder where your execute git init (Hello1 in ours case) :
*.docx
*.pdf
*.xlsx
*.pptx
All files with .docx, .pdf, .xlsx, *.pptx will be ignored by Git. Off couse, you will se that you can tracked (git add) the .gitignore file or you can add .gitignore at the end of your .gitignore file.
Suppose you create a new file equipe2.txt into the folder with the folowing content:
EQUIPE
###########
You can add to git the « untracked/unstaged » file with the git add but you forget. Many time if you need to understand which command will be more usuful just enter git status :
On branch main
Your branch is up to date with 'origin/main'.

Untracked files:
  (use "git add <file>..." to include in what will be committed)
        equipe2.txt

nothing added to commit but untracked files present (use "git add" to track)
Use git add or the plus button to add the file and enter git status :
On branch main
Your branch is up to date with 'origin/main'.

Changes to be committed:
  (use "git restore --staged <file>..." to unstage)
        new file:   equipe2.txt
So to rever the git add command, you will see the command :
git restore --staged equipe2.txt
Now move to develop branch, git add equipe2.txt file and commit
Now suppose you want to cancle last commit has it never exists :
git reset --soft HEAD~1
The git status will display the moment after the git add :
On branch develop
Changes to be committed:
  (use "git restore --staged <file>..." to unstage)
        new file:   equipe2.txt
Add authentication to Github easely
You can download the Github client with https://cli.github.com/ and install it on your computer. Then start this command from Windows terminal:
"c:\Program Files\GitHub CLI\gh.exe" auth login
You will be ask for severals questions as (my answers are in bleu):
? What account do you want to log into?  GitHub.com
? What is your preferred protocol for Git operations on this host? HTTPS
Authenticate Git with your GitHub credentials? No
How would you like to authenticate GitHub CLI? Paste an authentication token
Then you will can paste you generated token but before you must add to it right read:org :
Then you terminal will be link to Github website. You can confirm with :
"c:\Program Files\GitHub CLI\gh.exe" auth status

github.com
  ✓ Logged in to github.com account pierrejean (keyring)
  - Active account: true
  - Git operations protocol: https
  - Token: ghp_************************************
  - Token scopes: 'read:org', 'repo'
With Git, there are several ways to do the similar thing…
The default branch could be master or now it is more common to have main as name of the central branch.
Github is not the only web site for Git: Gitlab, Sourcesup (Renater), Bitbucket, Amazon, etc but Github is the most famous
Very simple configuration on Github Website
On the Github account opens by click on the top right circle icon, then choose « Settings »
Then at the bottom, choose « Developper settings » at the bottom end :
Then Personal access tokens > Tokens (classic) or just follow https://github.com/settings/tokens , then « Generate a personal access token » :
Then you can provide a name of this token, give an expiration date (not perpetual), give right at least on repo rights and press the bottom button « Generate token » :
Then you have to copy the generated token, please be sure to copy the token because there is no way to give you back this one. If you lost it, you have just to create a new one.
You have to preserve somewhere those three informations from Github:
The email account used to create the github account
The account name used, you can find by clicking again of the top right small circle
The tokens key just generated
Github website provides the basic start we need on the first page you see after login creation or you can return with the Github icon or the « Dashboard » link :
At first, create a new private repository to practice call hello1 :
Then you have the quick look on commands that we will learn bellow:
Also, you need to keep the URL address like just the username of your account and the name of the repository for later as :
https://github.com/pierre-jean-dhm/hello1.git
Git on your computer
Git is an open source software to manage a local version of a hard drive folder with files. Create on your desktop a folder call Projet1 with « File explorer » (Windows) or « Finder » (MacOS). You have to find the path of this folder with « File explorer » is into the top address bar.
C:\Users\pierre.jean\Desktop\Projet1\ in my case (keep into your mind) for the next step :
C:\Users\pierre.jean\Desktop\Projet1\
MacOS users will have to drag and drop the folder to a terminal application to show the path
So open terminal application and enter the following command :
cd "C:\Users\pierre.jean\Desktop\Projet1\"
If the combination of folders named as a path include no spaces you can enter simply :
cd C:\Users\pierre.jean\Desktop\Projet1\
Mac OS user can drag and drop the folder into the terminal to have the path. Windows users can replace into the « file explorer » address bar the content and enter « cmd » and press ENTER to open the terminal into the correct place.
NOTE: cd is fo Change Directory
Configuration of local git settings
So now into this terminal, just enter the following command but replace with the email address from the Github website :
Let’s start with versions control (Global Information Tracket)
1/ One new file, add and commit
Into the Projet1 folder, create a file equipe1.txt with notepad or any text editor to manage information about a team with a line of information as below:
Pierre
Then ask Git to follow this file equipe1.txt, inside :
git add equipe1.txt
Then create a first commit of this version of file with :
git commit -a -m "Initial version"
-a : for all file added previously
-m : to provide a message in this example « Initial version »
The « git commit » action is really to say « All those files are at the same point of developpement »
F&Q
Why to use git add : because some files could be into the folder and you do not want to include them into the version control
How to add several files and folders : with git add . or git add :/ to add everything into the current folder or everything into where you execute git init.
How to undo git add equipe1.txt : with git reset equipe1.txt
Why two command to add and commit : Several raisons, but I like to say: when I create a new file for a project, I add it at this moment into GIT with git add then later, I will include this file and more into the commit « package » with git commit.
Git and folders: GIT only manage files, if there is an empty folder, GIT will not manage it, so place a README.md file into and git add :/
Editor update: some editor will be updated by Git some other not, later it could be complex to close and reopen file each time to avoid troubles.
2/ Check state
We want to know what append into GIT so the previous command git lg will show us (or the short version git log –oneline –graph –all –decorate) :
We can display the status of our first commit with gitlog or git lg :
Initial commit log display short visible version
Each element is very important :
* : symbol for the active branch actually the main branch is call « master »
58d31e1 : short version of ID of the commit number, each commit will have a different version
HEAD : the position of the folder content files at present, the most important element
-> : very important symbol HEAD state is link to master state of the main branch
master : name of the first branch of commits (It could be main also)
Initial commit : the message of this version
The git lg command add more information, date of the commit and email of the user.
3/ Second version of our file
Edit the equipe1.txt file with this additional content :
Pierre
Gérard
Then commit this new version with the classical :
git commit -a -m "Team of 2 players"
Display the log via gitlog
Git log second commit
We have 2 commits so we have two versions of our group of one file (equipe1.txt), the first version 58d31e1 and the second is baf9c8d.
4/ Time machine
Suppose we can to go back to the first or previous version, you can either:
go to the version baf9c8d: with git checkout baf9c8d
go to the actual position (HEAD) minus one with : git checkout HEAD^
go to the actual position (HEAD) minus a number (here one) with : git checkout HEAD~1 or git checkout HEAD^1
Now reopen the file equipe1.txt to found the previous content. So we move back in time, the content of our file change to rescue the previous version :
Git checkout previous version
We can look the content of the file and find only one line « Pierre » as the content prepare when we create the « Initial commit ».
F&Q
Version number of position: you should avoid to use version number all the time. There are HEAD~number, and there are branch name and tag and so much
How to go back into the future: git checkout master or git switch master
Detach HEAD, a HEAD is normally supposed to point on the last element of a branch, without a branch name HEAD is just a flag on the history of commits version.
Why you should not do git checkout baf9c8d : the situation is called a detached HEAD, in fact the version control of GIT will keep master/main branch pointing on the baf9c8d version. So if you created a new commit version you will have the following situation :
* e04c5e7 - (HEAD) version detach of branch (3 seconds ago)
* baf9c8d - (master) Team of 2 players (63 minutes ago)
* 58d31e1 - First commit (2 hours ago)
So the HEAD moves with the new version but the branch name stayed on baf9c8d. Alway checkout to the last branch name.
5/ Branches
To avoid mix into the development, you have to think that your work will be share with someone. You should have 3 branches, your main/master branch, a develop/temporary/feature/test branch and the remote main/master branch.
First of all, where are in this situation :
* baf9c8d - (HEAD -> master) Team of 2 players (63 minutes ago)
* 58d31e1 - First commit (2 hours ago)
One file equipe1.txt with the following content :
Pierre
Gérard
We want to simulate a different way to develop our file. So we go back to the initial commit and we create a develop branch and try to work on :
git checkout HEAD~1
git branch develop
But we have to display the situation with git lg (of git log –oneline –graph –all –decorate) :
* baf9c8d - (master) Team of 2 players (2 hours ago)
* 58d31e1 - (HEAD, develop) First commit (4 hours ago)
There is a problem, HEAD is not linked to develop, HEAD is linked to 58d31e1 and develop is linked alos on 58d31e1.
git checkout develop
Then git lg display :
* baf9c8d - (master) Team of 2 players (2 hours ago)
* 58d31e1 - (HEAD -> develop) First commit (4 hours ago)
Alternative, to avoid the detach HEAD, you could just, but don’t now :
git switch -c develop
To simulate this situation, we want to delete develop branch to recreate, so we have this situation :
* baf9c8d - (master) Team of 2 players (2 hours ago)
* 58d31e1 - (HEAD -> develop) First commit (4 hours ago)
Detach the HEAD with git checkout 58d31e1 :
* baf9c8d - (master) Team of 2 players (2 hours ago)
* 58d31e1 - (HEAD, develop) First commit (4 hours ago)
Then delete the develop branch with :
git branch -d develop
Then we can create the new branch with :
git switch -c develop
Now we will update the file to create a new branch, edit equipe1.txt file as :
EQUIPE
##########
Pierre
Then commit this version and display situation ( -am is equivalent as -a -m) :
git commit -am "Nice version"
Then display:
* d1e4a2c - (HEAD -> develop) Nice version (4 seconds ago)
| * baf9c8d - (master) Team of 2 players (2 hours ago)
|/
* 58d31e1 - First commit (4 hours ago)
6/ Merge
Suppose we want to simulate some one who works on the master branch adding person to the list or master branch:
git checkout master
Then edit the file with a third person as :
Pierre
Gérard
Killian
Then commit this new version with :
git commit -am "Team of 3"
This is the situation :
* 6eac561 - (HEAD -> master) Team of 3 (2 seconds ago)
* baf9c8d - Team of 2 players (3 hours ago)
| * d1e4a2c - (develop) Nice version (5 minutes ago)
|/
* 58d31e1 - First commit (4 hours ago)
Then now return on the develop branch with :
git checkout develop

* 6eac561 - (master) Team of 3 (87 seconds ago)
* baf9c8d - Team of 2 players (3 hours ago)
| * d1e4a2c - (HEAD -> develop) Nice version (6 minutes ago)
|/
* 58d31e1 - First commit (4 hours ago)
We want to merge the nice version of develop branch into the master branch with :
git merge master
Then we will have the fusion because there is no conflict with this final result :
*   d153307 - (HEAD -> develop) Merge branch 'main' into develop (71 minutes ago)
|\
| * 6eac561 - (master) Team of 3 (74 minutes ago)
| * baf9c8d - Team of 2 players (4 hours ago)
* | d1e4a2c - Nice version (78 minutes ago)
|/
* 58d31e1 - First commit (5 hours ago)
You can display the merge file equipe1.txt Git succed to combine file in this case:
EQUIPE
##########
Pierre
Gérard
Killian
But we are lucky, equipe1.txt file from master/main branch have commun element from equipe1.txt from develop branch. you can display this information with this command (and yes we use ~1 as HEAD~1:
git diff develop~1 master
This will display difference beetwen 6eac561 and d153307 with :
diff --git a/equipe1.txt b/equipe1.txt
index 6eac561..d153307 100644
--- a/equipe1.txt
+++ b/equipe1.txt
@@ -1,3 +1,3 @@
-EQUIPE
-##########
 Pierre
+Gérard
+Killian
Red element if for the develop branch, Pierre element is common and green element if for main/master branch.
To cancel and go back to previous situation, you can move the HEAD and develop branch name by moving it (and we will lose d153307)
git reset --hard d1e4a2c
7/ Merge conflict
Now we want a real conflict, so edit the equipe1.txt file from develop branch and remove Pierre and insert Simon :
EQUIPE
##########
Simon
Now commit this new version with :
git commit -am "Pretty and Simon"
So now we can look a potential merge conflict before by compare :
git diff --word-diff=color develop master
Result show a conflict on the third line :
-EQUIPE
-##########
SimonPierre
Gérard
Killian
So we know it will be a problem with the futur merge.
We can display also side by side with :
 git difftool -y -x sdiff develop master

EQUIPE                                           | Pierre
##########                                       | Gérard
Simon                                            | Killian
So we will create the merge conflict with :
git merge master
This will display the conflict message :
Auto-merging equipe1.txt
CONFLICT (content): Merge conflict in equipe1.txt
Automatic merge failed; fix conflicts and then commit the result.
We can display the file and it is a mess :
<<<<<<< HEAD
EQUIPE
##########
Simon
=======
Pierre
Gérard
Killian
>>>>>>> master
Ok just to read it I had color as git diff
<<<<<<< HEAD
-EQUIPE
##########
Simon
=======
Pierre
Gérard
Killian
>>>>>>> master
The simpliest solution is just remove everything from git merge (<<<<< , >>>>> and =====) to create ours merged version and even add information and save it :
EQUIPE
##########
Simon
Pierre
Gérard
Killian
Adam
Then to finish create the commit :
git commit -am "Combine pretty and team of 3 plus Adam"
Finaly, we have got :
*   9ddbc45 - (HEAD -> develop) Combine pretty and team of 3 plus Adam (22 minutes ago)
|\
| * 6eac561 - (master) Team of 3 (15 hours ago)
| * baf9c8d - Team of 2 players (18 hours ago)
* | 8f1fead - Pretty and Simon (47 minutes ago)
* | d1e4a2c - Nice version (15 hours ago)
|/
* 58d31e1 - First commit (19 hours ago)
But master/main branch is not update, we should move in parallel. Finish, we merge develop to main/master. This time no conflict, Git knows what comme from develop and what comme from main:
git checkout master
git merge develop
Then we can see HEAD is on master and develop branch is also on the last commit :
*   9ddbc45 - (HEAD -> master, develop) Combine pretty and team of 3 plus Adam (22 minutes ago)
|\
| * 6eac561 - (master) Team of 3 (15 hours ago)
| * baf9c8d - Team of 2 players (18 hours ago)
* | 8f1fead - Pretty and Simon (47 minutes ago)
* | d1e4a2c - Nice version (15 hours ago)
|/
* 58d31e1 - First commit (19 hours ago)
Remote
Ok now everything we done is only local. We need to link to Github, so we need information keep at the begining as the git token (symbolise by ghp_XXXXXXXXX later) and the url :
https://github.com/pierre-jean-dhm/hello1.git
We need to create this command with you information :
In fac this will create a short name « origin » to your hello1.git repository. You can choose something other than origin as github but origin is really commun.
At first, I want to rename master branch as main with :
git branch -M master main
Then I will push with :
git push -u origin main
The -u parameter (or –set-upstream) is to devine the default branch to later do not have to write all the time you want the main branch.
You can go online to reresh the page and find everything:
Top left: the main branch
Top right: 6 commits from your computer
Center: our unique equipe1.txt file
You can open the file to see the last content and you can list all the commit to find history of commit or you can open the equipe1.txt file to see history also.
You can see the commit comments and unique number but only the main branch is uploaded.
In local you can see now there is a new remote origin/main branch with git lg command (or the short version git log –oneline –graph –all –decorate) :
*   9ddbc45 - (HEAD -> main, origin/main, develop) Combine pretty and team of 3 plus Adam (2 hours ago)
|\
| * 6eac561 - Team of 3 (17 hours ago)
| * 6c6fd31 - Team of 2 players (20 hours ago)
* | 8f1fead - Pretty and Simon (3 hours ago)
* | d1e4a2c - Nice version (17 hours ago)
|/
* 633f1e4 - First commit (21 hours ago)
Remote conflict
We will simulate a conflict between the origin/main branch and your local branch, on the main repository file you can click on the equipe1.txt file :
Then on the right, the pen button or the short menu then « Edit online » let you edit the file :
Change the content Equipe becomes TEAM :
TEAM
##########
Simon
Pierre
Gérard
Killian
Adam
Then you have to « Commit » this new version with the top right button, this will open a dialog box to enter the messsage :
At this point, the online origin/main is updated but not your local version. There are two solutions from here :
Download the remote origin/main branch to look what it could happen with : git fetch
Download the remote origin/main branch to stray away merge to your HEAD: git pull
We can say « git fetch » and « git merge » is equivalent as « git pull ». Git fetch is the light version, you can download from Github but your ane not sure to use it. Git pull is you will download from Github but you use it at present.
The situation at present with git lg before git fetch:
* 9ddbc45 - (HEAD -> main, origin/main, develop) Combine pretty and team of 3 plus Adam (2 hours ago)
after git fetch and again git lg to display :
* 70735d2 - (origin/main) Change Equipe to Team (6 minutes ago)
*   9ddbc45 - (HEAD -> main, develop) Combine pretty and team of 3 plus Adam (3 hours ago)
Ok know we can see the the difference :
git diff --word-diff=color origin/main main
This will display :
TEAMEQUIPE
##########
Simon
Pierre
Gérard
Killian
Adam
Ok three strategies :
git merge origin/main to have the remote origin/main version with TEAM word
git merge –strategy=ours origin/main to have the local main version with EQUIPE word
git merge –no-ff origin/main this is a very useful one that will create a new commit from the merge of origin/main and main branches without fast-forward strategy to merge into the actual commit.
Let look the result of this last git merge –no-ff origin/main with git lg command :
*   24e02d5 - (HEAD -> main) Merge remote-tracking branch 'origin/main' (10 seconds ago)
|\
| * 70735d2 - (origin/main) Change Equipe to Team (71 minutes ago)
|/
*   9ddbc45 - (develop) Combine pretty and team of 3 plus Adam (4 hours ago)
So the equipe1.txt include a merge of the two branch so this is the content :
But we want to decide better how to manage the content into the merge. So now switch to a new tool GitHub Desktop
GitHub Desktop
Install GitHud Desktop now, but we will skip the Github authentication to test again Git.
Step one « Skip the Github authentication » we will authenticate at first with token and later we could « Sign in to Github.com » :
Enter nothing or your username and email as we store at the top of this exercice. Why noting : because informations are store into the .git folder of this repository (remeber git config user.email) :
Then now the important, we ask GitHup Desktop to manage the Git local folder c:\Users\pierre.jean\Dekstop\Projet1\
Let start with the GitHub Desktop :
Top left button: to change the repository, at present we have only one Projet1
Middle top button, you can see and change branch as git checkout, you can also merge branch into this windows
Top right button Git pull origin or the small one git fetch (git pull = git fetch + git merge)
History menu : as git lg we will see later
Large left white area: List of potential files to git add, at present no file, create a new text file into the Projet1 folder and you will see there, then delete it
Git commit message area as we did with git commit -am « message area »
Git commit description : not used
Commit to main : the commit button to create a new commit
At this point, we have the same operation on the classic process to modify files, add new files, commit and push. One drawback, nothing display the remote origin/main branch at this moment with GitHub Desktop. We will see how to manage this point later.
You can use now the « History » button to display list on the main current branch the evolution of the content of the equipe1.txt file :
On the « First commit », you will find only Pierre, then adding Gérard.
The « Nice version » is suppose to be into the develop branch, but everything is merge into the last commit and so Github Desktop display everything.
GitHub Desktop philosophy
As you can see on the first screen, GitHub Desktop show us this message in blue : « Pull 1 commit from the origin remote » :
In fact, GitHub Desktop wants the main branch is synchronize all the time to the remote origin/main. At present git lg shows us :
* 70735d2 - (origin/main, origin/HEAD) Change Equipe to Team * 9ddbc45 - (HEAD -> main, develop) Combine pretty and team of 3 plus Adam |\ | * 6eac561 - Team of 3 | * 6c6fd31 - Team of 2 players * | 8f1fead - Pretty and Simon * | d1e4a2c - Nice version
GitHub Desktop wants you merge local main branch and origin/main. And it also adds origin/HEAD that I don’t know why (event after I delete it, it comes back).
Anyway, we are suppose to have a local main branch always equals to origin/main branch.
So we should develop on the develop branch and then merge to the local main branch and then push to the remote origin/main branch.
So press button : « Pull origin » to receive the last commit « Change Equipe to Team » and the equipe1.txt file contents will be :
TEAM
##########
Simon
Pierre
Gérard
Killian
Adam
So main branch and remote origin/main branche are equals now. I still have develop branch with equipe1.txt contains :
EQUIPE
##########
Simon
Pierre
Gérard
Killian
Adam
Two options:
I want to move develop branch on the last commit from the origin/main branch (= main branch)
I want to preserve the content from develop branch
1/ Option 1: Develop branch = local main branch = remote origin/main branch
This strategy is remote content is the correct solution with TEAM word.
Change to the develop branch
Choose to create a merge commit from the main branch.
Press « Create a merge commit » to confirm the merge
A new commit is « added » to the develop branch and this commit is just the same of main branch, see git lg :
* 70735d2 - (HEAD -> develop, origin/main, origin/HEAD, main) Change Equipe to Team
*   9ddbc45 - Combine pretty and team of 3 plus Adam
|\
| * 6eac561 - Team of 3
You can go on work on the develop branch until you merge with the main branch.
2/ Option 2: local main branch has to update then remote origin/main branch will be update
This strategy is the local content is the correct solution with EQUIPE word. We cannot merge because develop branch is an ancestror of main branch.
* 70735d2 - (HEAD -> main, origin/main) Change Equipe to Team
* 9ddbc45 - (develop) Combine pretty and team of 3 plus Adam
|\
| * 6eac561 - Team of 3
We could imagine to create a new commit from develop branch change something then merge to simulate and update on the develop.
We will just choose the previous commit and right click to create a new commit with the previous content :
The git lg command will show:
* 161d109 - (HEAD -> main) Revert "Change Equipe to Team"
* 70735d2 - (origin/main, origin/HEAD) Change Equipe to Team
* 9ddbc45 - (develop) Combine pretty and team of 3 plus Adam
|\
| * 6eac561 - Team of 3 (26 hours ago) <pierre.jean@umontpellier.fr>
Now we can push the new modification and delete the develop branch and recreate it on the HEAD.
The installation process supposes to download and install a list of software. You will find an installation process bases on Windows OS, but same installation could be done with Linux and macOS just correct the path.
NOTE: I used a special folder call c:\DEV23\ more convenience with Windows OS with no space, no special characters and no path length limitation.
Apache Maven 3.9 to install into c:\DEV23\apache-maven-3.9.4-bin\ folder
Vscode 1.10 zip download for standalone version into c:\DEV23\VSCode-win32-x64-1.82.0\
MySQL 8.X Community ZIP archive for standalone version into C:\DEV23\mysql-8.1.0-winx64\
Installation standalone
We install software into a standalone version to avoid conflict with other development. It is also close to a production installation with docker or any other solution.
Java JDK installation is a common install, we will just use an environment variable to manage the JDK version used.
Maven installation in standalone version is just unzip into the correct folder.
> Mysql standalone
Mysql installation is just unzipping into a folder, but you have to make some configuration a command line the first time to configure.
Unzip Mysql into c:\DEV23\mysql-8.1.0-winx64\ folder
Create a config.ini text file into c:\DEV23\mysql-8.1.0-winx64\ with content show below
Create an initialize.cmd text file into c:\DEV23\mysql-8.1.0-winx64\ with content show below
We suppose the port 12345 is available, but you can change to another one. You can add a root user password, but default no password is more convenience for development.
Content of config.ini file :
[mysqld]
mysql_native_password=ON
sql_mode = NO_ENGINE_SUBSTITUTION,STRICT_TRANS_TABLES
# set basedir to your installation path
basedir = ".\\"
# set datadir to the location of your data directory
datadir = ".\\mydb"
# The port number to use when listening for TCP/IP connections. On Unix and Unix-like systems, the port number must be
# 1024 or higher unless the server is started by the root system user.
port = "12345"
# Log errors and startup messages to this file.
log-error = ".\\error_log.err"
secure_file_priv = ".\\"

[mysqladmin]
user = "root"
port = "12345"
Content of initialize.cmd file, to start one time to create initial database and configuration.
You will see some lines as following to show MySql system databases are created and a root user with an empty password is also added :
[Warning] [MY-010915] [Server] 'NO_ZERO_DATE', 'NO_ZERO_IN_DATE' and 'ERROR_FOR_DIVISION_BY_ZERO' sql modes should be used with strict mode. They will be merged with strict mode in a future release.
[System] [MY-013169] [Server] C:\Dev\mysql-8.0.39-winx64\bin\mysqld.exe (mysqld 8.0.39) initializing of server in progress as process 25940
[System] [MY-013576] [InnoDB] InnoDB initialization has started.
[System] [MY-013577] [InnoDB] InnoDB initialization has ended.
[Warning] [MY-010453] [Server] root@localhost is created with an empty password ! Please consider switching off the --initialize-insecure option.
Then, if everything is ok, you can create 3 text files start.cmd, stop.cmd and mysql.cmd. I use the windows command cd « %~dp0 » to move from any folder into the folder where the script is stored. The Linux bash equivalence is cd $(dirname « $0 ») .
Content of start.cmd :
cd "%~dp0"
.\bin\mysqld.exe --defaults-file=".\\config.ini"
Content of stop.cmd :
cd "%~dp0"
.\bin\mysqladmin.exe --defaults-file=".\\config.ini" shutdown
Content of mysql.cmd :
cd "%~dp0"
.\bin\mysql.exe --port=12345 --user=root --password
We could start MySQL server with start.cmd at the start of a development session and access to the MySQL client software with mysql.cmd.
Create the todo database and todo mysql user with the following SQL commands :
CREATE DATABASE todo;
CREATE USER 'todo'@'localhost' IDENTIFIED WITH mysql_native_password BY 'todo';
GRANT all on todo.* TO 'todo'@'localhost';
flush privileges;
NOTE: The new version of MySql do not use mysql_native_password so the line will be :
CREATE USER 'todo'@'localhost' IDENTIFIED BY 'todo';
NOTE2 : a confirmation from Windows Defender firewall could be display, but you can cancel this confirmation, the local connection from Spring to the database will ignore the firewall.
You can find the related rules (one for TCP one for UDP protocol) into the firewall mangament software input rules :
But your mysql.cmd script will work to prove this rule is for incoming network TCP/UDP connection and not for the localhost connexion.
> VScode standalone
To use VSCode as a standalone with environment variable set by default, I create a code.cmd text file script with the following content :
cd "%~dp0"
SET VSCODE_PATH=VSCode-win32-x64-1.82.2
SET MAVEN_PATH=apache-maven-3.9.4-bin
SET JAVA_HOME=C:\DEV23\Java\jdk-17.0.2
SET MYSQL_PATH=mysql-8.1.0-winx64
SET WORKSPACE_PATH=Workspace-vscode-192.0

SET PATH=%PATH%;%cd%\%MAVEN_PATH%\bin;

if not exist .\%VSCODE_PATH%\extensions-dir\   mkdir .\%VSCODE_PATH%\extensions-dir
if not exist .\%VSCODE_PATH%\data\             mkdir .\%VSCODE_PATH%\data\
if not exist .\%WORKSPACE_PATH%                mkdir .\%WORKSPACE_PATH%\


cd .\%WORKSPACE_PATH%
..\%VSCODE_PATH%\code.exe --extensions-dir=..\%VSCODE_PATH%\extensions-dir\ --user-data-dir=..\%VSCODE_PATH%\data\ .

cd ..
The script create environment variables of each software, add maven to the default PATH, create extensions-dir and data into VSCode subfolder, create a Workspace-vscode folder, start VScode.
You can add MySQL start and stop scripts to manage everything into one place.
1/ Use Spring Initializr
Open the https://start.spring.io/ website to create the template application with compatibles configurations. We will Maven and Java, the add a group/package name with Jar, JDK 21 settings. More important, we include Spring Web, Spring Data JPA and MySQL Drivers dependencies into our configuration :
Then press the « Generate » button to download the todo.zip file created, and unzip it into the c:\DEV23\Workspace-vscode\todo\ folder (but avoid c:\DEV23\Workspace-vscode\todo\todo\ folder ).
2/ Use VScode first time
Start VScode with the code.cmd script for the first time, so you have to confirm you trust the Workspace folder prior to anything:
Then you will have to install plugins for development with Java and Spring boot, then press « Extensions » button at the left :
The « spring boot extension pack » is the main extension, and it will trigger install of several dependent other plugins and to trust editors of those plugins.
Then you need also « Extension pack for Java »
Then you can open the « Explorer » by clicking on the top left menu icon. We will use most of the time the « Java Project » area more than the « Explorer » part, so increase the size of this area :
Then we must use a terminal for severals commands, you can open the Command Palette with CTRL+SHIFT+P and enter View: Toggle Terminal.
Or Menu View > Terminal or an other shortcut as CTRL+ù (french version) or CTRL+` (US version). We start with a basic command to check the Maven and the JDK installation are OK:
Maven is located into the PATH environment variable, JDK is also found with JAVA_HOME environment variable, so with this message everything is OK. Do not start VS Code from a start menu or from directly the executable, start VS Code with the start.cmd script to provide variable.
NOTE: you can change the default terminal location with the settings : terminal.integrated.cwd. Two ways to changes :
Edit the file settings.json into Vscode sub-folders: ./data/user-data/User/ with the following settings (unfortunatly no variables) : « terminal.integrated.cwd »: « C:/Dev/Workspace-vscode-192.0/todo/ »,
Or via Menu File > Preferences > Settings and search « terminal.integrated.cwd » and sets the same folder path : C:/Dev/Workspace-vscode-192.0/todo/
3/ Maven and Spring configuration
Into the terminal change folder to be into todo directory with cd todo command and you could also update the code.cmd script to be into this directory by default. NOT SURE IS IT WORKING ?
Into the terminal, start the mvn install command to rescue jar and install everything, but you will have an error. In short, this line explains there is no data source find
o.s.w.c.s.GenericWebApplicationContext : Exception encountered during context initialization - cancelling refresh attempt: org.springframework.beans.factory.UnsatisfiedDependencyException: Error creating bean with name 'dataSourceScriptDatabaseInitializer' defined in class path resource
So we will have to create a text file application.properties into src/main/ressources folder ith the following content (you can let the initial line is already there : spring.application.name=todo) :
Mysql username as todo or if you create a specific user
Mysql password as todo
So create the file and restart mvn install command which will go through
Scanning for projects...
-------------------------< fr.ema.ceris:todo >--------------------------
Building todo 0.0.1-SNAPSHOT   from pom.xml
--------------------------------[ jar ]---------------------------------
--- resources:3.2.0:resources (default-resources) @ todo ---
Copying 1 resource

--- compiler:3.10.1:compile (default-compile) @ todo ---
Nothing to compile - all classes are up to date

--- resources:3.2.0:testResources (default-testResources) @ todo ---
Using 'UTF-8' encoding to copy filtered resources.
Using 'UTF-8' encoding to copy filtered properties files.
skip non existing resourceDirectory C:\Dev23\Workspace-vscode-182.2\todo\src\test\resources

--- compiler:3.10.1:testCompile (default-testCompile) @ todo ---
Nothing to compile - all classes are up to date

--- surefire:2.22.2:test (default-test) @ todo ---

-------------------------------------------------------
 T E S T S
-------------------------------------------------------
Running fr.ema.ceris.todo.TodoApplicationTests

  .   ____          _            __ _ _
 /\\ / ___'_ __ _ _(_)_ __  __ _ \ \ \ \
( ( )\___ | '_ | '_| | '_ \/ _` | \ \ \ \
 \\/  ___)| |_)| | | | | || (_| |  ) ) ) )
  '  |____| .__|_| |_|_| |_\__, | / / / /
 =========|_|==============|___/=/_/_/_/
 :: Spring Boot ::               (v2.7.15)

fr.ema.ceris.todo.TodoApplicationTests   : Starting TodoApplicationTests using Java 17.0.2 on DESKTOP-B8A57NP with PID 24940 (started by pierre.jean in C:\Dev23\Workspace-vscode-182.2\todo)
fr.ema.ceris.todo.TodoApplicationTests   : No active profile set, falling back to 1 default profile: "default"
.s.d.r.c.RepositoryConfigurationDelegate : Bootstrapping Spring Data JPA repositories in DEFAULT mode.
.s.d.r.c.RepositoryConfigurationDelegate : Finished Spring Data repository scanning in 3 ms. Found 0 JPA repository interfaces.
o.hibernate.jpa.internal.util.LogHelper  : HHH000204: Processing PersistenceUnitInfo [name: default]
org.hibernate.Version                    : HHH000412: Hibernate ORM core version 5.6.15.Final
o.hibernate.annotations.common.Version   : HCANN000001: Hibernate Commons Annotations {5.1.2.Final}
com.zaxxer.hikari.HikariDataSource       : HikariPool-1 - Starting...
com.zaxxer.hikari.HikariDataSource       : HikariPool-1 - Start completed.
org.hibernate.dialect.Dialect            : HHH000400: Using dialect: org.hibernate.dialect.MySQL5Dialect
o.h.e.t.j.p.i.JtaPlatformInitiator       : HHH000490: Using JtaPlatform implementation: [org.hibernate.engine.transaction.jta.platform.internal.NoJtaPlatform]
j.LocalContainerEntityManagerFactoryBean : Initialized JPA EntityManagerFactory for persistence unit 'default'
WARN JpaBaseConfiguration$JpaWebConfiguration : spring.jpa.open-in-view is enabled by default. Therefore, database queries may be performed during view rendering. Explicitly configure spring.jpa.open-in-view to disable this warning
fr.ema.ceris.todo.TodoApplicationTests   : Started TodoApplicationTests in 2.912 seconds (JVM running for 3.497)
Tests run: 1, Failures: 0, Errors: 0, Skipped: 0, Time elapsed: 3.417 s - in fr.ema.ceris.todo.TodoApplicationTests

Results:

Tests run: 1, Failures: 0, Errors: 0, Skipped: 0


--- jar:3.2.2:jar (default-jar) @ todo ---
Building jar: C:\Dev23\Workspace-vscode-182.2\todo\target\todo-0.0.1-SNAPSHOT.jar

--- spring-boot:2.7.15:repackage (repackage) @ todo ---
Replacing main artifact with repackaged archive

--- install:2.5.2:install (default-install) @ todo ---
Installing C:\Dev23\Workspace-vscode-182.2\todo\target\todo-0.0.1-SNAPSHOT.jar to C:\Users\pierre.jean\.m2\repository\fr\ema\ceris\todo\0.0.1-SNAPSHOT\todo-0.0.1-SNAPSHOT.jar
Installing C:\Dev23\Workspace-vscode-182.2\todo\pom.xml to C:\Users\pierre.jean\.m2\repository\fr\ema\ceris\todo\0.0.1-SNAPSHOT\todo-0.0.1-SNAPSHOT.pom
------------------------------------------------------------------------
BUILD SUCCESS
------------------------------------------------------------------------
Total time:  8.661 s
How do we know to call maven command as mvn alias plus a parameter as install ?
You can display the list of phase for a maven project with :
To display the following table include the maven plugin (full name to convert from spring-boot-maven-plugin to spring-boot), the phase, the ID and the goal:
The list of phase is the most important part, but I detect some missing goal into spring-boot maven plugin:
process-resources
compile
process-test-resources
test-compile
test
package
install
deploy
Each phase will include the previous one, we will use mainly mvn install because we do not provide architecture for the mvn deploy command on Github for example.
A custom spring maven command to start a project could be :
mvn spring-boot:run
You can check the project has access to todo database into our project and you can check a « Whitelabel Error Page » is display on the URL http://127.0.0.1:8080/.
4/ Entity
Create a package model to store a POJO Entity class for Spring into the src/main/java/ folder with the following code:
To Debug and Open a browser with VScode, add a configuration with Menu Run > Add configuration (or Run > Open configurations if available), then edit and adapt the launch.json content based on my file :
{
    // Use IntelliSense to learn about possible attributes.
    // Hover to view descriptions of existing attributes.
    // For more information, visit: https://go.microsoft.com/fwlink/?linkid=830387
    "version": "0.2.0",
    "configurations": [
        {
            "type": "java",
            "name": "Current File",
            "request": "launch",
            "mainClass": "${file}"
        },
        {
            "type": "java",
            "name": "TodoApplication",
            "request": "launch",
            "mainClass": "fr.ema.ceris.todo.TodoApplication",
            "projectName": "todo"
        },
        {
            "name": "chrome",
            "type": "chrome",
            "runtimeExecutable":"C:/Users/pierre.jean/AppData/Local/Chromium/Application/chrome.exe",
            "runtimeArgs": [
                "--auto-open-devtools-for-tabs",
                "--new-window"
              ],
            "url": "http://127.0.0.1:8080/todos",
            "webRoot": "${workspaceFolder}",
          }
    ]


}
Then you can debug the TodoApplication with F5 shortcut (or Menu Run > Start Debugging), then open command palette (CTRL+SHIFT+P) and enter debug chrome (first time you have to enter debug chrome and NOT > debug chrome , YES remove > symbol please ) to start a Chrome/Chromium browser with the web developers tools already open.
You can also add a compounds settings to group starting two launching configuration as below (url et WebRoot are only here to understand where to add compounds code) :
We can see the controller class as the Servlet of our previous practical class, last year. Controller could manage HTTP request from GET and POST trigger from a specific URL part.
You can also read the table about « Relation entre URI et méthodes HTTP » (sorry the French version is more clear than the English one), to understand a direct relation between HTTP method and the UR/URI part.
We can add a method trigger by a GET URL to add a new Todo into our controller :
 @RequestMapping(value = "/todo/{id}", method = RequestMethod.GET)
 public Todo getTodo(@PathVariable int id) {
     Todo todo = new Todo( "todo-" +id , false );
     return todo;
 }
Try the following URL to debug the
We can also test with a curl command, but in PowerShell curl is an alias for Invoke-WebRequest command. The -d switch is for future JSON send object.
curl.exe -X GET -H "Content-Type: application/json" -d '{}' http://localhost:8080/todo/100
You can also use the following code into the Javascript console of Dev Web Tools inside your browser.
fetch("http://127.0.0.1:8080/todo/100", {
  method: "GET",
})
.then(response => {
  response.json().then( data => { console.log( data ); } ) });
public interface TodoRepository extends JpaRepository<Todo, Long> {
@Query("SELECT t FROM Todo t WHERE t.actif = :actif") List<Todo> findTodosByActif(@Param("actif") Boolean actif);
}
Then you can connect the TodoDao into our controller as a simple new property
@RestController
public class TodoControl {

    @Autowired
    private TodoDao todoDao;

    @RequestMapping(value = "/todo/{id}", method = RequestMethod.GET)
    public Todo getTodo(@PathVariable int id) {
       Todo todo = new Todo( "todo-" +id , false );
       todoDao.saveOrUpdate(todo);
       return todo;
    }
}
So now, you can create all the CRUD methods to manage CRUD operation and more customs methods. We also add on the class a new @RequestMapping to apply a new base URL as http://127.0.0.1:8080/api/todos/ for all methods.
@RestController
@RequestMapping("/api/todos")
public class TodoControl {
    @Autowired
    private TodoDao todoDao;

    @RequestMapping(value = "/test/{id}", method = RequestMethod.GET)
    public Todo getTodo(@PathVariable int id) {
       Todo todo = new Todo( "todo-" +id , false );
       return todo;
    }

    @GetMapping
    public List<Todo> getAllTodos() {
        return todoDao.getAllTodos();
    }

    @GetMapping("/{id}")
    public Todo getTodoById(@PathVariable Long id) {
        return todoDao.getTodoById(id);
    }

    @PostMapping
    public Todo createTodo(@RequestBody Todo todo) {
        return todoDao.saveOrUpdate(todo);
    }

    @PutMapping("/{id}")
    public Todo updateTodo(@PathVariable Long id, @RequestBody Todo todo) {
        todo.setId(id);
        return todoDao.saveOrUpdate(todo);
    }

    @DeleteMapping("/{id}")
    public void deleteTodoById(@PathVariable Long id) {
        todoDao.deleteTodoById(id);
    }
}
NOTE: the old method which returns a String concatenation of todos JSON file is not useful, the conversion from the Todo instance into Json format is managed by Spring framework.
Create all the element to manage TodoApplication at this point.
9/Static content into Spring
The src/main/ressources/static folder will be really useful to provide static HTML, CSS, JavaScript and Image content, we can imagine to place all the production file from a JavaScript framework as Angular, Reac, ViewJs, etc.
Create a IndexControl new class for provide index.html file stores into src/main/ressources/static folder.
IndexControl.java content will be :
@Controller
public class IndexController {
@RequestMapping("/")
  public String welcome() {
    return "index.html";
  }
}
Suppose you want to provide any images, javascripts, css files from a src/main/ressources/static/js/ folder, you can add to TodoApplication class this method to handle:
public void addResourceHandlers(ResourceHandlerRegistry registry) {
   registry.addResourceHandler("/js/**").addResourceLocations("classpath:/js/");
}
You can also add CSS and images folders and manage also contents inside.
Most of JavaScript framework will build a package of files for a final distribution, so place those files into the src/main/ressources/static/ folder will be a simple way to integrate the frontend with the backend.
10/ React development with VS Code
To the frontend development, we will use a separate standalone VS Code install. Why, to avoid conflict between Vscode plugins version and separate the backend to the frontend.
At first, we need to download a version of NodeJS server in standalone binary version and unzip the content into C:\Dev23\node-v22.17.0-win-x64 folder for example.
Then download Vscode 1.101 zip download for standalone version into c:\DEV23\VSCode-win32-x64-1.101.2-react\ folder and create a start a file to manage the VS Code configuration for React as code-react.cmd :
cd "%~dp0"
SET VSCODE_PATH=VSCode-win32-x64-1.101.2-react
SET MYSQL_PATH=mysql-8.4.5-winx64
SET WORKSPACE_PATH=Workspace-vscode-101.2-react
set NODE_PATH=node-v22.17.0-win-x64
set BUILD_PATH=C:\Dev23\Workspace-vscode-101.2-react\todo\src\main\resources\static\

SET PATH=%PATH%;%cd%\%NODE_PATH%;

if not exist .\%VSCODE_PATH%\extensions-dir\   mkdir .\%VSCODE_PATH%\extensions-dir
if not exist .\%VSCODE_PATH%\data\             mkdir .\%VSCODE_PATH%\data\
if not exist .\%WORKSPACE_PATH%                mkdir .\%WORKSPACE_PATH%\


cd .\%WORKSPACE_PATH%
..\%VSCODE_PATH%\code.exe --extensions-dir=..\%VSCODE_PATH%\extensions-dir\ --user-data-dir=..\%VSCODE_PATH%\data\ .

cd ..
The script need to know where we will deploy into the Spring boot project a build of our React front end project.
An environment variable BROWSER could store the path to a specific browser but this settings is not working at present :
SET BROWSER=C:/Users/pierre.jean/AppData/Local/Chromium/Application/chrome.exe
Open VS Code with a terminal and enter the following command to check npm program is available into your PATH and also update npm to the last version :
npm update npm
Then install create-React-app package with :
npm install -g create-react-app
We are ready to start to use React framework with the following command:
npx create-react-app todo
This command will create an architecture of React application where you can create a new launch.json file into .vscode folder with Menu Run > Add configuration… :
The following content will start Chromium browser with the classical default settings we used commonly :
Later we will launch a debug session for React with the F5 shortcut, but do not forget to change directory with the command into the terminal:
cd todo
And start the default React application with the command :
npm start
If you forget to change directory, you will see the following error :
Could not read package.json: Error: ENOENT: no such file or directory, open 'C:\Dev23\Workspace-vscode-101.2-react\package.json'
Instead, display the default React application into a browser at http://127.0.0.1:3000/ :
On the left, the browser displays the React application, in the right I open Dev Web Tools include a React additional tabs install from React Developer Tools to display React Component easily into the browser.
11/ React files and folders structure
The structure of a basic React application could be display as, but we will ignore somes technical folders :
This new test file include 2 tests one to check if the welcome message « Hello World: » is present and the second test use the DOM container to check if a divElement with id=main and class important is present :
import { render, screen } from '@testing-library/react';

import App from './App';

test('test content of App', () => {
  render(<App />);
  const textWelcome = screen.getByText("Hello World!")
  expect(textWelcome).toBeInTheDocument();

});

test('test id and class of App', () => {
  const {container} = render(<App />);
  const divElement = container.querySelector('[id="main"]')
  expect(divElement).toBeInTheDocument();

  expect(Array.from(divElement.classList)).toContain("important");

});
To start React test, just enter the following command :
npm test
Test server will restart each time you change something into test file, output if everything is OK:
 PASS  src/App.test.js
  √ test content of App (24 ms)
  √ test id and class of App (2 ms)

Test Suites: 1 passed, 1 total
Tests:       2 passed, 2 total
Snapshots:   0 total
Time:        1.026 s
Ran all test suites related to changed files.

Watch Usage
 › Press a to run all tests.
 › Press f to run only failed tests.
 › Press q to quit watch mode.
 › Press p to filter by a filename regex pattern.
 › Press t to filter by a test name regex pattern.
 › Press Enter to trigger a test run.
12/ Add component List and Todo
Now we will add two new React Component : List and Todo with the corresponding files :
Liste.js
Liste.test.js
Liste.css
Todo.js
Todo.test.js
Todo.css
At first, change the App.js to render a new List React component :
import logo from './logo.svg'; import './App.css'; import Liste from './Liste';
React do not provide a specific library to create Ajax request, but you remember the Spring server is not working on the 3000 port but on the 8080 port, so we need to create a proxy into React application with setupProxy.js file (into C:\Dev23\Workspace-vscode-101.2-react\todo\src\ folder):
module.exports = function (app) { // Redirect requests starting with /todos/ to http://127.0.0.1:8000/todos/ app.use( '/api/todos', createProxyMiddleware({ target: 'http://127.0.0.1:8080/', changeOrigin: true, }) ); };
URLs from http://127.0.0.1:3000/api/todos/ will be transfert to http://127.0.0.1:8080/api/todos/ to bypass CORS constraint using 2 server webs NodeJS for React and Tomcat inside Spring Boot.
Now we will send an update URL to Spring server ( http://127.0.0.1:3000/api/todos/test/1/true ) each time user clicks on the todo element,
At first, I will create a test method into the TodoControler.java file with the following code :
    @RequestMapping(value = "/test/{id}/{actif}", method = RequestMethod.GET)
    public Todo getToggleTodo(@PathVariable Long id, @PathVariable boolean actif) {
        Todo todo = todoDao.getTodoById(id);
        todo.setActif(actif);
        todoDao.saveOrUpdate(todo);
       return todo;
    }
I can test it with a curl command or into the the console Dev Web Tools with at first to Spring boot web server with 8080 port :
The function will invert the actif value then create an Ajax Http request to the server a this structure : http://127.0.0.1:3000/todo/1/true to update todo item number 1 to set the new actif value at true.
NOTE: it is also possible to send the actual todo item value and let the Spring boot method to reverse the value.
15/ Add a form
Create a new form React Component called FormTodo with a new FormTodo.js file. At first, we will just send a POST URL request to the server. The curl format will be :
curl.exe -X POST -H "Content-Type: application/json" -d '{\"texte\":\"chocolat\",\"actif\":\"true\"}' http://127.0.0.1:3000/api/todos
The FormTodo.js file at start :
export default function FormTodo() {
function handleSubmit(e) { // Prevent the browser from reloading the page e.preventDefault(); const formData = new FormData(e.target); formData.set('actif', "false"); if ( formData.get('actif') === "on" ) formData.set('actif', "true")
Note: we have to convert the default checkbox value from on or nothing to boolean true/false value.
17/ React useState to update a list
When we update a Todo on the server, we receive from the Http Ajax request a Json of the new created todo with the unique id from the database. The next step is to update the React list of all todos.
At first we need to receive a JSON list of all todos instead of use a JSON initial array. We will need to change lightly Spring boot controller with a new method to download a JSON array of Todo:
Then we can change change List React Component to manage receive a list of todos. We use a variable isLoading with a method setIsLoading to manage the delay before loading list
import React, { useEffect, useState } from 'react';
if (isLoading) { return (<div> <h1>{name}</h1> Loading... </div>); }
So we can see the Loading… message before the actual list of todo items is available. To simulate a long delay we can open Web Dev Tools with Menu > More tools > Network conditions and use a « Slow 3G » Network throttling as show :
We see that isLoading variable when value change throw setIsLoading method will trigger a new render of our React Component.
18/ Callback from FormTodo to List
Now we will create a method into List React Component as add_new_todo which will receive from another React Component a todo item and add it to the list of todos :
  function add_new_todo(new_todo){
    setTodos([...todos, new_todo]);
  }
We cannot directly use the property todos to add element, we have to call setTodos() function to call react new rendering of the component Liste.
The add_new_todo function is supposed to be pass to the FormTodo React element from List.js :
<FormTodo callback_add_new_todo={add_new_todo} />
Then into FormTodo we can receive this function as callback_add_new_todo element and use it after receive data from the fetch method into handleSubmit function :
export default function FormTodo({callback_add_new_todo}) {
This is the way, the sub React Component is able to use a callback function from the top level. You will find more information from React tutorial about Hook and Sharing data.
NOTE: to deploy React application, the following command will create a bunch of html,css, javascript and more files to place into the BUILD_PATH environment variable :
npm run build
This will create the React application files into the src/main/ressources/static/ folder to be available into one Web full application with frontedn and backend :
19/ Angular Front-End alternative
We will install a different Visual Code version into folder C:\Dev23\VSCode-win32-x64-1.82.2-angular with a specific code-182.2.angular.cmd file as :
cd "%~dp0"
SET VSCODE_PATH=VSCode-win32-x64-1.82.2-angular
SET WORKSPACE_PATH=Workspace-vscode-182.2-angular
SET NODE_PATH=node-v20.7.0-win-x64
SET BUILD_PATH=C:\Dev23\Workspace-vscode-182.2\todo\src\main\resources\static\


SET PATH=%PATH%;%cd%\%NODE_PATH%\;


if not exist .\%VSCODE_PATH%\extensions-dir\   mkdir .\%VSCODE_PATH%\extensions-dir
if not exist .\%VSCODE_PATH%\data\             mkdir .\%VSCODE_PATH%\data\
if not exist .\%WORKSPACE_PATH%                mkdir .\%WORKSPACE_PATH%\


cd .\%WORKSPACE_PATH%\
..\%VSCODE_PATH%\code.exe --extensions-dir=..\%VSCODE_PATH%\extensions-dir\ --user-data-dir=..\%VSCODE_PATH%\data\ .


cd ..
We will install a different standalone NodeJS into C:\Dev23\node-v20.7.0-win-x64\
Open Visual code terminal, confirm execution from the terminal and check which NodeJs your using with npm –version and node.exe –version as :
If you answer no you can force to allow execution from command line with :
At first, we will install Angular Framework into our NodeJS server:
npm install -g @angular/cli
Time to time, it could be useful to update all packages and also check integrity of packages with npm command :
npm i npm

npm cache verify
We will create a new Angular project with the command
ng new todo
Then we can several questions :
Do you want to create a ‘zoneless’ application without zone.js (Developer Preview) ? : No
Do you want to enable Server-Side Rendering (SSR) and Static Site Generation (SSG/Prerendering)?: No
Which stylesheet format would you like to use (use arrow keys): choose CSS but one day have a look to SASS https://sass-lang.com/guide as CSS with variables and template
Then a new Angular project is created into todo folder. But Node.js will use 4200 port and our Spring Server stills listen on 8080. To avoid CORS conflict, we will create proxy.conf.json file with redirection as :
Open a web browser to display the Welcome interface :
Or may be this old version:
20/ Typescript and Angular
TypeScript is a kind of meta langage over JavaScript (TypeScript), the main concept is to write a code into TypeScript then convert it into JavaScript after verifications and controls to avoid for example a classical « Object doesn’t support property » as :
var todo = {"id":1,"texte":"lait","actif":false}
console.log( todo.Id );
Previous year, we see the initial framework of AngularJS version that is not used a lot nowadays code only in JavaScript.
The new application main component is divided into several files (old version use app.component.ts or app.component.html) :
app.ts — main file for the main angular component
app.html — view part of the main angular component
app.css — CSS file link to the main angular component
app.spec.ts — unit test to the main angular component
The default main angular component app.html is far to complex, so remove everything and just enter :
<div id="title">
  <h1>{{title}}</h1>
</div>
Then add new style to this component with change into app.css :
Add into app.html some code to display the list of todo items as :
<ul>
  <li *ngFor="let todo of lesTodos">{{todo.texte}}</li>
</ul>
This is not the « good » way to do, later we will create an Angular Component to manage Todo item.
21/ Deploy into Spring
As explain the final version of Angular development could be deployed into the Spring folder which manage the front-end, the following command will create the final group of files (html, css, js, images).
This version is of terminal command line :
ng build todo --output-path=%BUILD_PATH%
I you use Powershell terminal, the version will be :
ng build todo --output-path=$env:build_path
NOTE: the actual version of Angular create a content into a browser subfolder. There are 3 strategies: configuration of Angular deployment, change the static folder to point browser subfolder or move the content. I choose move the content because this setting will be change in the futur and I like to keep close to the classical Spring configuration so in Powershell :
ng build todo --output-path=$env:build_path ; move $env:build_path/browser/* $env:build_path/ ; rmdir $env:build_path/browser/
You can see the URL to call Spring project contains all the html and 3 JavaScript files:
Please be aware on the JSON format very strict by Angular, so :
No sub object if the array of element is send back
No single quote, JSON use double quote only
No text value element without double quote
You can bypass some double quote with applications.properties settings :
import { HttpClient } from '@angular/common/http';
import { Observable } from 'rxjs';
Angular has a difference between a constructor() and a ngOnInit() method. Constructor will mainly create properties and ngOnInit() will use into the cycle of life of composants and dependences. Short version, first constructor then ngOnInit so :
export class AppComponent implements OnInit { lesTodos: Array<Todo> = [];
You can test on the server HTTP request with a fetch, at first open an URL on the server to avoid CORS restriction then you enter the previous code to test the request :
You can simulate also a POST request in the console with :
We will replace the basic interface of Todo buy a fresh new Angular Component, into the terminal enter the following command:
ng generate component Todo
4 new files are created :
todo.component.css — CSS file for the TODO angular component
todo.component.html — view file for the TODO angular component
todo.component.spec.ts — unit test file for the TODO angular component
todo.component.ts — main file for the TODO angular component
We will not use the todo.component.css at first but mainly with the todo.component.html to transfers html element from Application component to Todo component don’t forget we will be into a HTML tag <li></li>.
<span>( {{currentTodo.id}} ) -> {{currentTodo.texte}} is {{currentTodo.actif}}</span>
Now we need to create the currentTodo instance into the TodoComponent as a property in Angular as @Input() currentTodo:Todo; . Edit the todo.component.ts :
We will later keep only one version of export interface Todo but for this situation keep it in double.
Now we can use this new Angular component into app.component.html (keep th old version as HTML template to learn difference) :
   <li *ngFor="let todo of lesTodos">
      <!-- <span>{{todo.id}}</span> {{todo.texte}} -->
      <app-todo [currentTodo]=todo></app-todo>
    </li>
The link is made with the unique selector name as app-todo and test this component, but with Angular new version we need to add the TodoComponent into the import of app.component.ts file :
We will manage into TodoComponent to link the value of the input field with the currentTodo.texte. Any modification from the property will be transfers to the field and vice versa.
Lost of the focus is removed because when you click on the checkbox, the input field lost the focus. When you lost the focus, we need to stop propagation of event because click on the Update button will trigger the span tag to be editable :
The to send an Ajax HTTP request to the Spring Boot server the URL will be call but do not forget to add a proxy rule to manage the new URL and to import the http module into the Todo Component :
We can now remove the interface Todo to create a new file todo.ts with following content :
export class Todo{
    private _id:number = -1;
    private _texte: string = "<>";
    private _actif:boolean = false;

    public constructor(newId:number,newTexte:string,newActif:boolean){
        this._id = newId;
        this._texte = newTexte;
        this._actif = newActif;
    }

    public get id() {
        return this._id;
    }
    public set id(newId: number) {
        this._id = newId;
    }
    public get texte() {
        return this._texte;
    }
    public set texte(newTexte: string) {
        this._texte = newTexte;
    }
    public get actif() {
        return this._actif;
    }
    public set actif(newActif: boolean) {
        this._actif = newActif;
    }
}
Just import when you need the class with :
import { Todo } from './todo';
If you place the todo.ts file into a sub folder, please consider using :
import { Todo } from './todo/todo';
25/ Test with Angular
At first to create a custom karma.conf.js file inside todo folder to add specific custom settings for the Chromium browser based from karma.conf.js.template :
// Karma configuration file, see link for more information
// https://karma-runner.github.io/1.0/config/configuration-file.html

module.exports = function (config) {
  config.set({
    basePath: '',
    frameworks: ['jasmine', '@angular-devkit/build-angular'],
    plugins: [
      require('karma-jasmine'),
      require('karma-chrome-launcher'),
      require('karma-jasmine-html-reporter'),
      require('karma-coverage'),
      require('@angular-devkit/build-angular/plugins/karma')
    ],
    client: {
      jasmine: {
        // you can add configuration options for Jasmine here
        // the possible options are listed at https://jasmine.github.io/api/edge/Configuration.html
        // for example, you can disable the random execution with `random: false`
        // or set a specific seed with `seed: 4321`
      },
      clearContext: false // leave Jasmine Spec Runner output visible in browser
    },
    jasmineHtmlReporter: {
      suppressAll: true // removes the duplicated traces
    },
    coverageReporter: {
      dir: require('path').join(__dirname, '<%= relativePathToWorkspaceRoot %>/coverage/<%= folderName %>'),
      subdir: '.',
      reporters: [
        { type: 'html' },
        { type: 'text-summary' }
      ]
    },
    reporters: ['progress', 'kjhtml'],
    browsers: ['Chrome_without_security'],
     customLaunchers: {
      Chrome_without_security: {
        base: 'Chromium',
        flags: ['--disable-web-security', '--disable-site-isolation-trials', '--auto-open-devtools-for-tabs' ]
      }
    },
    restartOnFileChange: true
  });
};
We can call tests from the following command line :
ng test --karma-config=karma.conf.js
A lot of test will fails, because may be a missing <div id=’main’> to inclose the <ul> list of todo and also because TodoComponent do not have default value for the property currentTodo, so :
@Input() currentTodo:Todo = new Todo(-1,"",false);
You can modify app.component.spec.ts as follows :
import { TestBed } from '@angular/core/testing'; import { AppComponent } from './app.component'; import { provideHttpClient } from '@angular/common/http'; import {provideHttpClientTesting } from '@angular/common/http/testing'; import {By} from '@angular/platform-browser';
it(`should have as list tag <ul>`, () => { const fixture = TestBed.createComponent(AppComponent); const inputElement = fixture.debugElement.query(By.css('div#main > ul')); const app = fixture.componentInstance; expect(inputElement).toBeTruthy(); }); });
You can create a distinct test for component with edit the file todo.component.spec.ts to test s:
import { ComponentFixture, TestBed } from '@angular/core/testing'; import { TodoComponent } from './todo.component'; import { provideHttpClient } from '@angular/common/http'; import {provideHttpClientTesting } from '@angular/common/http/testing'; import {By} from '@angular/platform-browser'; import { Todo } from './todo';
describe('TodoComponent', () => { let component: TodoComponent; let fixture: ComponentFixture<TodoComponent>;
Install the Postman Vscode plugin or any kind of test API tools (Bruno is Ok also)
Then add your test, here a test with an open API to find places from their « postal zip code », test : https://api.zippopotam.us/fr/30100 will return :
Then tree basics tests will be, just to check if the URL match Alès city :
pm.test("Status test", function () {
    pm.response.to.have.status(200);
});
pm.test("Contient une seule place", function () {
    var jsonData = pm.response.json();
    pm.expect(jsonData.places.length).to.eql(1);
});
pm.test("Contient Alès", function () {
    var jsonData = pm.response.json();
    pm.expect(jsonData.places[0]["place name"]).to.eql("Alès");
});
Deliverables
User stories as non-technical way
Technicals tasks derived from User stories
Tasks time evaluations
API lists
API Postman-like test scenario
UML class diagram
UML sequence diagram
Wireframes interfaces
Github source code commit each session
Database schema
JSON data exchange format
Demonstrations
User storie sample: a teacher displays training details and manage linked contents Technical taks: click on a training to display contents, remove contents, add contents
Use a tasks poker to evaluate time of each User stories and tasks
First, you can download slides from Web Development course, which include detailed explanations of Servlet/JSP development using MVC pattern. Feel free to review them regulary to refresh your understandoing of the features.
Development tools and software are free and/or open source. Tomcat 9 and Eclipse J2EE are provide regarding of your OS on this website to fast download http://www.dev.lgi2p.mines-ales.fr/install/, but you can also download online anyway :
Web Browser for Web Development as Chrome/Chromium/Edge or Firefox with embedded DevWeb Tools (CTRL+MAJ+I) mainly tab /Network, Inspect and Source will be used
Some other library and tools will be downloaded as databases tools and JARs libraries later (Junit, Log4J, etc.), you can find into the folder : http://www.dev.lgi2p.mines-ales.fr/install/Jar/
TP 0 Installation Eclipse and Tomcat to adapt regards your OS and specific configuration
Somes requirements to avoid some of complex errors (real-world feedback, trust me):
No folder with space and special symbols: please avoid letters/symbols outside range a-z, A-Z, 0-9 and « -«
No so long path, please avoid to install into c:/Utilisateurs/A-very-long-name-as-the-user-of-the-computer/Documents/Courses-IMT-Mines-Ales/Computer-Sciences/Web-Developpement/… Windows and MacOs could be limited into the long path
No import from an other friend/server/ old contents without explains (ie: import a web.xml file is not a good idea while using annotations)
No tools into an othere tools, please try to have this classical folder structure :
Please at first install an Oracle Java JDK version 21 for compatibility purpose, and check the folder where installation is done. JDK update process could also change the folder path.
If needed, look on your computer to find a software call javac.exe or javac to be sure to find a Java JDK not the Java JRE. The Java JRE is not design to manage Tomcat, and errors will be find later into the process. So please it will better to double check and write down the path to a full standard Oracle Java JDK.
Download and unzip Apache Tomcat 9 core version into a subfolder without space or not classical characters as accents or special characters. Usually with Windows OS, I am please to find a folder call c:\Developpement or c:\DEV to easy managed software programs. With Tomcat is common to unzip C:\DEV\apache-tomcat-9.0.75\ (but it is better to avoid C:\DEV\apache-tomcat-9.0.75\apache-tomcat-9.0.75\)
Download and unzip the Eclipse IDE for Enterprise Java and Web Development, later called Eclipse J2EE into a specific folder without space or not classical characters as accents or special characters. Usually with Windows OS, I am please to find a folder call c:\Developpement or c:\DEV to easy managed software programs. I usually unzip everything into C:\DEV\eclipse-jee-2023-12-R-win32-x86_64\ (but it is better to avoid C:\DEV\eclipse-jee-2023-12-R-win32-x86_64\eclipse\)
NOTE: don’t use another Eclipse software provide by another courses, Eclipse Plugins could be in conflict and version of settings could lead to troubles in this training and orthers.
Start Eclipse with eclipse.exe or eclipse program, then answer settings as bellow :
The folder Worskspace (as Windows path C:\DEV\Workspace) will store all settings and projects, so it is important to backup this place regularly.
Tick « Use this as the default and do not ask again » prevent Eclipse to popup this dialog each time Eclipse start. You can switch Workspace in case with Menu File > Switch Workspace.
Then you can close the « Welcome » tab windows, not really useful at this moment.
The next step is to remove the default Java JRE from Eclipse J2EE and provide our Oracle Java JDK. Technically, Eclipse J2EE could manage several Java versions but we will keep simple with only one JDK.
Menu « Windows » > « Preferences » > « Java » > « Installed JREs »
Select the unique « jre(default) » installed by default by Eclipse
Press buton « Edit » to provide « JRE Home » directory is the full path of the initial Oracle Java JDK noted at the first step.
And change the « JRE name » to « jdk-21 » and « Apply and close » to record everything
Change the default JRE to JDK
Eclipse IDE provide several tabs organizations call perspectives. We will use mainly Java EE perspective and Debug Perspective. Please use Menu « Window » > « Open Perspective »> > »Other » and activate « Java EE » perspective (top right button).
Java EE Perspective is the only perspective with « Server » Tab so if you do not find this tab please switch perspective or right click on « Java EE » perspective button to reset this perspective to its initial configuration.
Then click on « No servers are available. Click this link to create a new server »
The first step is to select the « Tomcat 9 Server » version (enter « tomcat v9 » to filter)
Please provide, the full path to find the Apache Tomcat previously download and unzip as below. I like to choose the correct JDK installed previously. Eclipse will trigger an error if any update change the JDK provide by default (when your OS updated Java for example):
When press « Finish » you will return to the main interface, and then you can open tab « Server », right click to open the menu and start in Debug Mode this Apache Tomcat server from Eclipse.
On Windows, the firewall dialog should be open to ask you the authorization to give access to the network to Java and Eclipse, so please answer yes.
Open « Console » tab to consult all output from Tomcat server, the last sentence should be « The server startup took [xxx] milliseconds » to inform you the configuration is correct.
To confirm, please open a web browser and consult http://127.0.0.1:8080/ , you could be surprise by :8080, the default settings for Tomcat in development is to listen the 8080 port instead the default http port 80 or the default https port 443.
The front page will be 404 page because no content will be at present deploy by Tomcat but this page with « Apache Tomcat/9.0.xxx » (xxx could a security update) shows everything is fine just there is no content:
So now, we will create a new project to deploy content into Tomcat. With Eclipse, use Menu File > New > Other > Web > Dynamic Web Project:
Then provide a Project Name without space or specific characters as accents. DevWeb will be ok . Please check:
The workspace folder where your code will be store, please backup the whole folder
The « Target runtime », sometime Eclipse do not provide the server configuration, so check
Check « Configuration » sometime Eclipse do not provide any configuration, so please check
When everything is OK then press « Finish » button (You can press Next to see default settings but please do not change then).
Then you have to add this project to our fresh new Tomcat server.
With the « Server » tab, right clic on the Tomcat Server and select « Add and Remove », with the new dialog windows, press « Add all>> » to add this project then « Finish » button :
You can drag and drop the image from the desktop to the src/main/webapp/ folder and choose « Copy files » or you can place the image into the disk at C:\DEV\Workspace\DevWeb\src\main\webapp\ but after you have to « Refresh » the project by pressing F5 key :
Now try to correct the URL http://127.0.0.1:8080/ by adding the project name and the image filename to display this image into the browser. The default form should be « http://127.0.0.1:8080/DevWeb/<image_name>.png »
By default, some Web server could display the content of the folder, but the default configuration of Tomcat is to hide the folder content.
You can see with the DevWeb tool of Firefox/Chrome Browser (CTRL+ALT+I key) there are trouble with the 211.css file. The Network tab show the browser is not able to download the 211.css file. You have to correct the « CSS Zen Garden The Beauty of CSS Design.htm » file to match the URL.
NOTE: anytime you find %20 is the encoding URL value for space, please correct the HTML file to help the browser to download and apply the stylesheet file. The way to open « Network » tab with DevWeb Tools into the Web Browser is the correct way to look of trouble with Web Development, key this way of working in your mind.
Next step is to create index.jsp page with right clic on the « webapp » folder then File > New > JSP File, you have to provide the filename as index.jsp and the parent folder should be src/main/webapp by default.
Then add the folowing code to display display number from 0 to 9 :
Severals informations from this interface :
A breakpoint is created with a click on the left of the line number 12. You can remote it by double clic but keep the breakpoint to debug
On the left interface « Project Explorer », « two arrows » icon link the visible file to the « Project Explorer » to display which file is edited
On the right « Outline » sumerise the tree of HTML/JSP content
You can add a title to your page and click on the left of line number to add (or remove if needed) a breakpoint, then click on the source code to open the menu to Debug As > « Debug on Server » then choose « Tomcat 9 server » and check « Alway use this server when running this project » to avoid this step later, then click on « Finish ».
You should have an Eclipse dialog to ask you two questions:
Server: Yes we want to « restart server » everytime we start a « debug » session
Confirme Perspective Switch: Yes we want to switch perspective to debug to have specific area for debug
You should check « Remember my decision » and button Switch to prevent this step later.
Eclipse then open the default browser for your OS (we can change easily with Menu Windows > Preferences) and start to debug the JSP at the line marks by the breakpoint.
Please find a short descriptions of area and important informations:
At the top menu, some icons to Debug from left to right:
Enable/disable all breakpoints
Resume the debug process ie: go on to the next beackpoint or finish execute the page
Pause: never used
Stop: Stop the server and the debug process
Disconnect: never used
Step Into (F5): debug and enter into any methods
Step Over (F6): debug and execute methods without entering inside
Step Return (F7) : debug until next breakpoint or go out the active method
At the Left area « Debug »: one thread is paused at line 12 of the index.jsp file
At the center area « index.jsp »: the active line is before execution of line 12
At the right area
« Variables »: shows all variable at the moment
« Breakpoints »: list all breakpoints, you can disable/activate individual breakpoint here
« Expressions »: check a value to understand the thread
Press F6 key to step over, or F8 key to Resume to the next break point.
deux versions de python peuvent cohabiter sur le même ordinateur, mais il faut bien sûr dans ce cas gérer correctement la situation pour éviter de s’emmêler
un logiciel de développement PyCharm sera installé par la suite pour nous aider à développer
Mes fichiers des programmes sont stockés dans un dossier PyCharmProjects mais ils peuvent tout aussi bien être dans « Mes Documents », sur le bureau, dans n’importe quel dossier, etc.
Il vaut mieux se souvenir du chemin complet sur le disque dur du programme c:\Developpement\Python312\python.exe (pour Windows par exemple) /usr/bin/python (pour Mac)
Installation de python 3.6.2 sous Mac OS
TROISIEME TRUC
Il n’est pas possible de donner un programme Windows par exemple python.exe à un ordinateur sous Mac et vice-et-versa.
Par contre, un programme écrit en langage python peut être envoyé depuis Windows pour être exécuté sur un Mac qui a l’exécutable python installé.
A l’identique de Matalb par exemple, les programmes ne sont pas exécutés directement par le système d’exploitation Windows ou Mac, mais sont exécutés pas un programme tierce python.exe ou matlab.exe (python et matlab sous MacOs) pour s’exécuter.
On appelle ces programmes des scripts et on peut ouvrir le fichier initial avec un simple éditeur de texte (bloc note sous Windows, text edit sous MacOs).
L’option aujourd’hui d’utiliser Vscode en version .zip puis de créer dans ce dossier un sous-dossier data (ou code-portable-data à côté du dossier dézipé) comme expliquer dans ce document rend VScode portable simplement.
NOTA : en fait python compile votre fichier.py en pseudo exécutable fichier.pyc qui sera plus rapidement exécuté ensuite s’il n’est pas modifié
On verra aussi comment utiliser l’interpréteur de commandes de python pour taper rapidement des lignes de scripts et voir le résultat.
EXERCICE 1
Après une installation réussie de python, fabriquez le fichier exercice1.py avec le contenu suivant :
# Exercice 1
import time

print ( "Je m'affiche 5 secondes " )

time.sleep(5)
# Fin du programme
Pour fabriquer ce fichier, vous pouvez utiliser de nombreux éditeurs. Personnellement, j’en utilise plusieurs selon la situation (tests d’une fonction, gros projets, proof-of-concepts, etc.) et on peut même entrer du python dans le navigateur via des sites comme http://ideone.com/ ou https://www.tutorialspoint.com//execute_python3_online.php.
Le plus simple pour commencer est d’utiliser l’éditeur IDLE qui est fourni par défaut par python :
IDLE proposé par python par défaut pour Windows
Logiciel IDLE proposé par python pour MacOS
Faites Menu File > New File et entrez le code suivant:
# Exercice 1
import time

print ( "Je m'affiche 5 secondes " )

time.sleep(5)
# Fin du programme
Sauvegarder le fichier en exercice1.py dans un dossier dont vous vous souviendrez par exemple dans « Documents ».
Pour exécuter le programme, le plus simple est d’utiliser la touche F5 ou via le menu
Run > Run Module
Une autre solution est d’utiliser l’interpréteur de commande python (appelé aussi shell python). Si vous lancez le programme python sans aucune information, c’est une fenêtre avec ce genre d’informations qui va apparaitre pour vous proposer d’entrer les commandes au prompt (le prompt est les symboles >>> avec le curseur qui attend vos commandes):
Python 3.12.2 (v3.12.2:5fd33b5, Jul 8 2017, 04:57:36) [MSC v.1900 64 bit (AMD64)]
 on win32
Type "help", "copyright", "credits" or "license" for more information.
>>>
Entrer la ligne suivante au clavier en modifiant le chemin pour correspondre aux dossiers où se trouvent votre programme. (NOTA: il faut saisir une simple quote):
exec( open ('c:/Users/pierre.jean/Desktop/Exercice1.py').read() )
Sous Mac par exemple si le fichier exercices1.py se trouve dans le dossier Documents:
Cette ligne lance le programme exercice1.py directement python dans l’interpréteur de commandes python.
On pourrait ainsi entrer directement les commandes en appuyant sur entrée à chaque bout de ligne. Essayez de modifier le temps d’attente de 5 secondes et le texte affiché:
On peut aussi fabriquer un raccourci sous windows qui va appeler python.exe en lui passant notre programme en paramètre. Clic droit sur bureau puis choisir « Nouveau » puis « Raccourci » dans l’emplacement indiquer le chemin vers le programme python suivi du nom du programme, par exemple (notez l’espace entre les .exe et le chemin du fichier exercice1.py):
This article is divided into two parts. First about Spring Boot Web Application and the second part is Tomcat Web Application without database.
Spring boot Web Application
1/ Create Web app with Azure account
Then choose to create a Web App of type Web App + Database :
Then provide information at first :
The « Ressource Group » is just a group of several « tools » provide by Azure in ours cases the already created empty group « sftp-test-europe » just provide networks settings, virtual network, database server, web app server and App Service plan.
We need to provide web app name here ceris1 as application name. This information will be used to create URL, database name, etc.
We provide the runtime stack of Java 17, and the Java web server stack » Java SE (Embedded Web Server) ».
Then we choose MySql database and check « Hosting Basic for hobby or research » to avoid to paid too much for a test.
The second interface provides information to keep about MySQL settings include server host, login, password, and default database name ceris1-database for me. The default MySQL port should be 3306.
2/ Modification Spring application
Change the file applications.properties to provide the azure MySQL settings as :
I change the default Web server port from 8080 to 80 to create classical URL :
http://ceris1.azure.com/
We need to generate the final jar of our application, but we also need to avoid tests from Spring. Why, we do not have access to the Azure MySQL server to test our application, so the command will be :
mvn clean install spring-boot:repackage -DskipTests to create
If the creation is OK, you will find a new jar file into :
Then we need FTPS settings to upload the jar file, with « Deployement Center » we can find several methods but historical FTPS is simple :
We need FTPs server name (FTPS endpoint), FTP Username and Password to upload file.
Open Filezilla or any ftps client with settings, remove the default file into « /site/wwwroot » folder and drag and drop the newly created jar file :
You can test running the project with the Azure SSH console with :
The first time, open the consol is really slow, but I use it a lot to understand which settings is not OK about MySQL, port, java version, etc. That really useful.
Enter the command to start spring server with our development after may be a change directory to /home/site/wwwroot/ default folder :
java -jar todo-0.0.1-SNAPSHOT.jar
You should find the classical deployment information :
You should have a port 80 conflit at the end because the default web start application is still alive. Just « Restart » the web app from the Azure interface to let remove it after remove the default file with Filezilla or the Azure console.
NOTE: the automatic deployment from git server should be used be the purpose here is to understand the basic deployment from a simple jar application.
Tomcat War Web Application
From Eclipse Java EE, we suppose to have a Dynamic Web Project with servlet and JSP. At present, we will not include a database, but the process will be identical as Spring boot Web Application.
1/ Create Web App with Azure account
Then choose to create a Web App of type Web App :
Then provide information at first :
Resource Group : a group of applications of azure, but in our case it will a group of only this Web App
Name: Name of the instance just for URL, and to identify this Web App
Runtime stack: Java 17 for our web application
Java web start stack: Apache Tomcat 9.0
Pricing plan: free F1 (Shared infrastructure) to test this application for free
After the creation of the instance of web application (could take several minutes), we will consult the « deployment Center » and « FTPS credentials » that we will use to upload with FTP.
2/ Create and deploy war file
Open Eclipse Java JEE to create a war file from your application :
Right-click on your project, the menu Export > war file then provide the destination to create the file : c:/Dev24/app.war. You have to teep the app.war as the name of the war file.
Then use Filezilla to upload the file, but I find a bug from FTPS credential : use a FTP connection NOT FTPS to simply upload the file from C:\Dev24\ to the /site/wwwroot/ :
I delete the initial hostingstart.html welcome file installed by default by Azure Web App.
Then you can consult your application, which will deployed after a short delay (several minutes) :
The Web application will be slow because we only have a free container for purpose. We can consult the Azure ssh console into the browser to manage logs and information about tomcat.
Utilisation d’un IDE (integrated development environment)performant pour gérer plusieurs fichiers pythons ou autre, plusieurs fichiers de données, plusieurs versions, etc.
A installer sur votre ordinateur comme habituellement, n’importez pas de « settings » et prenez les réglages par défaut.
Créez un nouveau projet, en fait un dossier qui va contenir vos futurs développements en python. Vous pouvez vérifier que PyCharm va bien utiliser python3.x pour vos développements.
Fermer le « Tip of the Day » et vous avez l’interface de PyCharm devant les yeux:
OK c’est ma version car vous n’avez en fait aucun dossier ni aucun fichiers actuellement. Donc par exemple, faites click droit dans la zone « Fichiers et dossier » dans le menu choisir:
New > Directory
Entrez le nom du dossier par exemple test et copier coller le fichier exercice1.py dedans.
Ouvrez le fichier exercice1.py en double cliquant dessus :
On peut exécuter le fichier exercice1 via le bouton en haut à droite ou le raccourci indiqué en survol de ce bouton. Le résultat de l’exécution sera visible donc dans la fenêtre du bas.
Copiez le fichier dans PyCharm avec Copier / Coller et profiter pour renommer le fichier en traitement_fichier.txt :
Nous allons manipuler le fichier de données traitement_fichier.txt pour extraire de l’information, vous pouvez l’ouvrir dans PyCharm pour voir sa composition:
Il s’agit des données en provenance d’un vol de planeur enregistré avec le GPS d’un smartphone.
On va donc dans le dossier test avoir le premier fichier exercice1.py, le fichier de données traitement_fichier.txt et on va ajouter un nouveau fichier, manipulation_fichier.py :
On va accéder au fichier pour afficher le contenu avec ces commandes:
with open("traitement_fichier.txt", "r") as fichier:
    contenu = fichier.readlines()
    print( contenu )
fichier.close()
Nous devons en premier lieu traiter le problème du retour à la ligne « \n » en le retirant pour chaque ligne.
Voici le code pour traiter ligne à ligne la variable contenu en retirant à chaque fois le retour à la ligne:
with open("traitement_fichier.txt", "r") as fichier:
    contenu = fichier.readlines()
    for ligne in contenu:
        ligne = ligne.rstrip("\n")
        print(ligne)
fichier.close()
Vous pouvez voir que l’indentation du code en python remplace les end du Matlab. Ils ne sont donc pas optionnel, ils donnent un sens à ce qui est dans la boucle et ce qui n’est pas dans la boucle.
% Exemple Matlab valable mais non indenté
for c = 1:10
for r = 1:20
H(r,c) = 1/(r+c-1);
end
end
Nous allons ensuite nous concentrer sur le timestamp et l’altitude en extrayant que ces 2 colonnes:
with open("traitement_fichier.txt", "r") as fichier:
    contenu = fichier.readlines()
    for ligne in contenu:
        ligne = ligne.rstrip("\n")
        data = ligne.split(";")
        # ici afficher les colonnes 0 et 3
fichier.close()
OK à vous , il faut extraire uniquement les altitudes qui ont été enregistré après le timestamp « 1491486791998 »
with open("traitement_fichier.txt", "r") as fichier:
    contenu = fichier.readlines()
    for ligne in contenu:
        ligne = ligne.rstrip("\n")
        data = ligne.split(";")
        if "1491486791998" < data[0] :
            print(data[0] + " -  " + data[3])
fichier.close()
SIXIÈME TRUC
Test de quelques commandes dans l’interpréteur intégré de PyCharm. Nous avons avec PyCharme la possibilité de lancer des programmes dans l’IDE mais pour tester quelques lignes de commandes, l’IDLE est très pratique. Heureusement, nous pouvons avoir l’interpréteur de commande dans PyCharm via le Menu Tools > Python Console …
Vous aurez ainsi la possibilité de tester quelques commandes avant de les intégrer dans votre fichier de commandes.
EXERCICE CINQ
Afficher au format CSV les données suivantes pour les timestamps supérieurs à « 1491486791998 » avec un numéro de ligne incrémenté à chaque ligne:
Mais malheureusement ou pas si vous essayez cette ligne que vous pouvez tester dans l’IDLE de Python ou en ouvrant l’interpréteur dans PyCharm comme vu précédemment.
numero_ligne = 0
print( numero_ligne + ","  )
Vous avez une erreur de type numero_ligne est de type entier (int en VO) et python ne veut pas prendre la responsabilité de le convertir en chaine de caractère (str en VO).
Essayez donc ceci encore une fois dans l’interpreteur:
On doit donc convertir notre numero_ligne en str pour l’utiliser pour l’affichage.
En fait depuis le début on manipule des textes et non pas des nombres. Ce qui parfois va entrainer quelques problèmes de conversion que l’on verra plus tard.
with open("traitement_fichier.txt", "r") as fichier:
    contenu = fichier.readlines()
    numero_ligne = 0
    for ligne in contenu:
        ligne = ligne.rstrip("\n")
        data = ligne.split(";")

        if numero_ligne > 0:
            print( str(numero_ligne) + "," + data[0] + "," + data[3]  )

        numero_ligne = numero_ligne + 1
fichier.close()
EXERCICE SIX
Maintenant, pour pouvoir enchainer les futurs traitements sur les données, le plus simple est de sauvegarder notre résultat au lieu de l’afficher à l’écran.
Pour écrire un fichier, on va faire en fin de notre programme comme ceci pour tester la création du fichier:
with open("extraction_fichier.txt", "w") as fichier_sortie:
    fichier_sortie.write( "numero_ligne;timestamp;altitude" )
fichier_sortie.close()
A vous d’intégrer ces modifications pour écrire non plus seulement une ligne d’entête mais toutes les données extraites précédemment dans ce fichier
with open("traitement_fichier.txt", "r") as fichier:
    contenu = fichier.readlines()
    numero_ligne = 0
    with open("extraction_fichier.txt", "w") as fichier_sortie:
        for ligne in contenu:
            ligne = ligne.rstrip("\n")
            data = ligne.split(";")

            if numero_ligne > 0:
                print( str(numero_ligne) + "," + data[0] + "," + data[3]  )
                fichier_sortie.write( str(numero_ligne) + "," + data[0] + "," + data[3]  )
                fichier_sortie.write("\n")
            else:
                fichier_sortie.write("numero_ligne;timestamp;altitude")

            numero_ligne = numero_ligne + 1
    fichier_sortie.close()
fichier.close()
SEPTIÈME TRUC
Le débugger est le meilleurs outil intégré dans les IDEs quelque soit le langage de programmation. Au lieu de ne disposer des erreurs ou des messages à la fin de l’exécution des programmes, le débuggeur fait exécuter étape par étape le programme.
La différence est similaire entre l’exécution d’une action de football en plein vitesse ou au ralenti:
Nous allons donc pour commencer ajouter un point d’arrêt à notre programme puis le faire exécuter ligne par ligne.
Pour bien débuter, nous allons mettre ce point d’arrêt à la première ligne de notre programme; plus tard nous mettrons ce point d’arrêt plus loin dans le programme car ce qui va nous intéresser sera non pas le début mais un endroit spécifique du programme.
C’est similaire avec l’action du but que l’on va décortiquer et non pas tout le début du match.
Placer le point d’arrêt en cliquant à droite du numéro de ligne, normalement un petit point rose indique que le point d’arrêt est actif.
Puis appuyer sur le bouton « Debug » en haut à droite juste à côté du bouton « Run ».
Le programme va démarrer et se mettre en pause sur la ligne avec le point d’arrêt. Pour enchainer ligne par ligne notre programme, nous allons utiliser soit le bouton « Ligne suivante » sur le dessin (Step over en VO) soit pour plus de simplicité la touche Fn+F8 sur MacOs et F6 sous Windows:
Nous pouvons avoir l’état des variables en mémoire soit dans la fenêtre du bas soit dans le code juste à droite de la ligne exécutée. Le mode debugage est très utile pour voir ce qui peut entrainer une erreur dans notre programme et en vérifiant l’enchainement qui est réalisé selon l’état des variables.
Pour retirer le point d’arrêt il faut cliquer de nouveau dessus. Vous pouvez avoir plusieurs points d’arrêt et les options de débogages sont très nombreuses, nous ne rentrerons pas dans les détails pour l’instant.
EXERCICE SEPT
Essaye le mode debugage sur votre programme pour vérifier l’enchainement des étapes.
Faites un point d’arrêt en face de l’instruction :
numero_ligne = numero_ligne + 1
Faites un clic droit sur le point d’arrêt et indiquer comme Condition:
numero_ligne == 10
Relancer le debugogage pour vérifier que le point d’arrêt ne se déclenche que quand cette valeur est atteinte.
EXERCICE HUIT
Nous voudrions obtenir le fichier de données suivant avec les timestamps qui sont transformé en intervalles de temps entre deux échantillonnages depuis un t zéro à la première valeur acquise par le GPS.
with open("traitement_fichier.txt", "r") as fichier:
contenu = fichier.readlines()
numero_ligne = 0
with open("extraction_fichier.txt", "w") as fichier_sortie:
for ligne in contenu:
ligne = ligne.rstrip("\n")
data = ligne.split(";")
if numero_ligne > 0:
if numero_ligne == 1:
tzero = int(data[0])
deltaTemps = int(data[0]) - tzero
# le tzero est recaluler à chaque fois après utilisation par le deltaTemps
tzero = int(data[0])
print( str(numero_ligne) + "," + str(deltaTemps) + "," + data[3])
fichier_sortie.write( str(numero_ligne) + "," + str(deltaTemps) + "," + data[3])
fichier_sortie.write("\n")
else:
fichier_sortie.write("numero_ligne;timestamp;altitude")
numero_ligne = numero_ligne + 1
fichier_sortie.close()
fichier.close()
Demander une information depuis la ligne de commande, pour filtrer les informations et ne garder que celle dont le numero_ligne est supérieur au numero_ligne_initial indiqué par l’utilisateur.
Pour demander une variable, voici la commande
numero_ligne_initial = input('Numéro de ligne initial: ')
numero_ligne_initial = int(numero_ligne_initial)
Normalement votre console va contenir ce message, avec le curseur pour attendre que vous indiquiez à partir de quel ligne on va traiter l’information
numero_ligne_initial = input('Numéro de ligne initial: ')
numero_ligne_initial = int(numero_ligne_initial)
with open("traitement_fichier.txt", "r") as fichier:
contenu = fichier.readlines()
numero_ligne = 0
for ligne in contenu:
ligne = ligne.rstrip("\n")
data = ligne.split(";")
if numero_ligne > 0:
if numero_ligne == numero_ligne_initial:
tzero = int(data[0])
if numero_ligne >= numero_ligne_initial:
deltaTemps = int(data[0]) - tzero
# le tzero est recaluler à chaque fois après utilisation par le deltaTemps
tzero = int(data[0])
print(str(numero_ligne) + "," + str(deltaTemps) + "," + data[3])
numero_ligne = numero_ligne + 1
fichier.close()
HUITIEME TRUC
Les bibliothèques additionnelles sont très importantes dans python. Par défaut, python ne charge pas toutes les bibliothèques car cela prendrais trop de temps, cela chargerais en mémoire trop d’informations et même il y a risque d’incompatibilités entre certaines bibliothèques. Donc on charge que ce que l’on a besoin et on les importes individuellement.
Par exemple pour faire un graphisme, la bibliothèque que je propose est matplotlib.
Pour l’installer, il faut soit appeler en ligne de commande le logiciel pip par exemple via la commande du système d’exploitation (terminal sous MacOs, cmd sous Windows :
pip install requests
ou on trouve aussi la commande exprimée comme ceci:
python -m pip install <nom de la bibliothèque>
Ce que je conseille sinon c’est ce petit programme python qui exécute pip (qui est développé en python), à exécuté dans l’interpreteur python:
Python 3.6.2 (v3.6.2:5fd33b5, Jul 8 2017, 04:57:36) [MSC v.1900 64 bit (AMD64)]
on win32
Type "help", "copyright", "credits" or "license" for more information.
>>>import pip
>>>pip.main(['list'])
>>>pip.main(['install','<nom de la bibliothèque>'])
Mais ce qui est vraiment pratique avec PyCharm c’est que l’on peut faire via l’IDE tout cela:
Allez sur le Menu File > Settings…
NOTA: sous Mac Os le menu settings est déplacé dans le menu le plus à gauche portant le nom de l’application soit ici PyCharm > Settings…
Choisissez « Project: <votre projet> » puis « Project Interpreteur » et complètement à droite le bouton « + » puis vous pouvez chercher une bibliothèque (un package en VO) par exemple « matplotlib » pour l’installer.
Une fois l’installation terminé, on peut constater que matplotlib n’a pas été installé tout seul mais des bibliothèques additionnelles ont été aussi installé pour le faire fonctionner:
On peut constater que la bibliothèque numpy qui est très utile pour le calcul scientifique est aussi installé car elle est nécessaire à matplotlib.
NEUVIÈME TRUC
Pour l’utilisation de matplotlib et numpy pour faire une figure et des calculs, il faut en premier lieu importer les bibliothèques. Pourquoi indiquer dans un programme ce que l’on veut importer précisément, on pourrait penser que python va charger toutes les bibliothèques que l’on a installer, oui mais dans ce cas là on va avoir un long temps de chargement avant que notre programme ne s’exécute.
Pour importer l’objet qui gère dans la bibliothèque matplotlib l’objet qui gère les diagrammes, on peut écrire ceci:
from matplotlib import pyplot
Mais on trouve la version plus abrégé suivante:
import matplotlib.pyplot
Sauf qu’après on se retrouve à devoir faire préfixer toutes les fonctions de cet objet, par exemple ici la fonction figure() par le nom de la bibliothèque + le nom de l’objet:
matplotlib.pyplot.figure()
Donc on peut faire un alias (le mot après as) pour remplacer le préfixe par quelquechose de plus court
import matplotlib.pyplot as plt
et du coup l’appel se fait avec la version écourtée:
plt.figure()
Par exemple pour numpy la bibliothèque de calcul scientifique, son alias est souvent np.
Mais revenons à ce que nous avons besoin d’importer pour faire une courbe :
import matplotlib import pyplot as plt
import numpy as np
from mpl_toolkits.mplot3d import Axes3D as ax3
Voici un petit morceau de programme pour tracer une courbe simple:
Cette courbe est le début du vol du planeur enregistré par le GPS d’un smartphone.
Essayons de construire un programme pour l’afficher avec les données du fichier traitement_fichier.txt.
En premier lieu, importer matplotlib et numpy. Ensuite il faut créer trois tableaux pour stocker les informations:
#initialisation des tableaux de données
longitude = []
latitude = []
altitude = []
Puis après avoir passé la première ligne du fichier traitement_fichier.txt qui contient les entête des colonnes. Nous pouvons ajouter les valeurs lu comme str en valeur de type float (nombre à virgule) via ces lignes:
#construction des tableaux de données
latitude.append(float(data[1]))
longitude.append(float(data[2]))
altitude.append(float(data[3]))
Bien sur éviter de lire la colonne data[0] qui contient les timestamps peut utile pour ce diagramme.
A la fin de notre programme après avoir bien construit les 2 tableaux de données voici le code pour afficher le diagramme:
#dessin de la figure
fig = plt.figure()
ax = fig.add_subplot(111, projection='3d')
ax.plot(longitude, latitude, altitude, label='parametric curve')
# Ajouter des labels aux axes
ax.set_xlabel('longitude')
ax.set_ylabel('lattitude')
ax.set_ylabel('altitude')
plt.show()
from matplotlib import pyplot as plt
import numpy as np
from mpl_toolkits.mplot3d import Axes3D as ax3
#initialisation des tableaux de données
longitude = []
latitude = []
altitude = []
with open("traitement_fichier.txt", "r") as fichier:
contenu = fichier.readlines()
numero_ligne = 0
for ligne in contenu:
ligne = ligne.rstrip("\n")
data = ligne.split(";")
if numero_ligne != 0:
#construction des tableaux de données
latitude.append(float(data[1]))
longitude.append(float(data[2]))
altitude.append(float(data[3]))
# Ne pas oublier d'incrémenté le numéro de ligne
numero_ligne = numero_ligne + 1
fichier.close()
#dessin de la figure
fig = plt.figure()
ax = fig.add_subplot(111, projection='3d')
# Tracer les points
ax.plot(longitude, latitude, altitude)
# Ajouter des labels aux axes
ax.set_xlabel('longitude')
ax.set_ylabel('lattitude')
ax.set_ylabel('altitude')
# Afficher le graphique
plt.show()
DIXIÈME TRUC
Si vous ne codez pas, tout cela ne va pas vraiment être utile.
Mettez des commentaires pour expliquer les morceaux du code.
Indiquez clairement ce que fait une variable, numero_ligne ou numeroLigne.
Faites des fichiers intermédiaires pour pouvoir rejouer l’intégralité ou une partie du processus.
Utilisez le débogage pour tracer l’enchainement du code et l’état des variables.
Installer pyinstaller avec la commande suivante :
pip install -U pyinstaller
Et vous pouvez ensuite créer un exécutable avec la commande suivante :

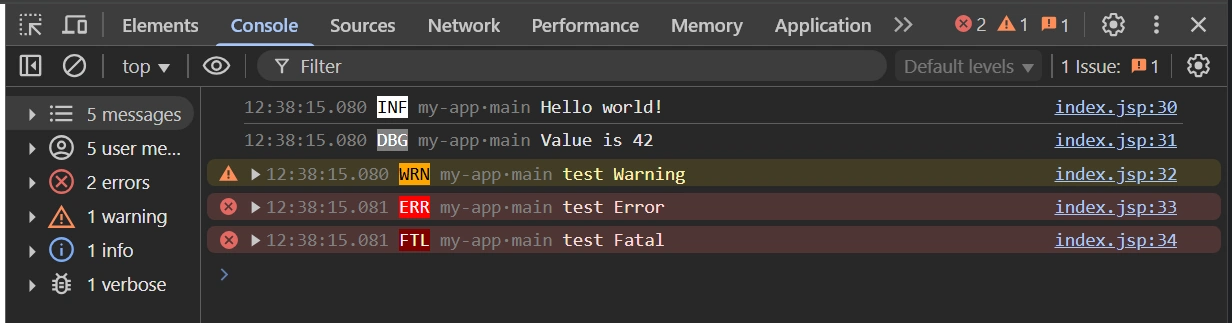


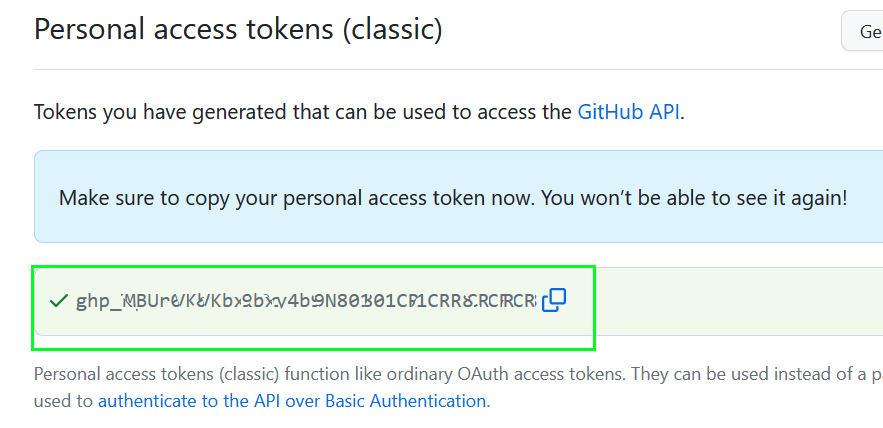
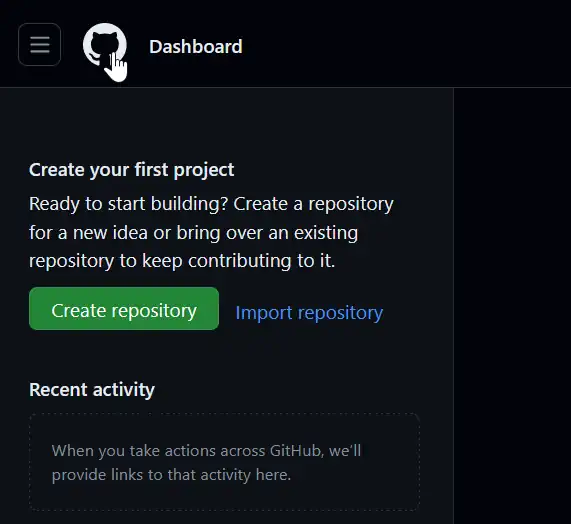


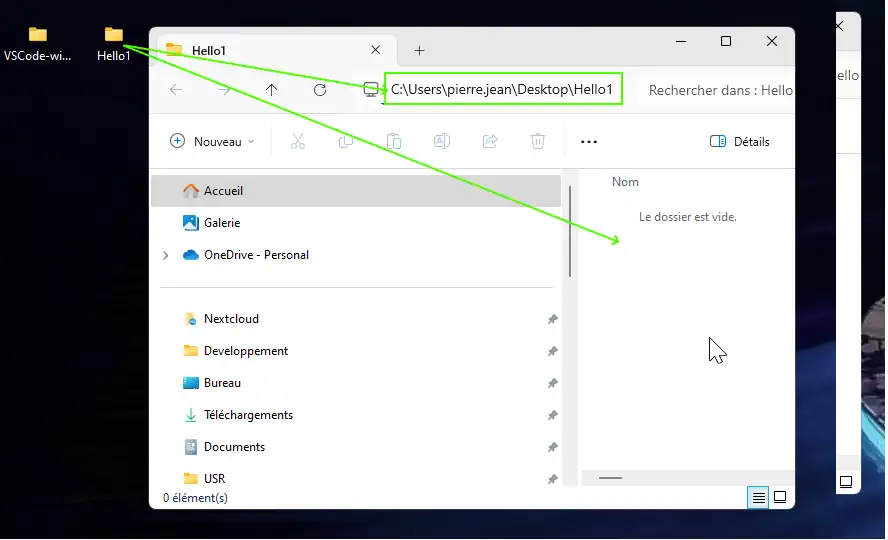
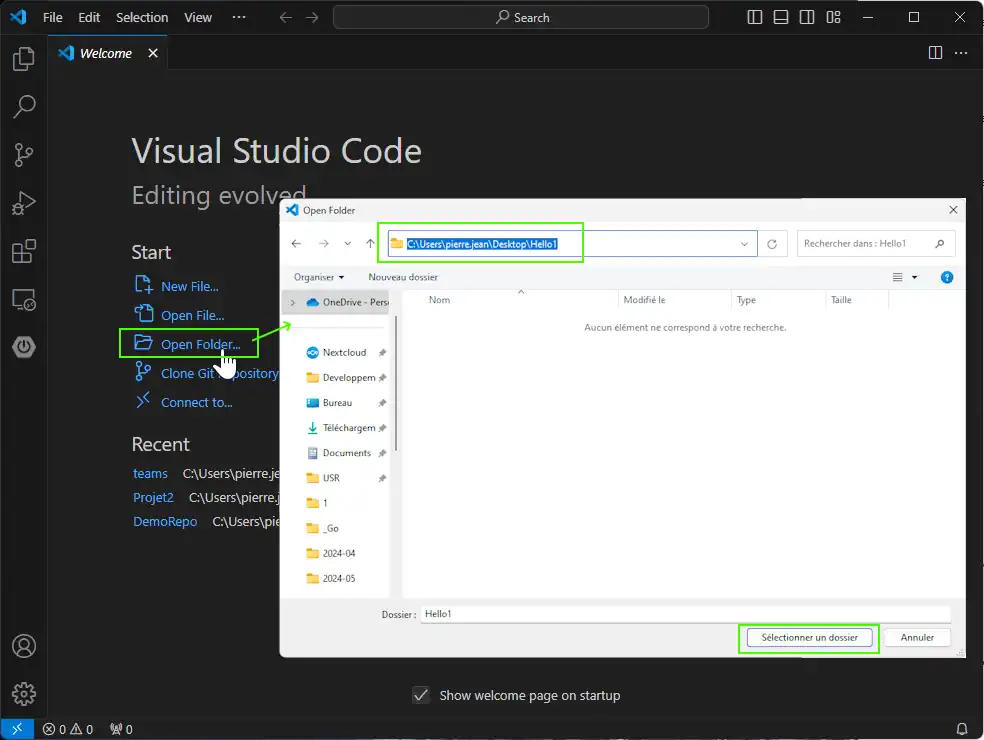

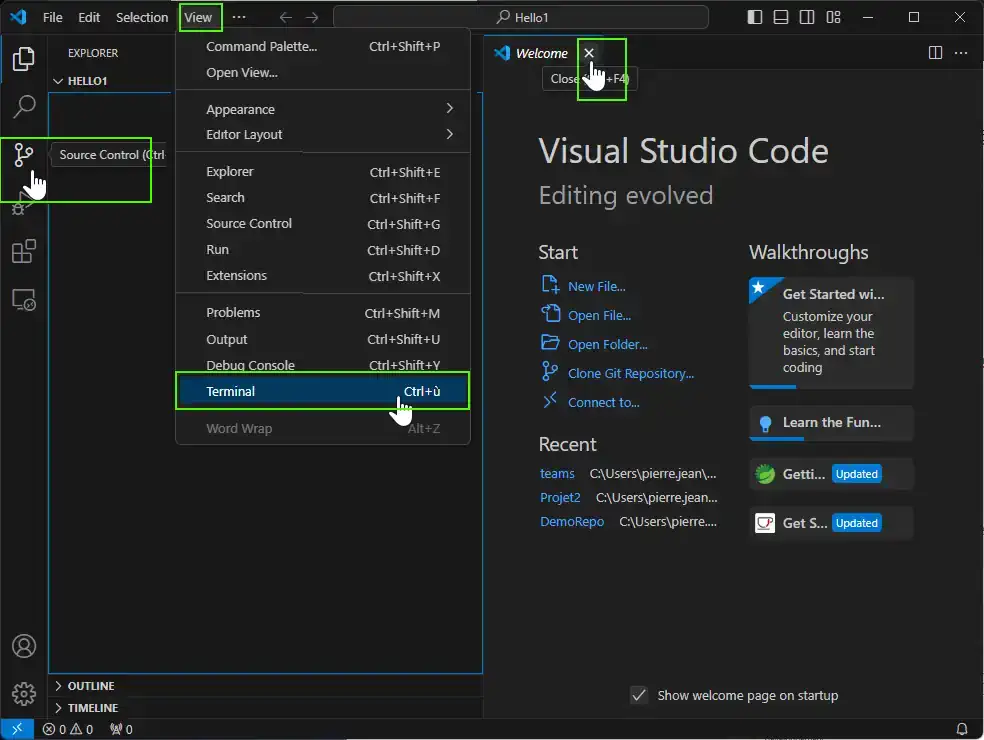
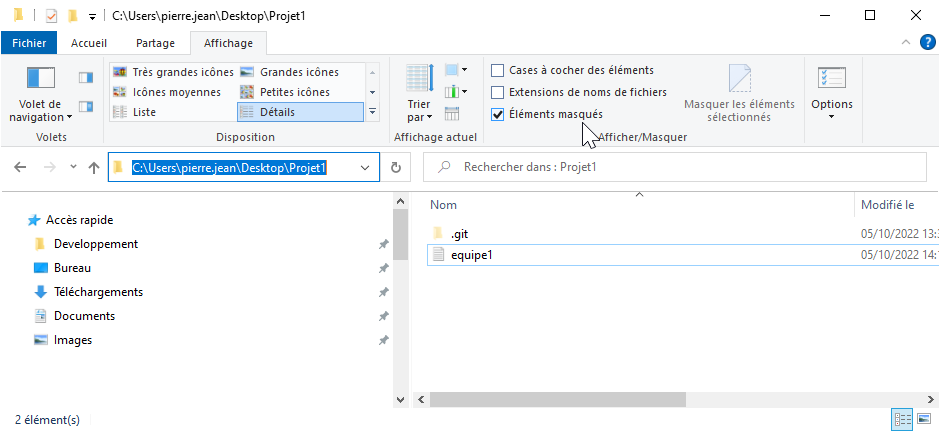
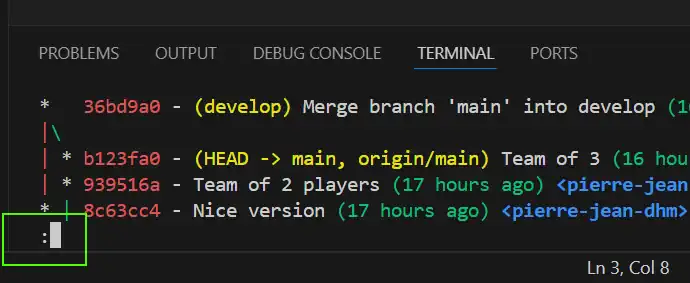
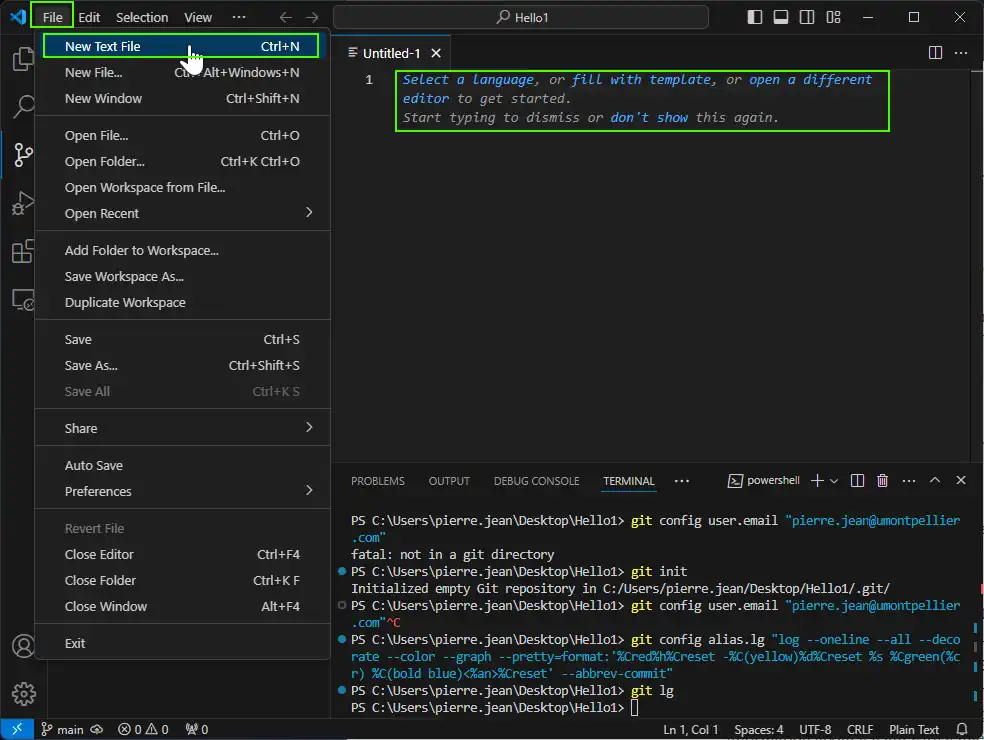
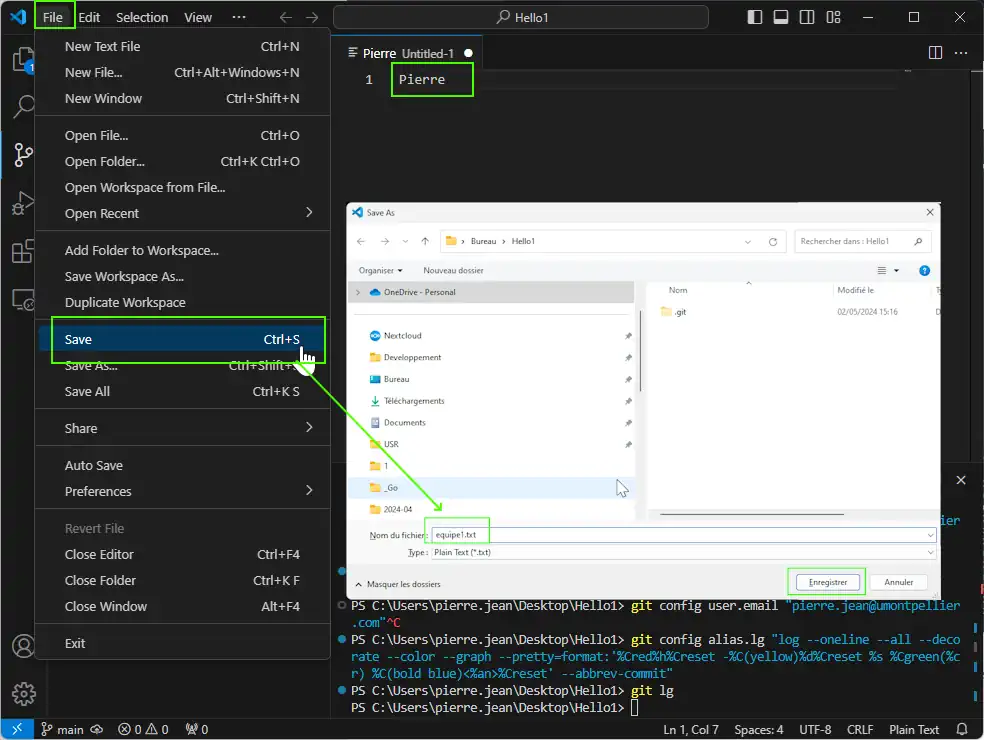
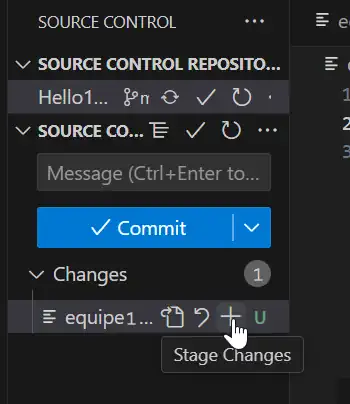
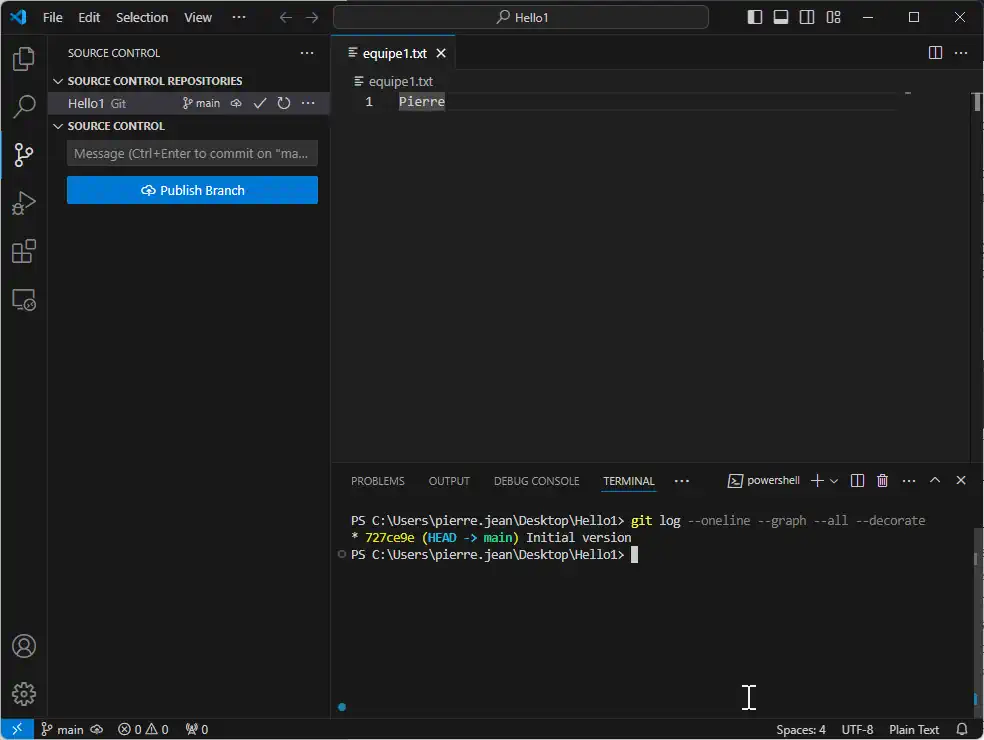

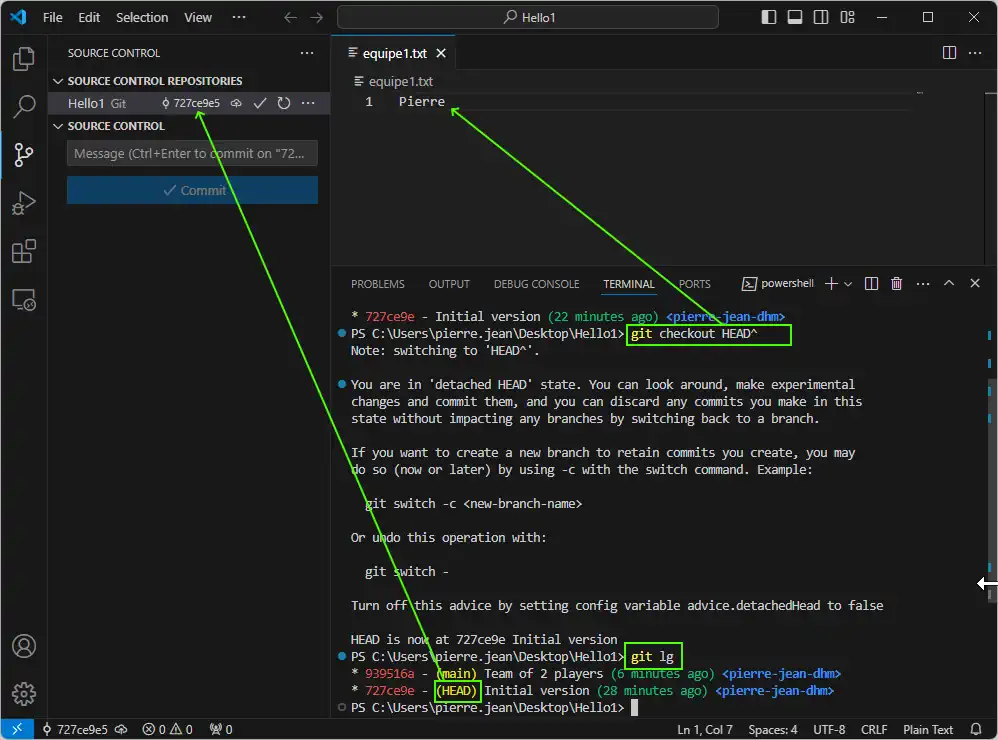
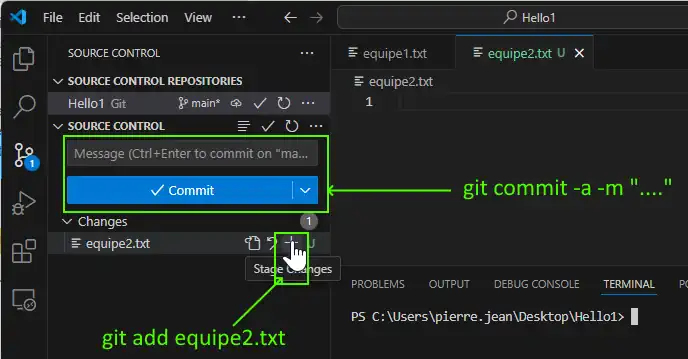
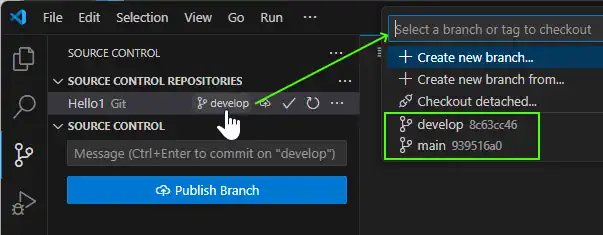
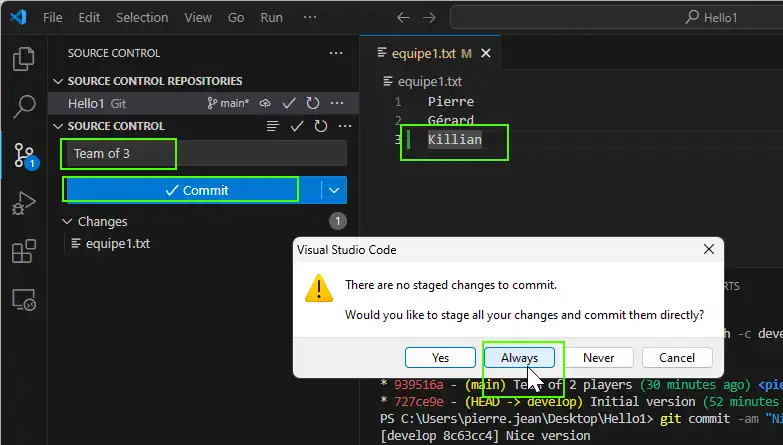
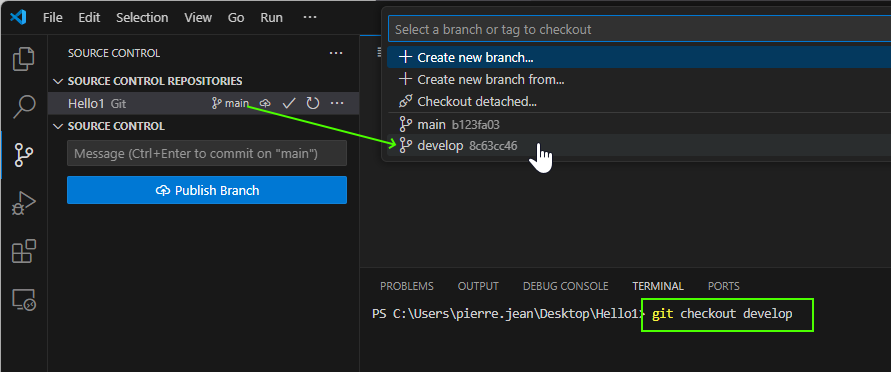

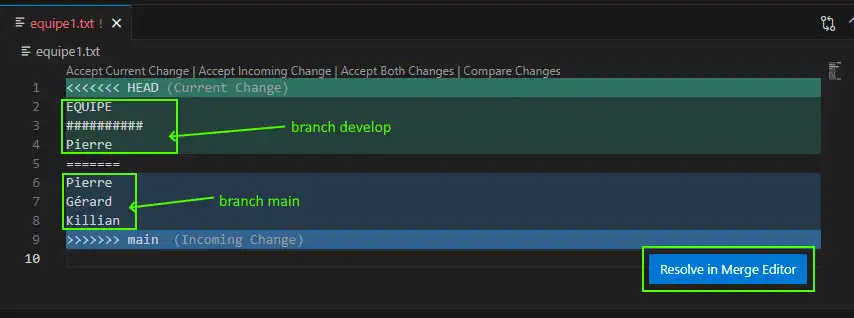
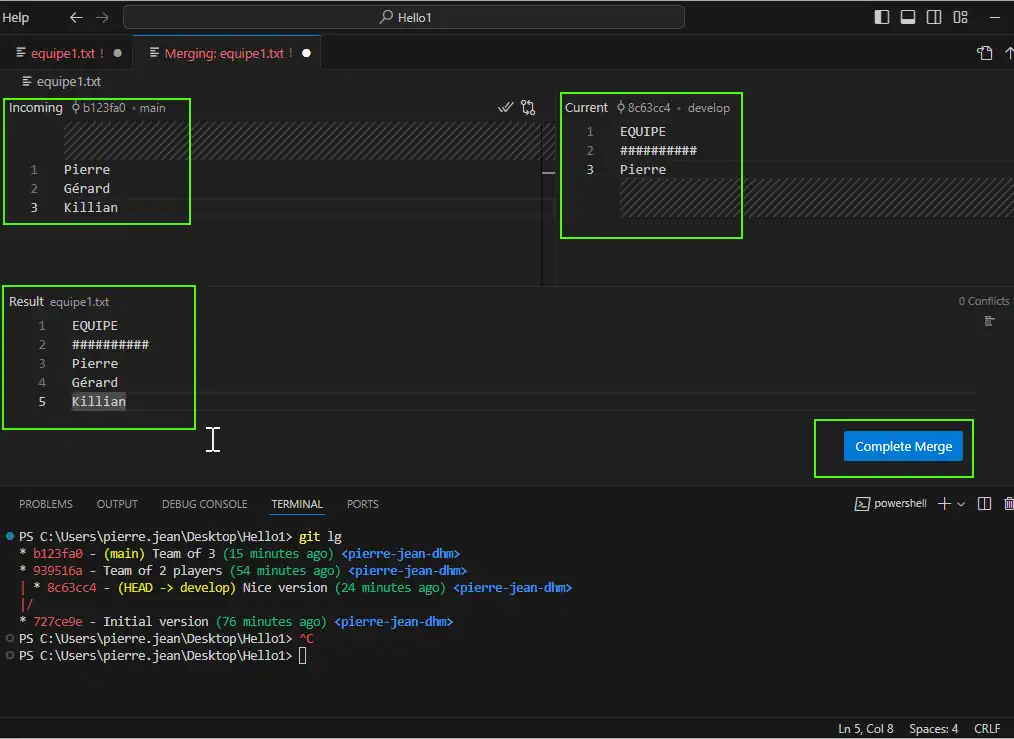

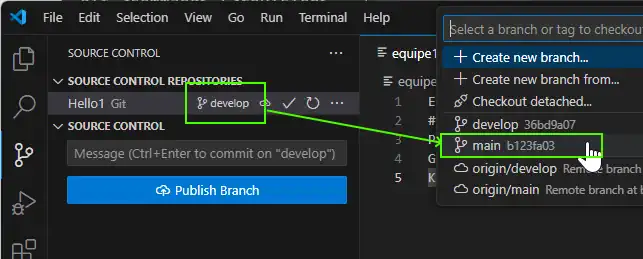
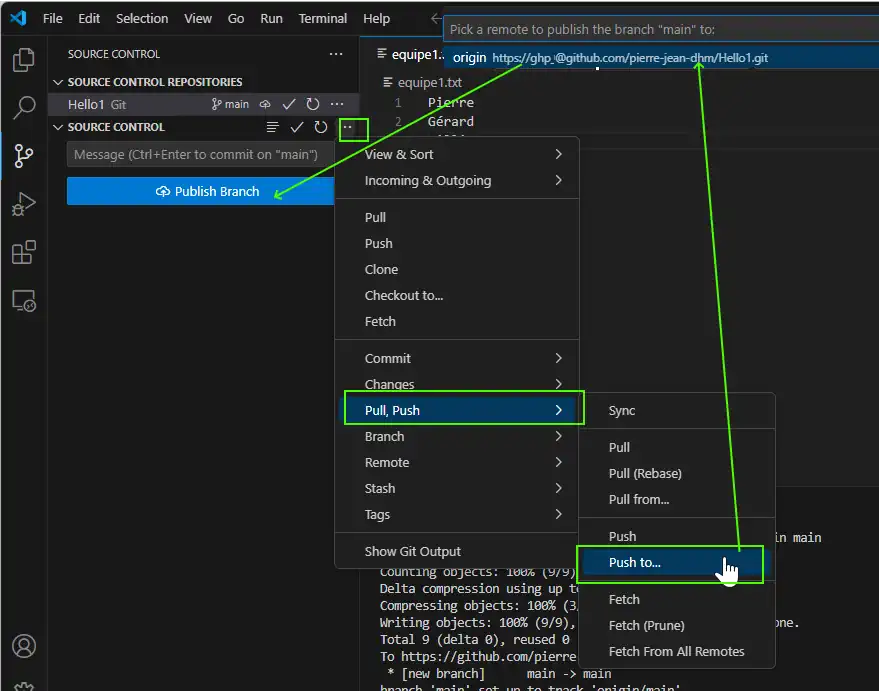


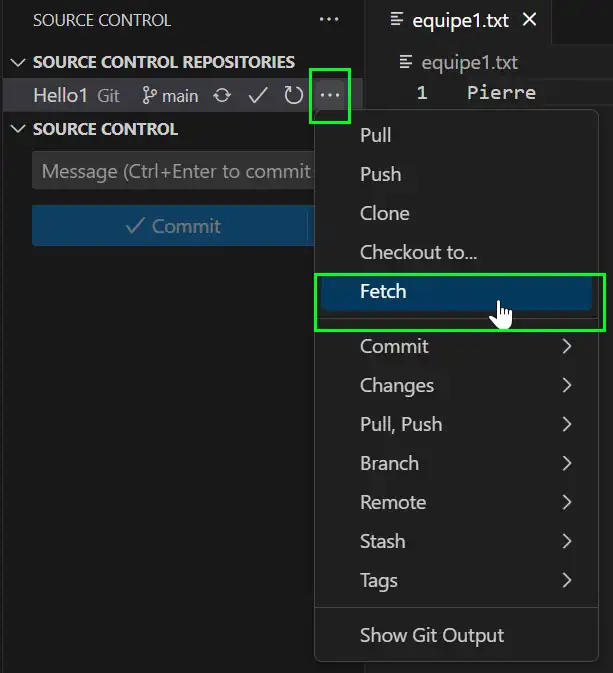

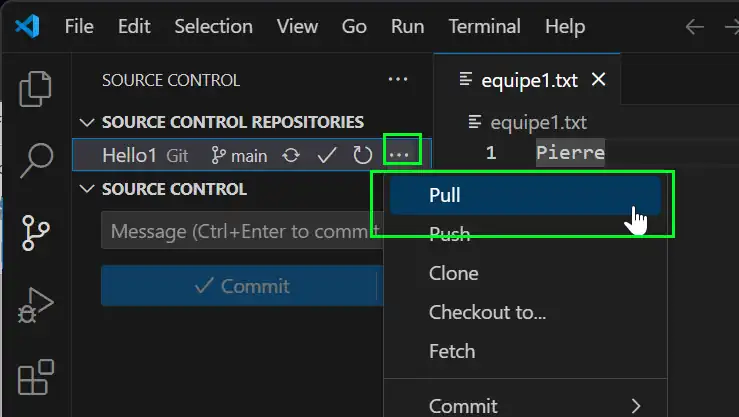


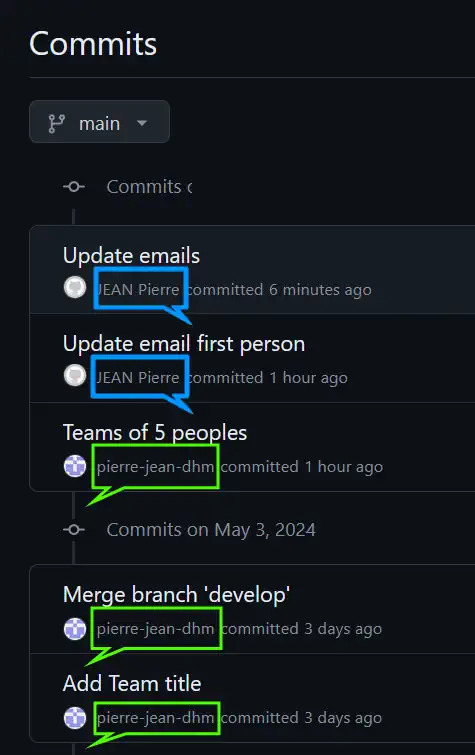
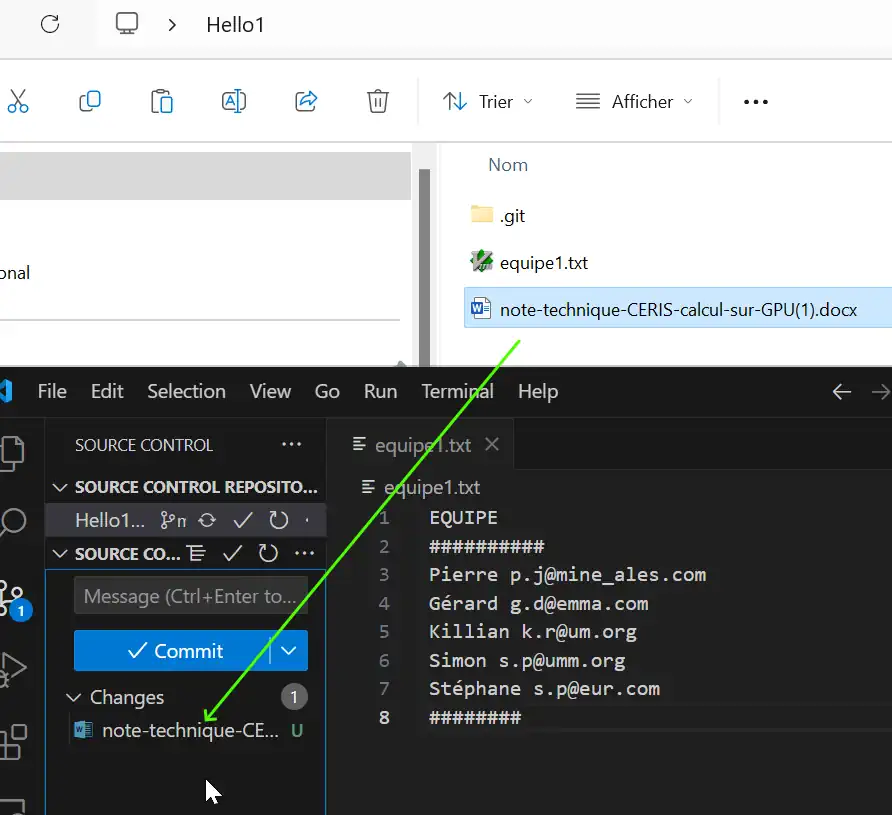


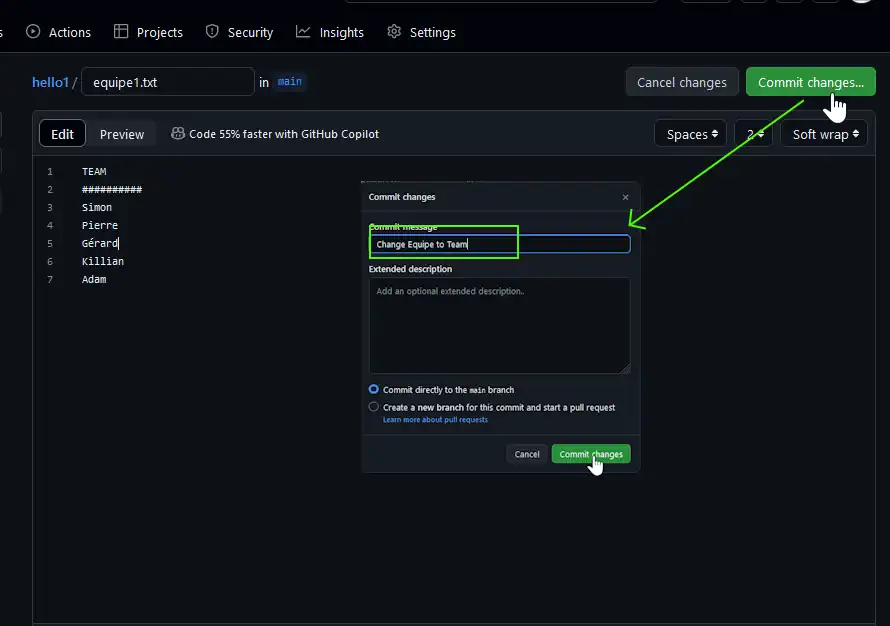
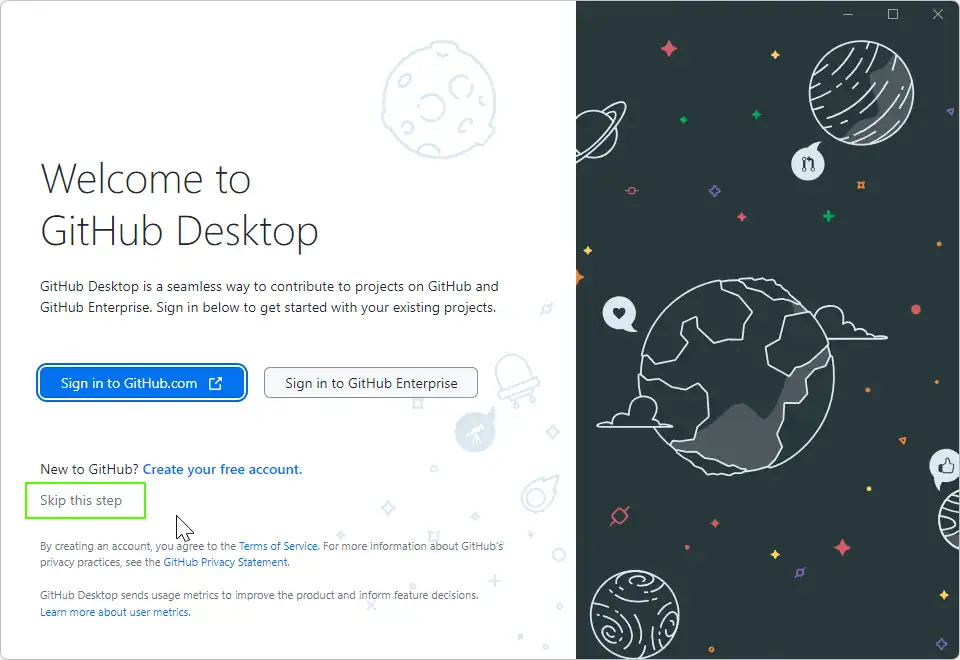
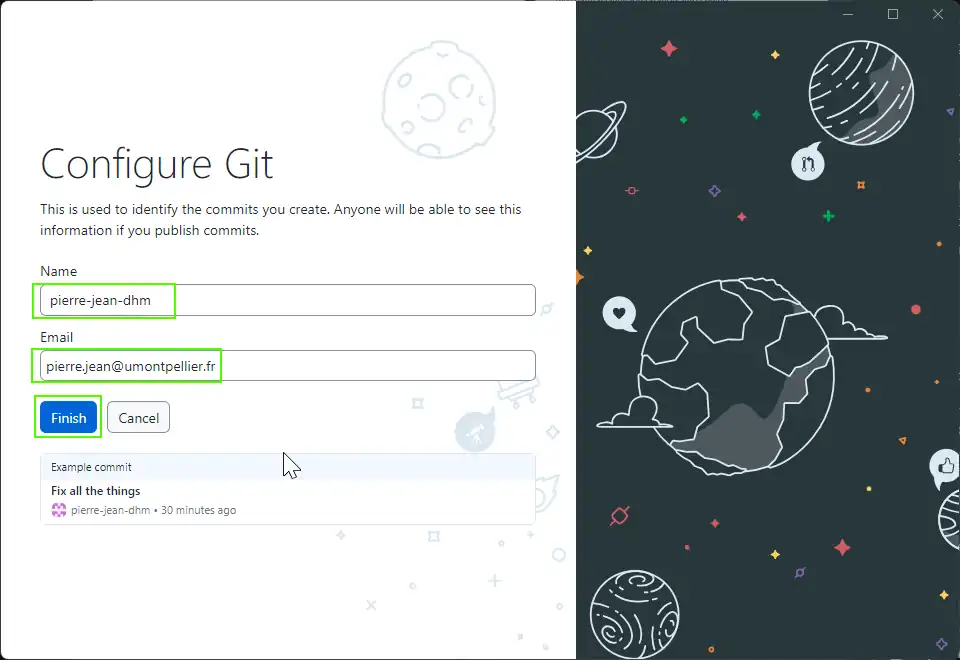
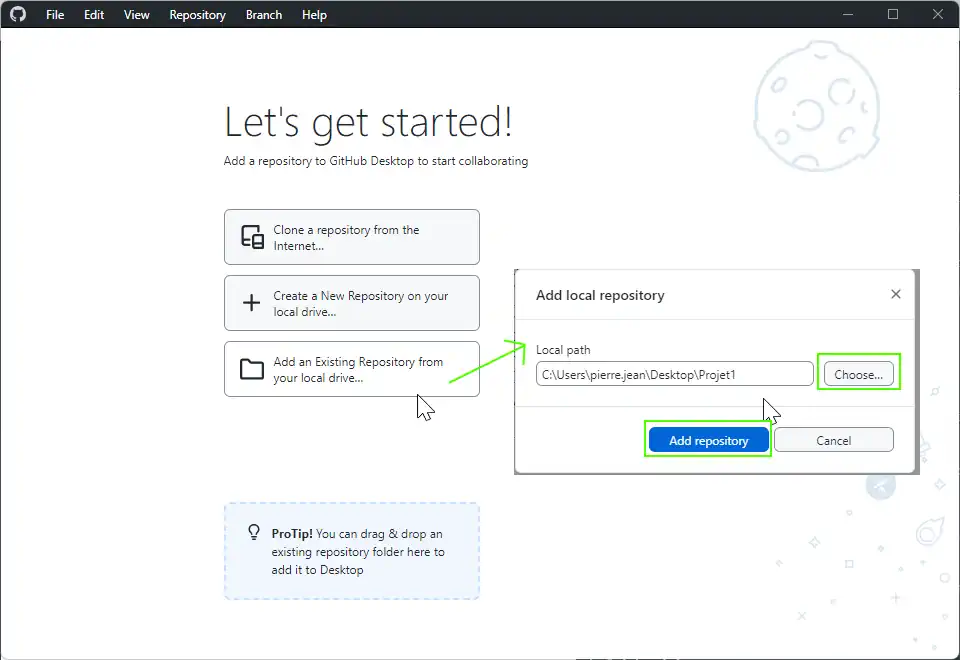


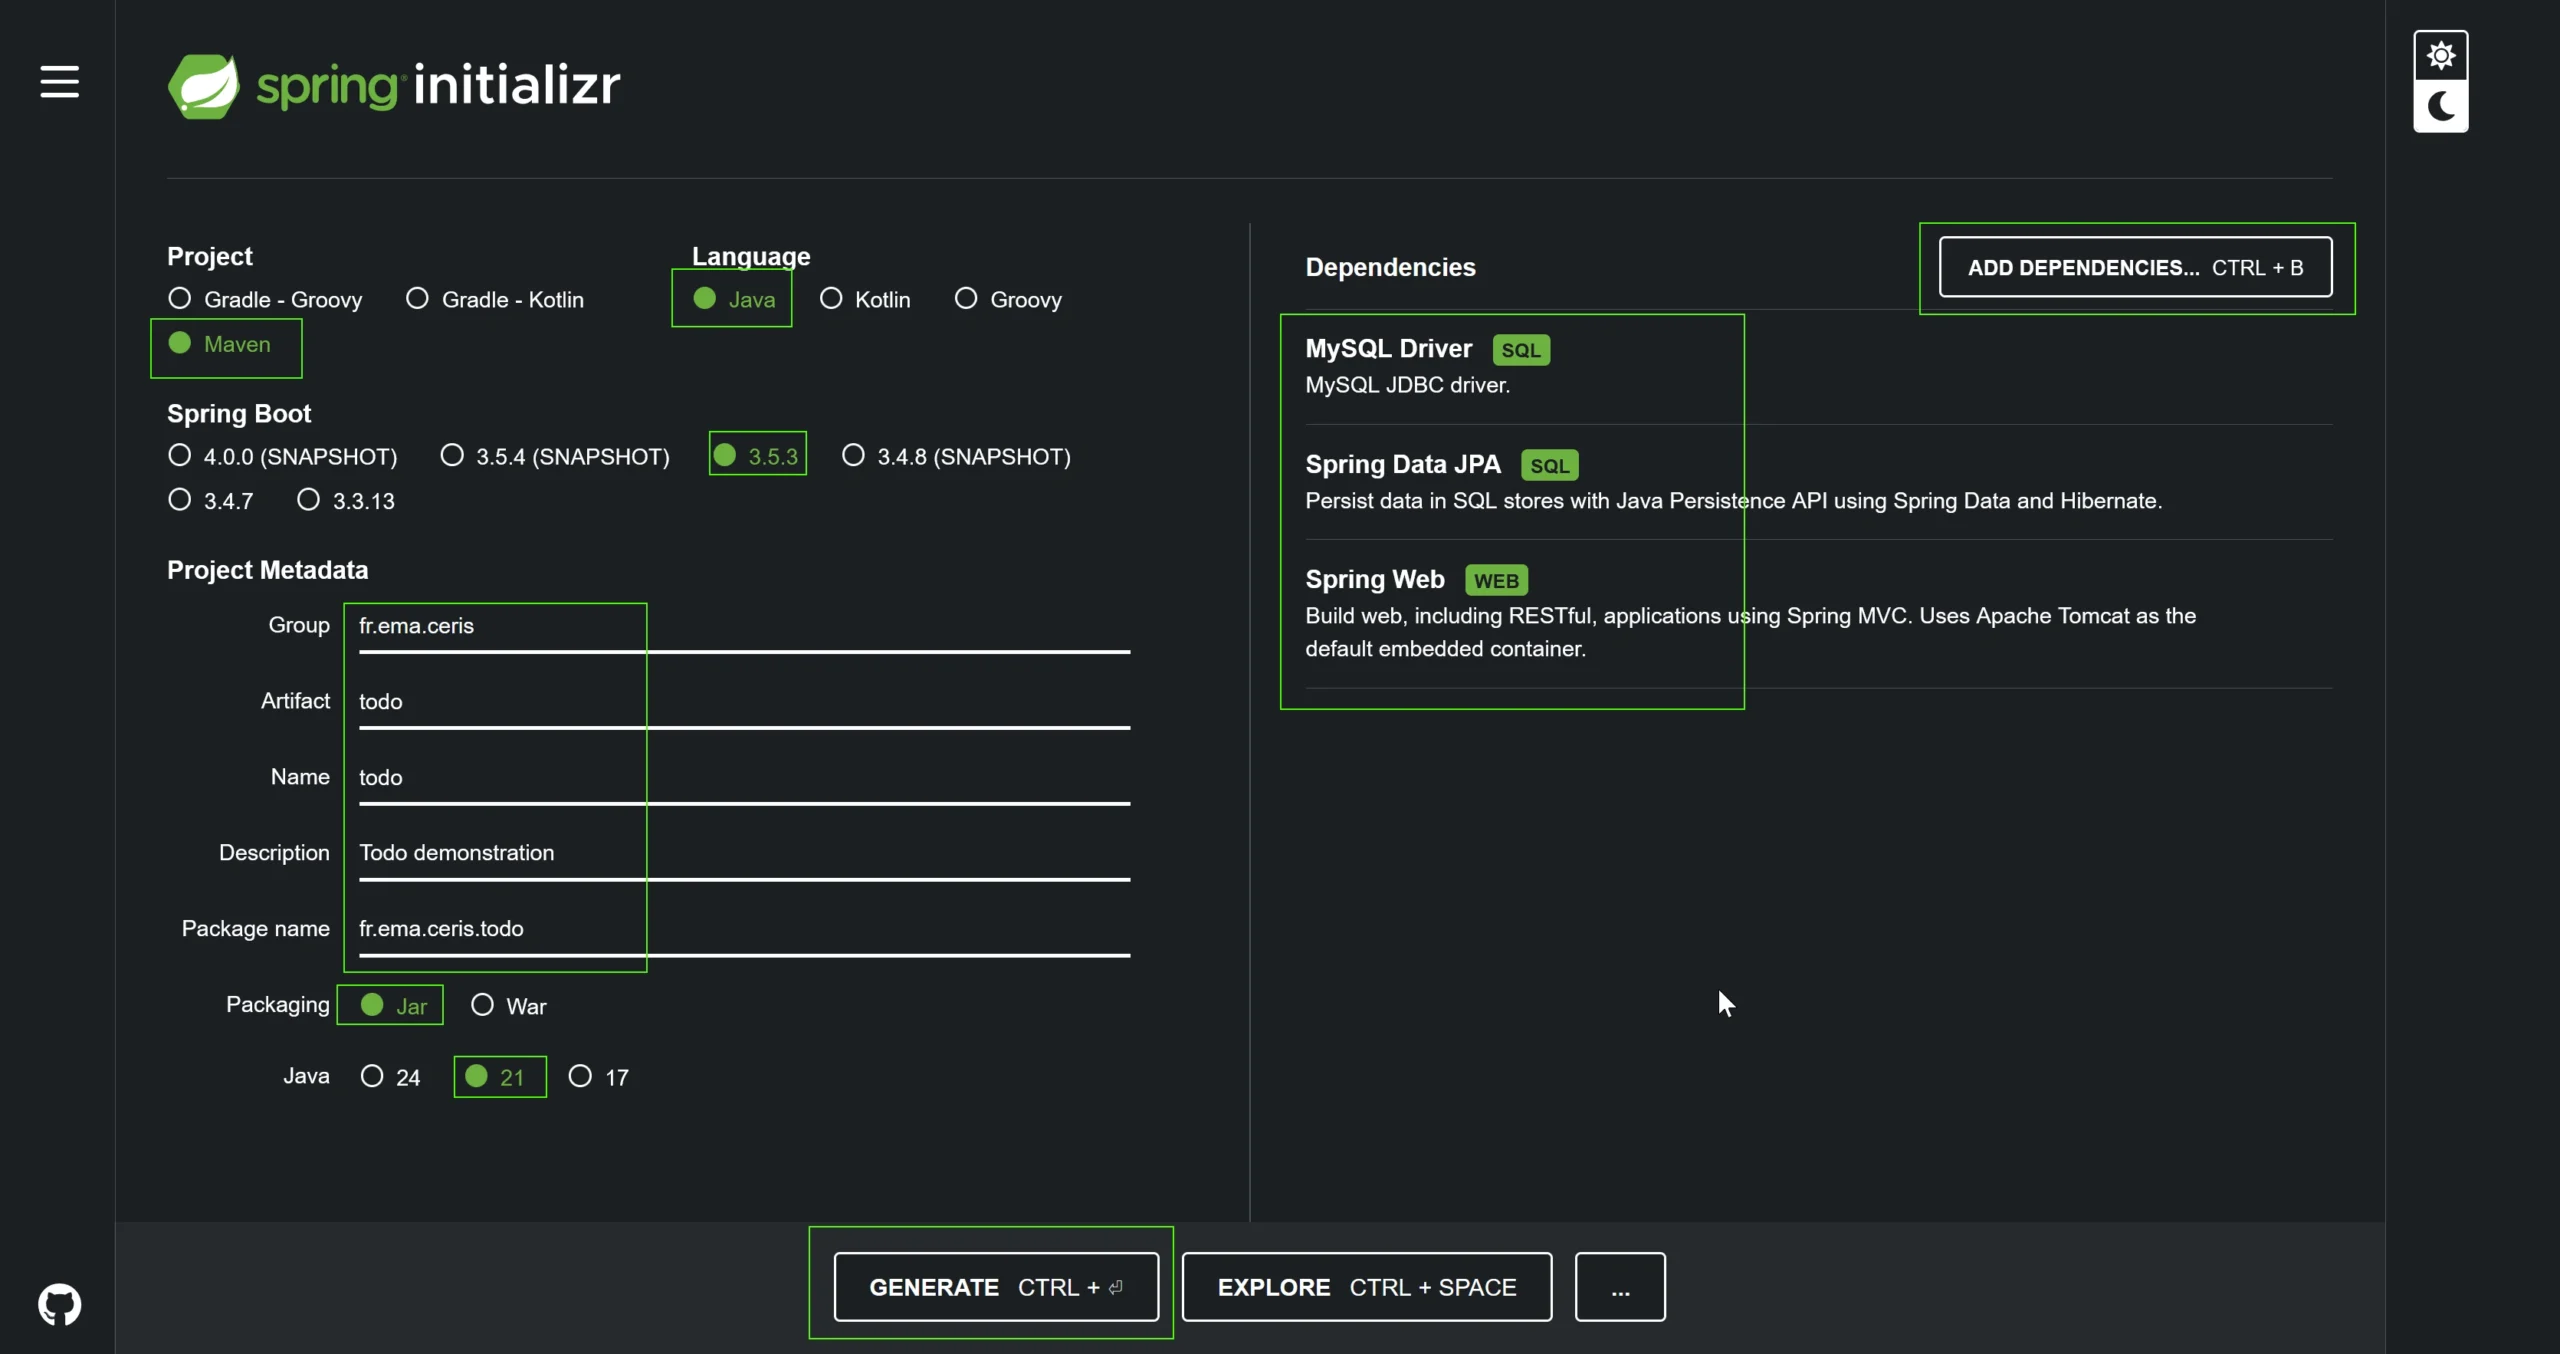


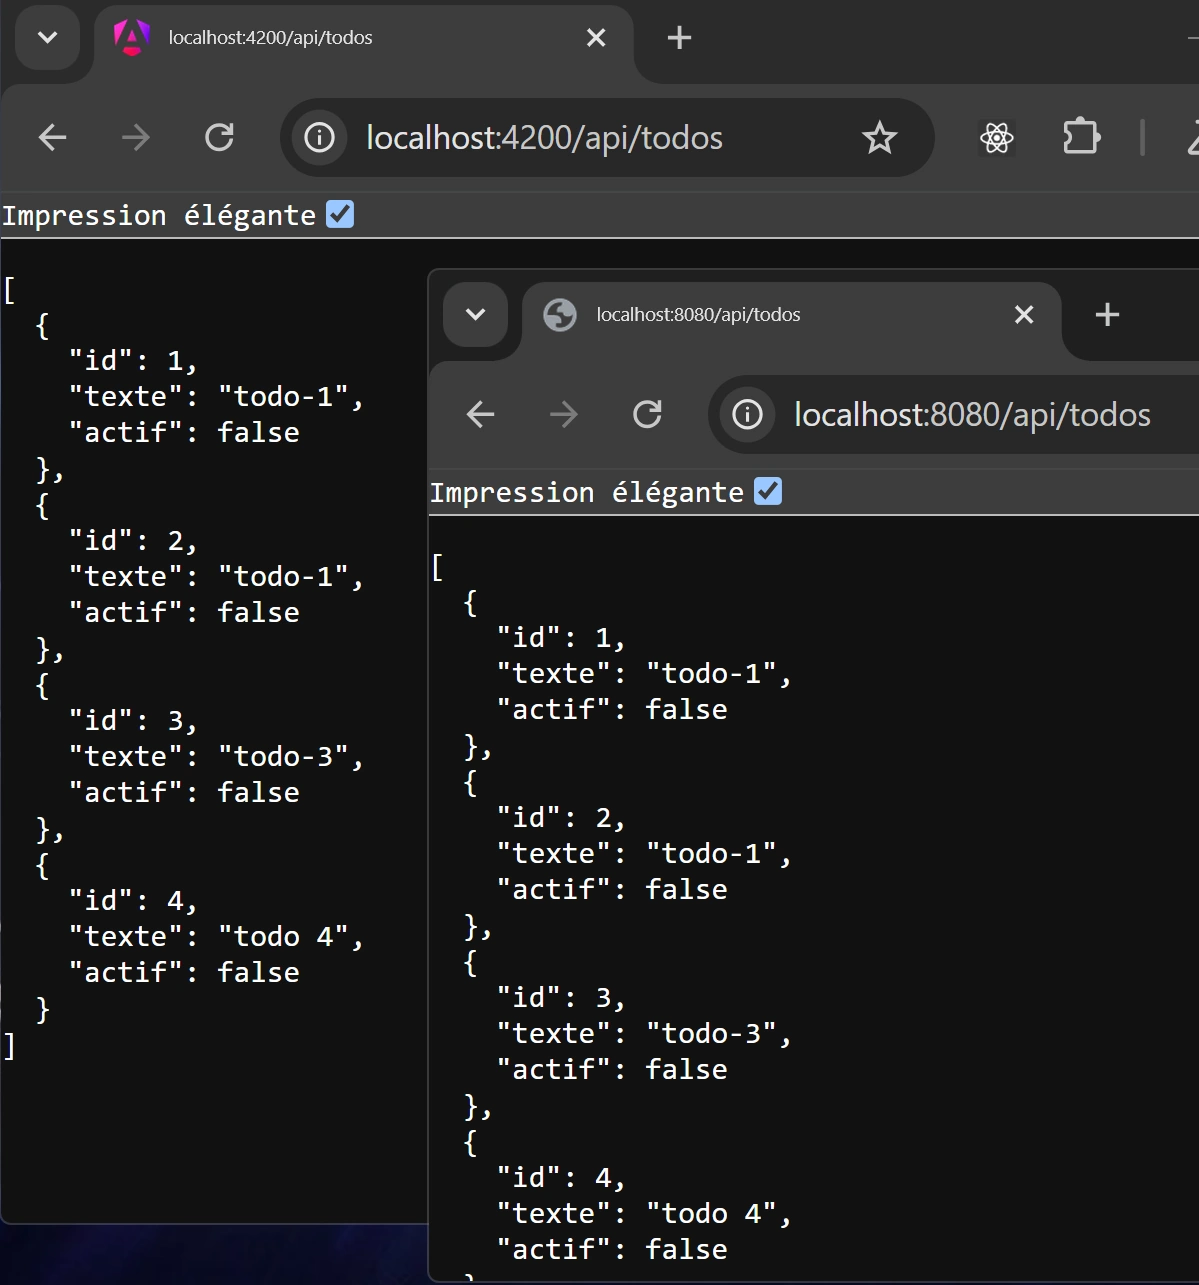


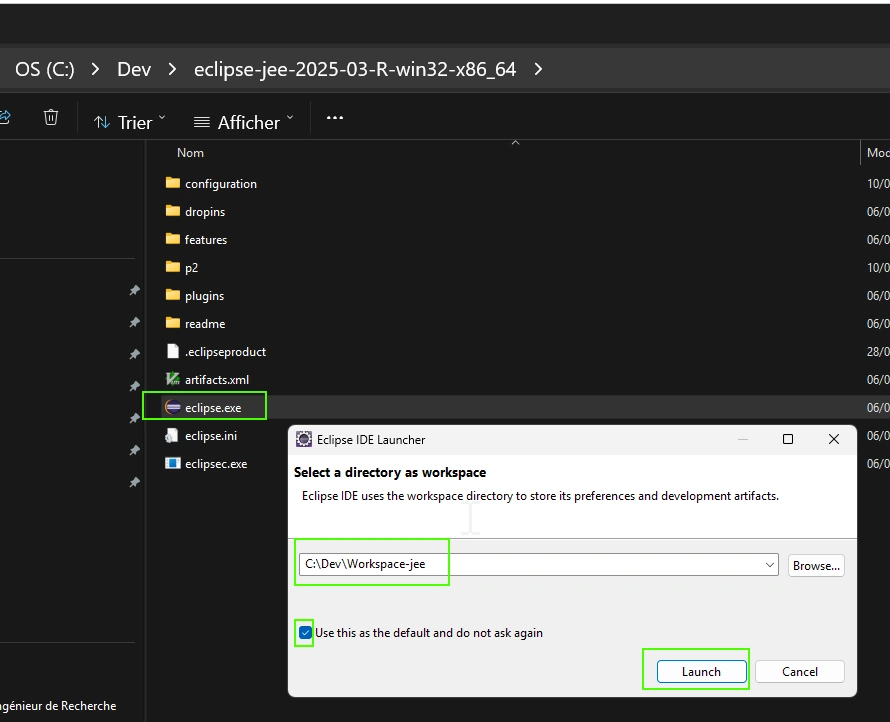


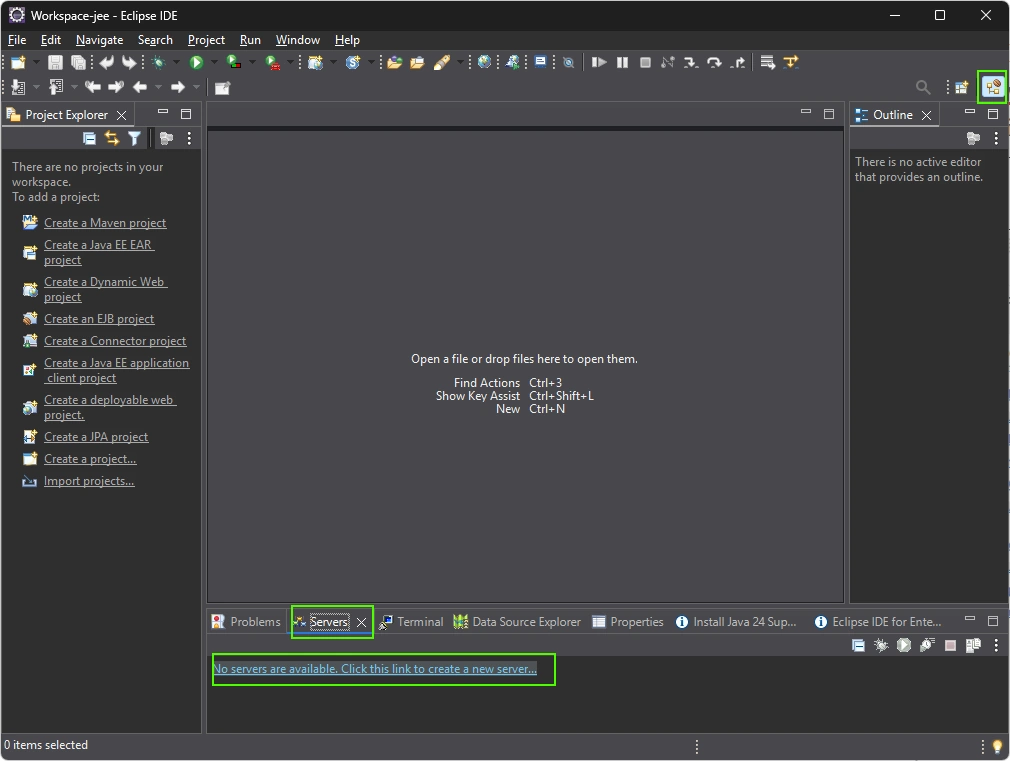
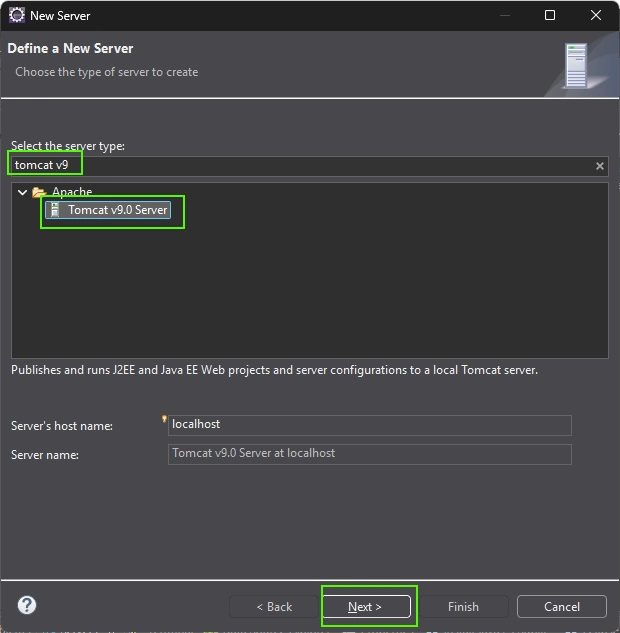
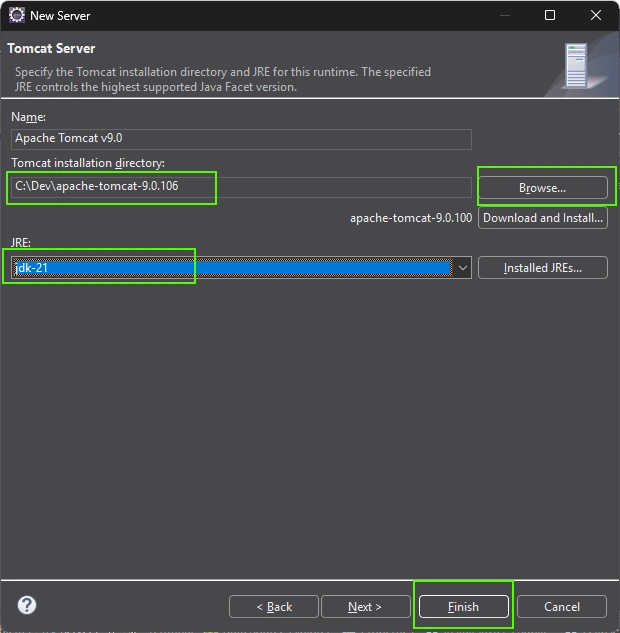
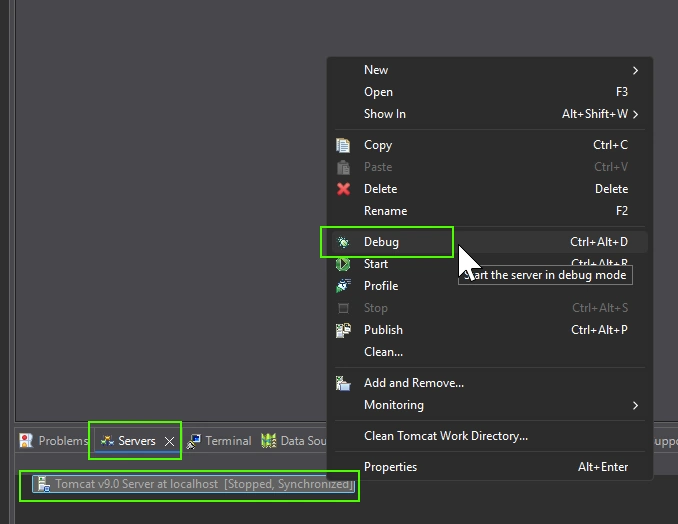
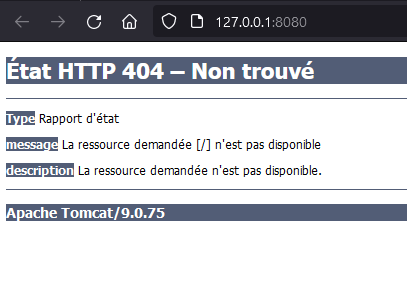
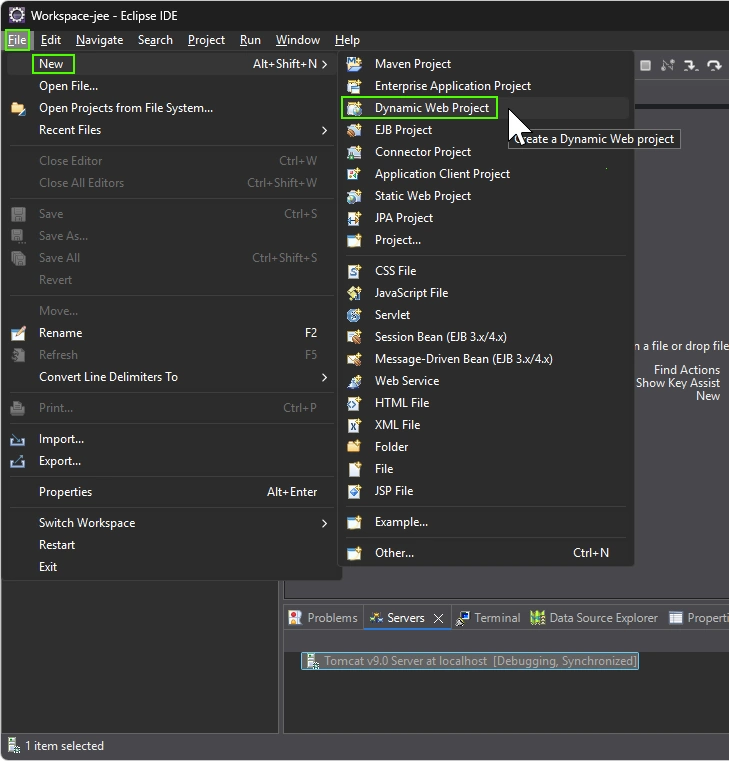

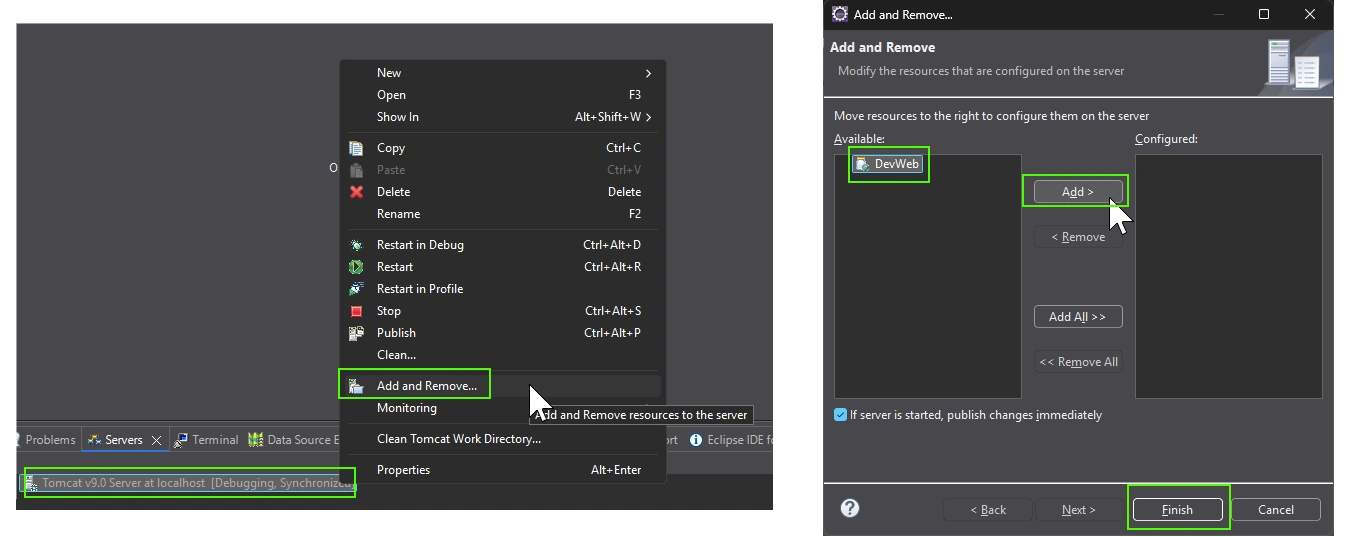
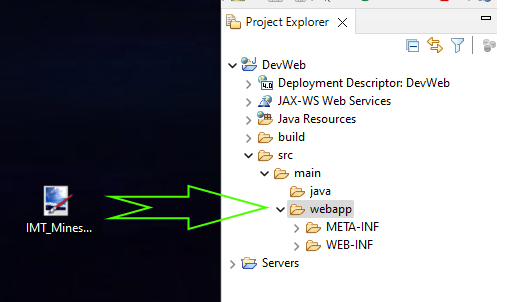
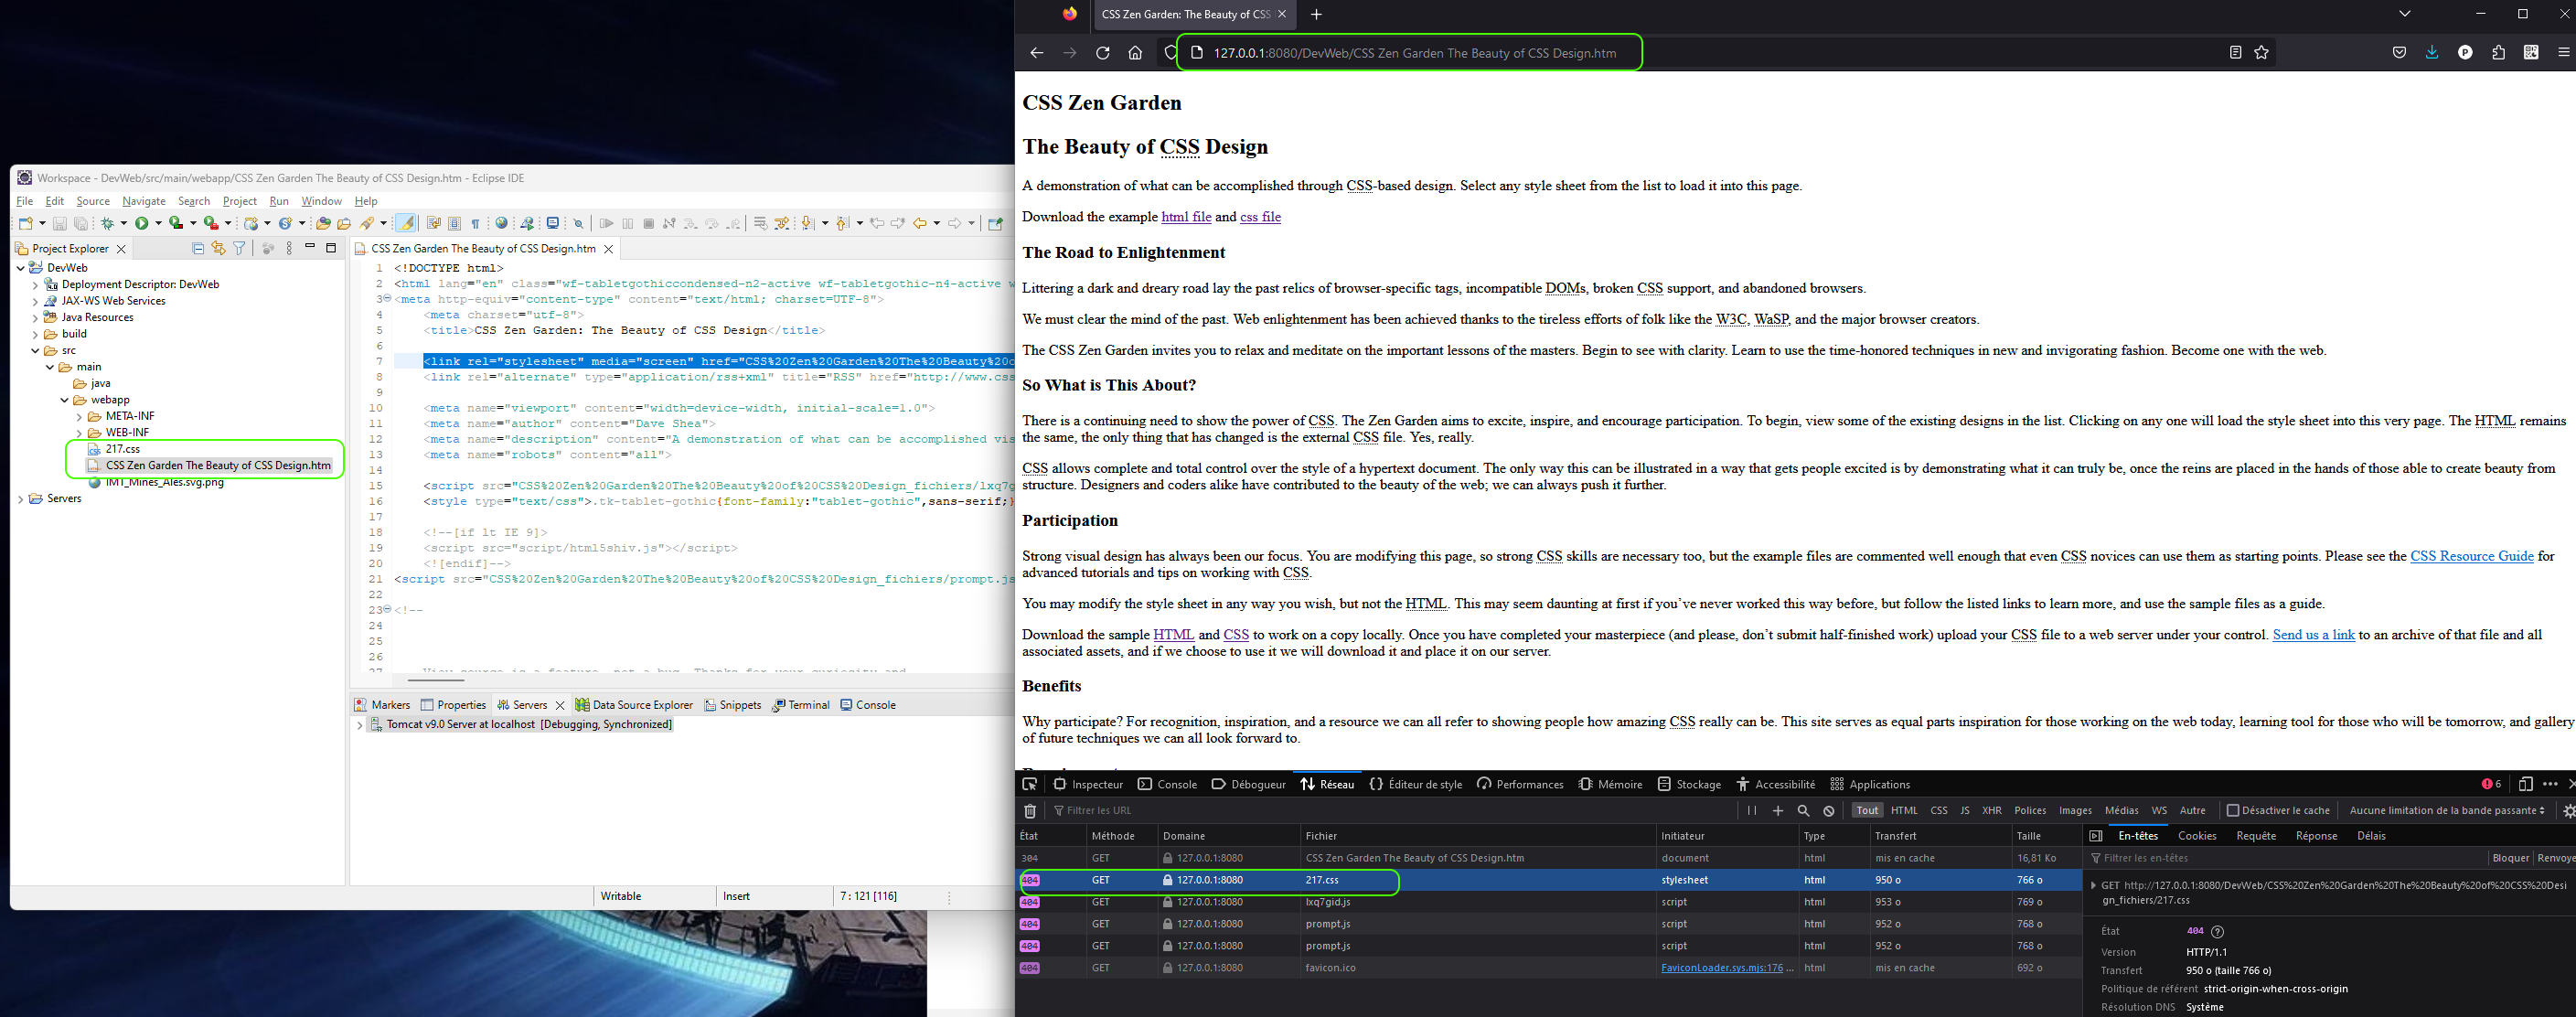
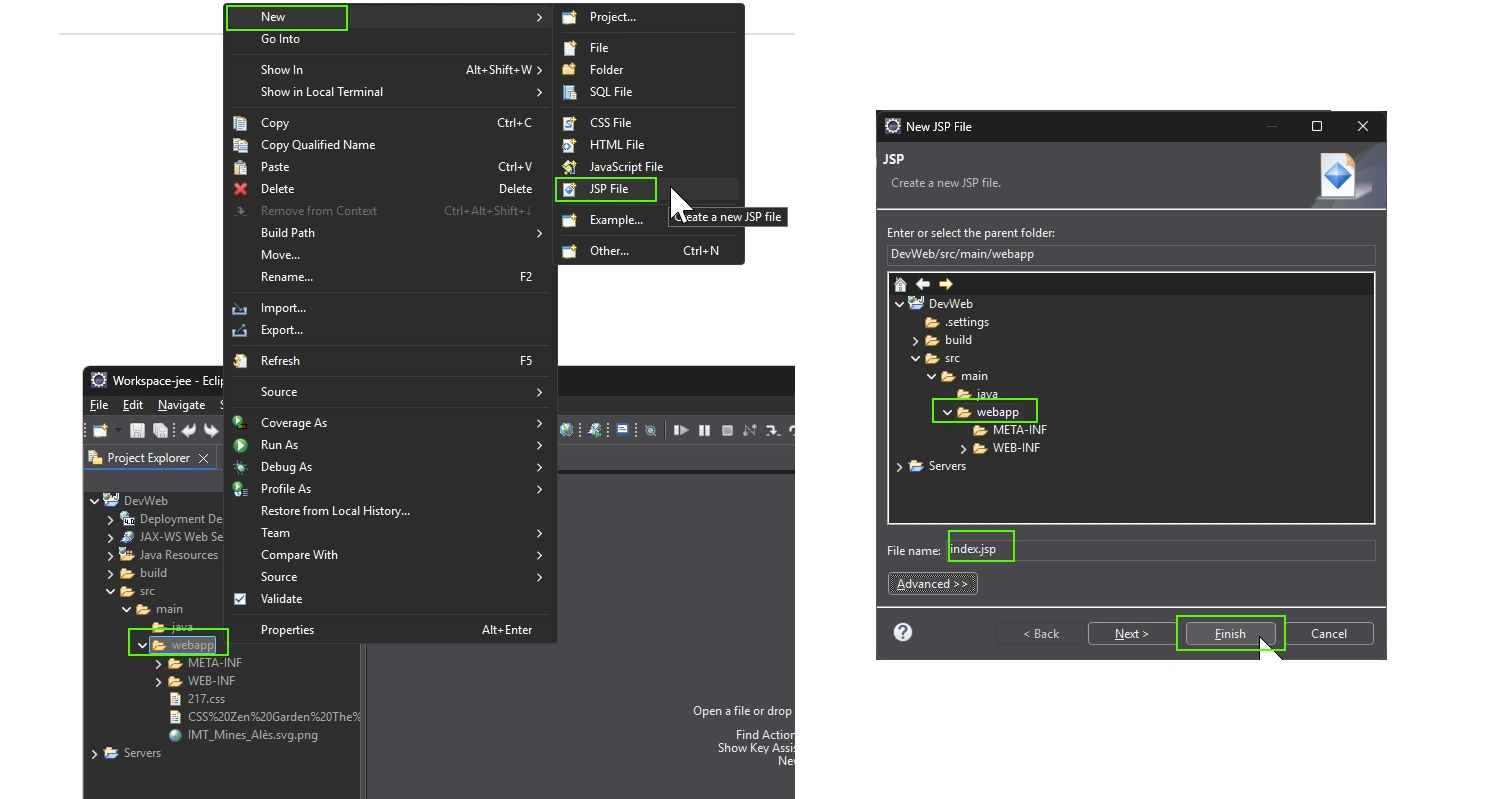
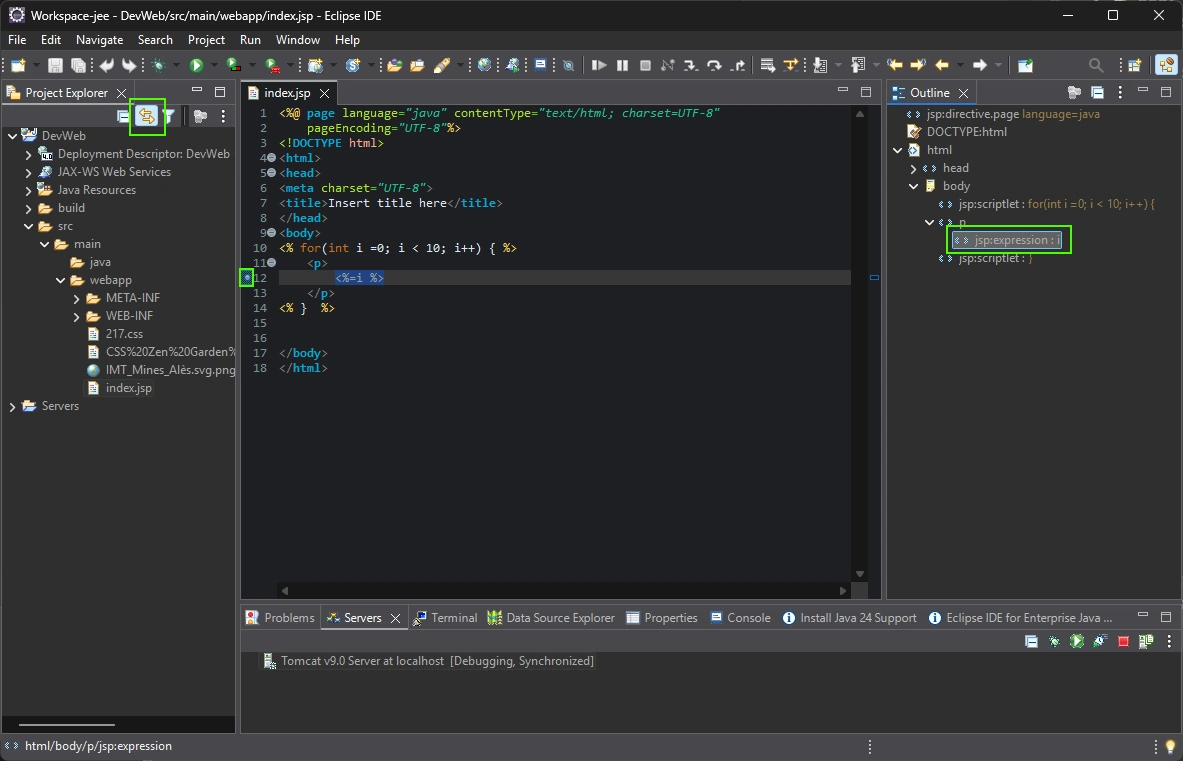
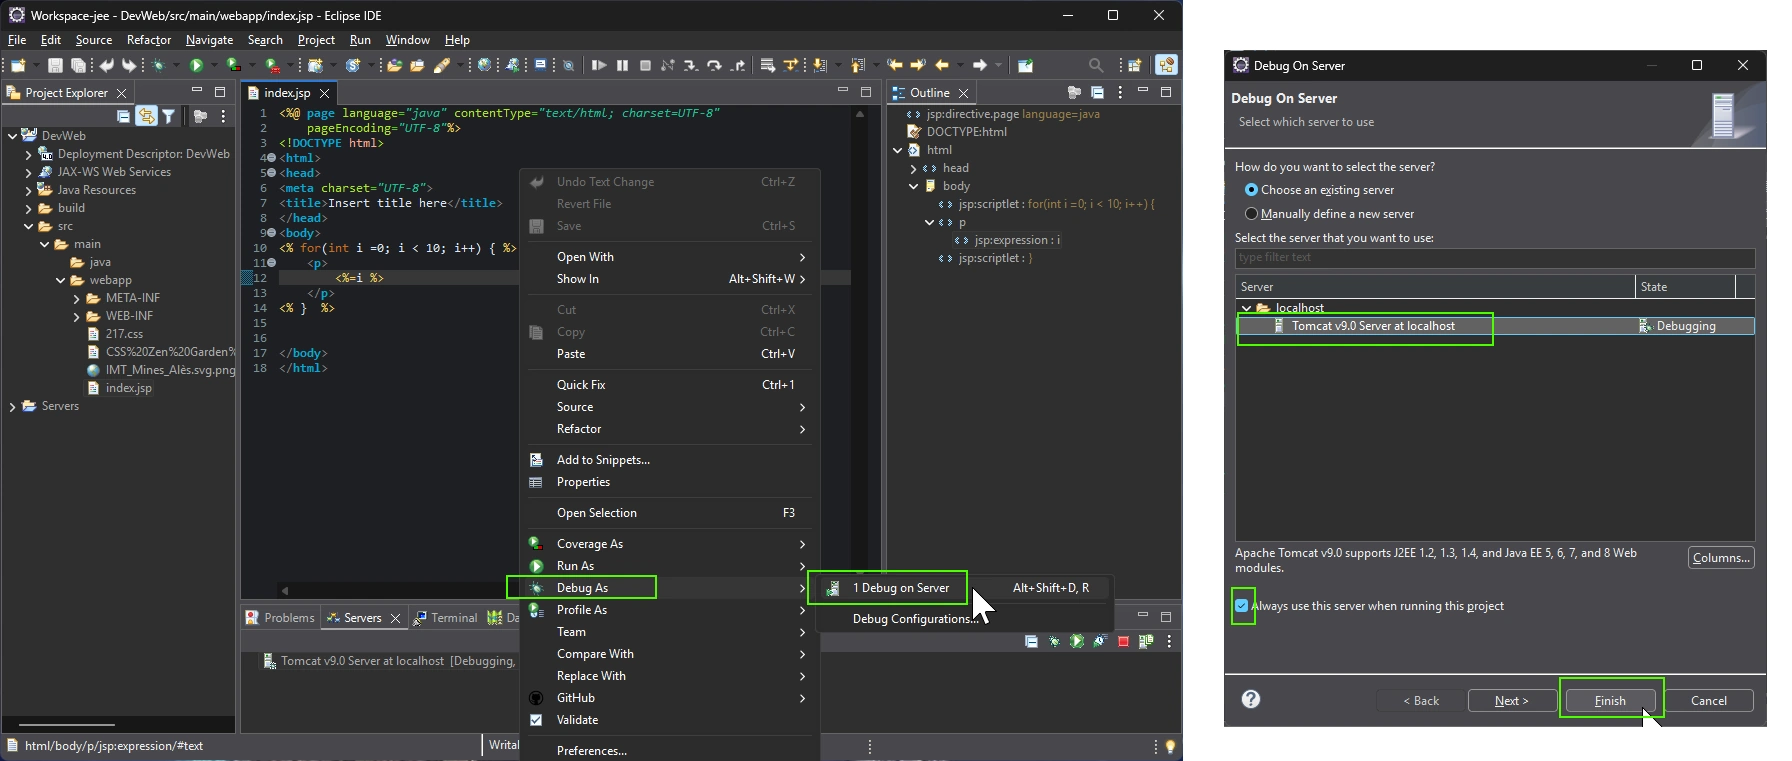
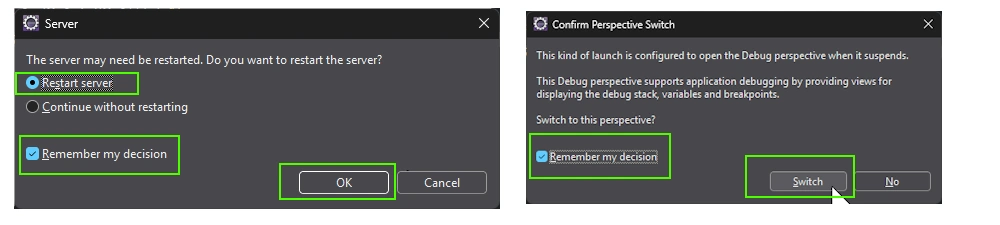
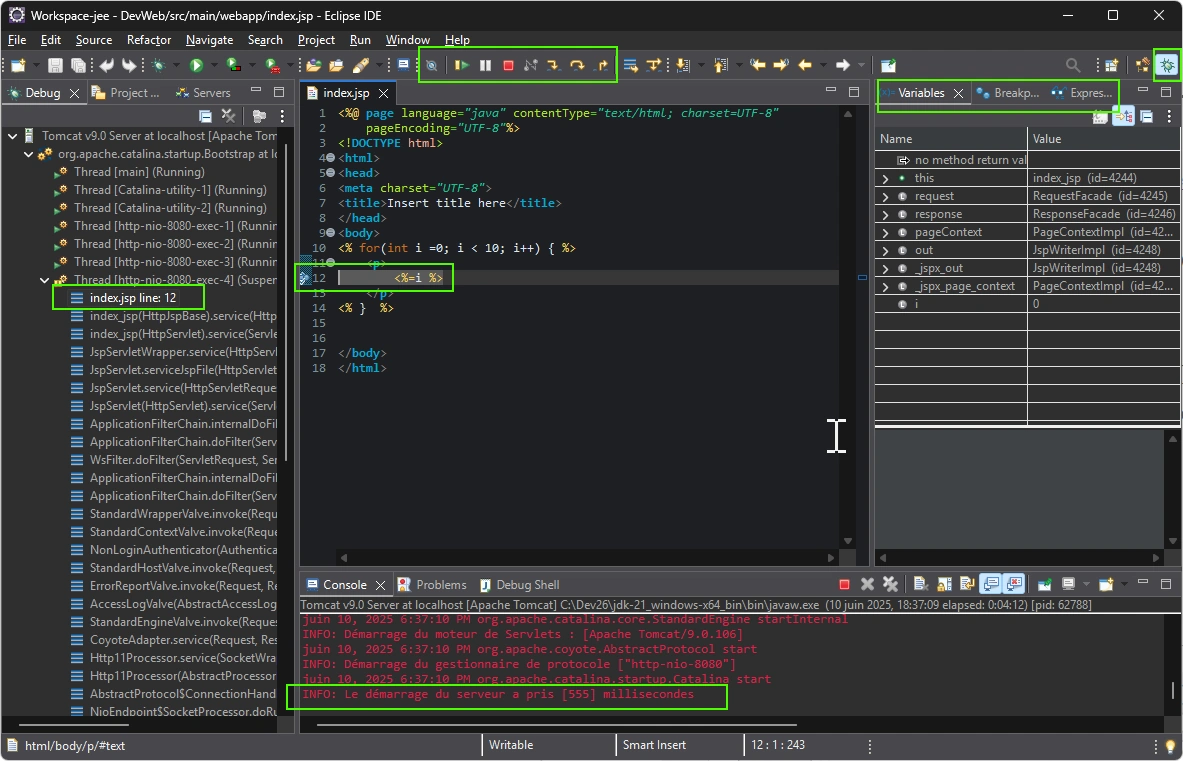
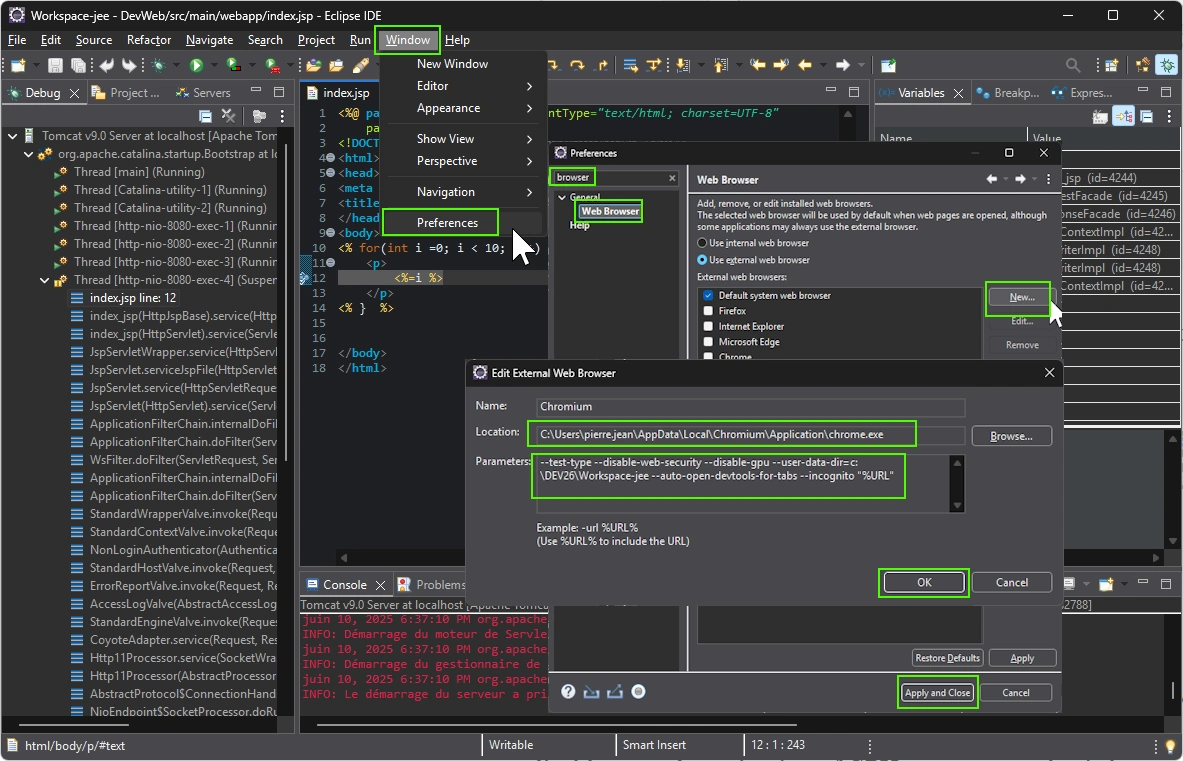


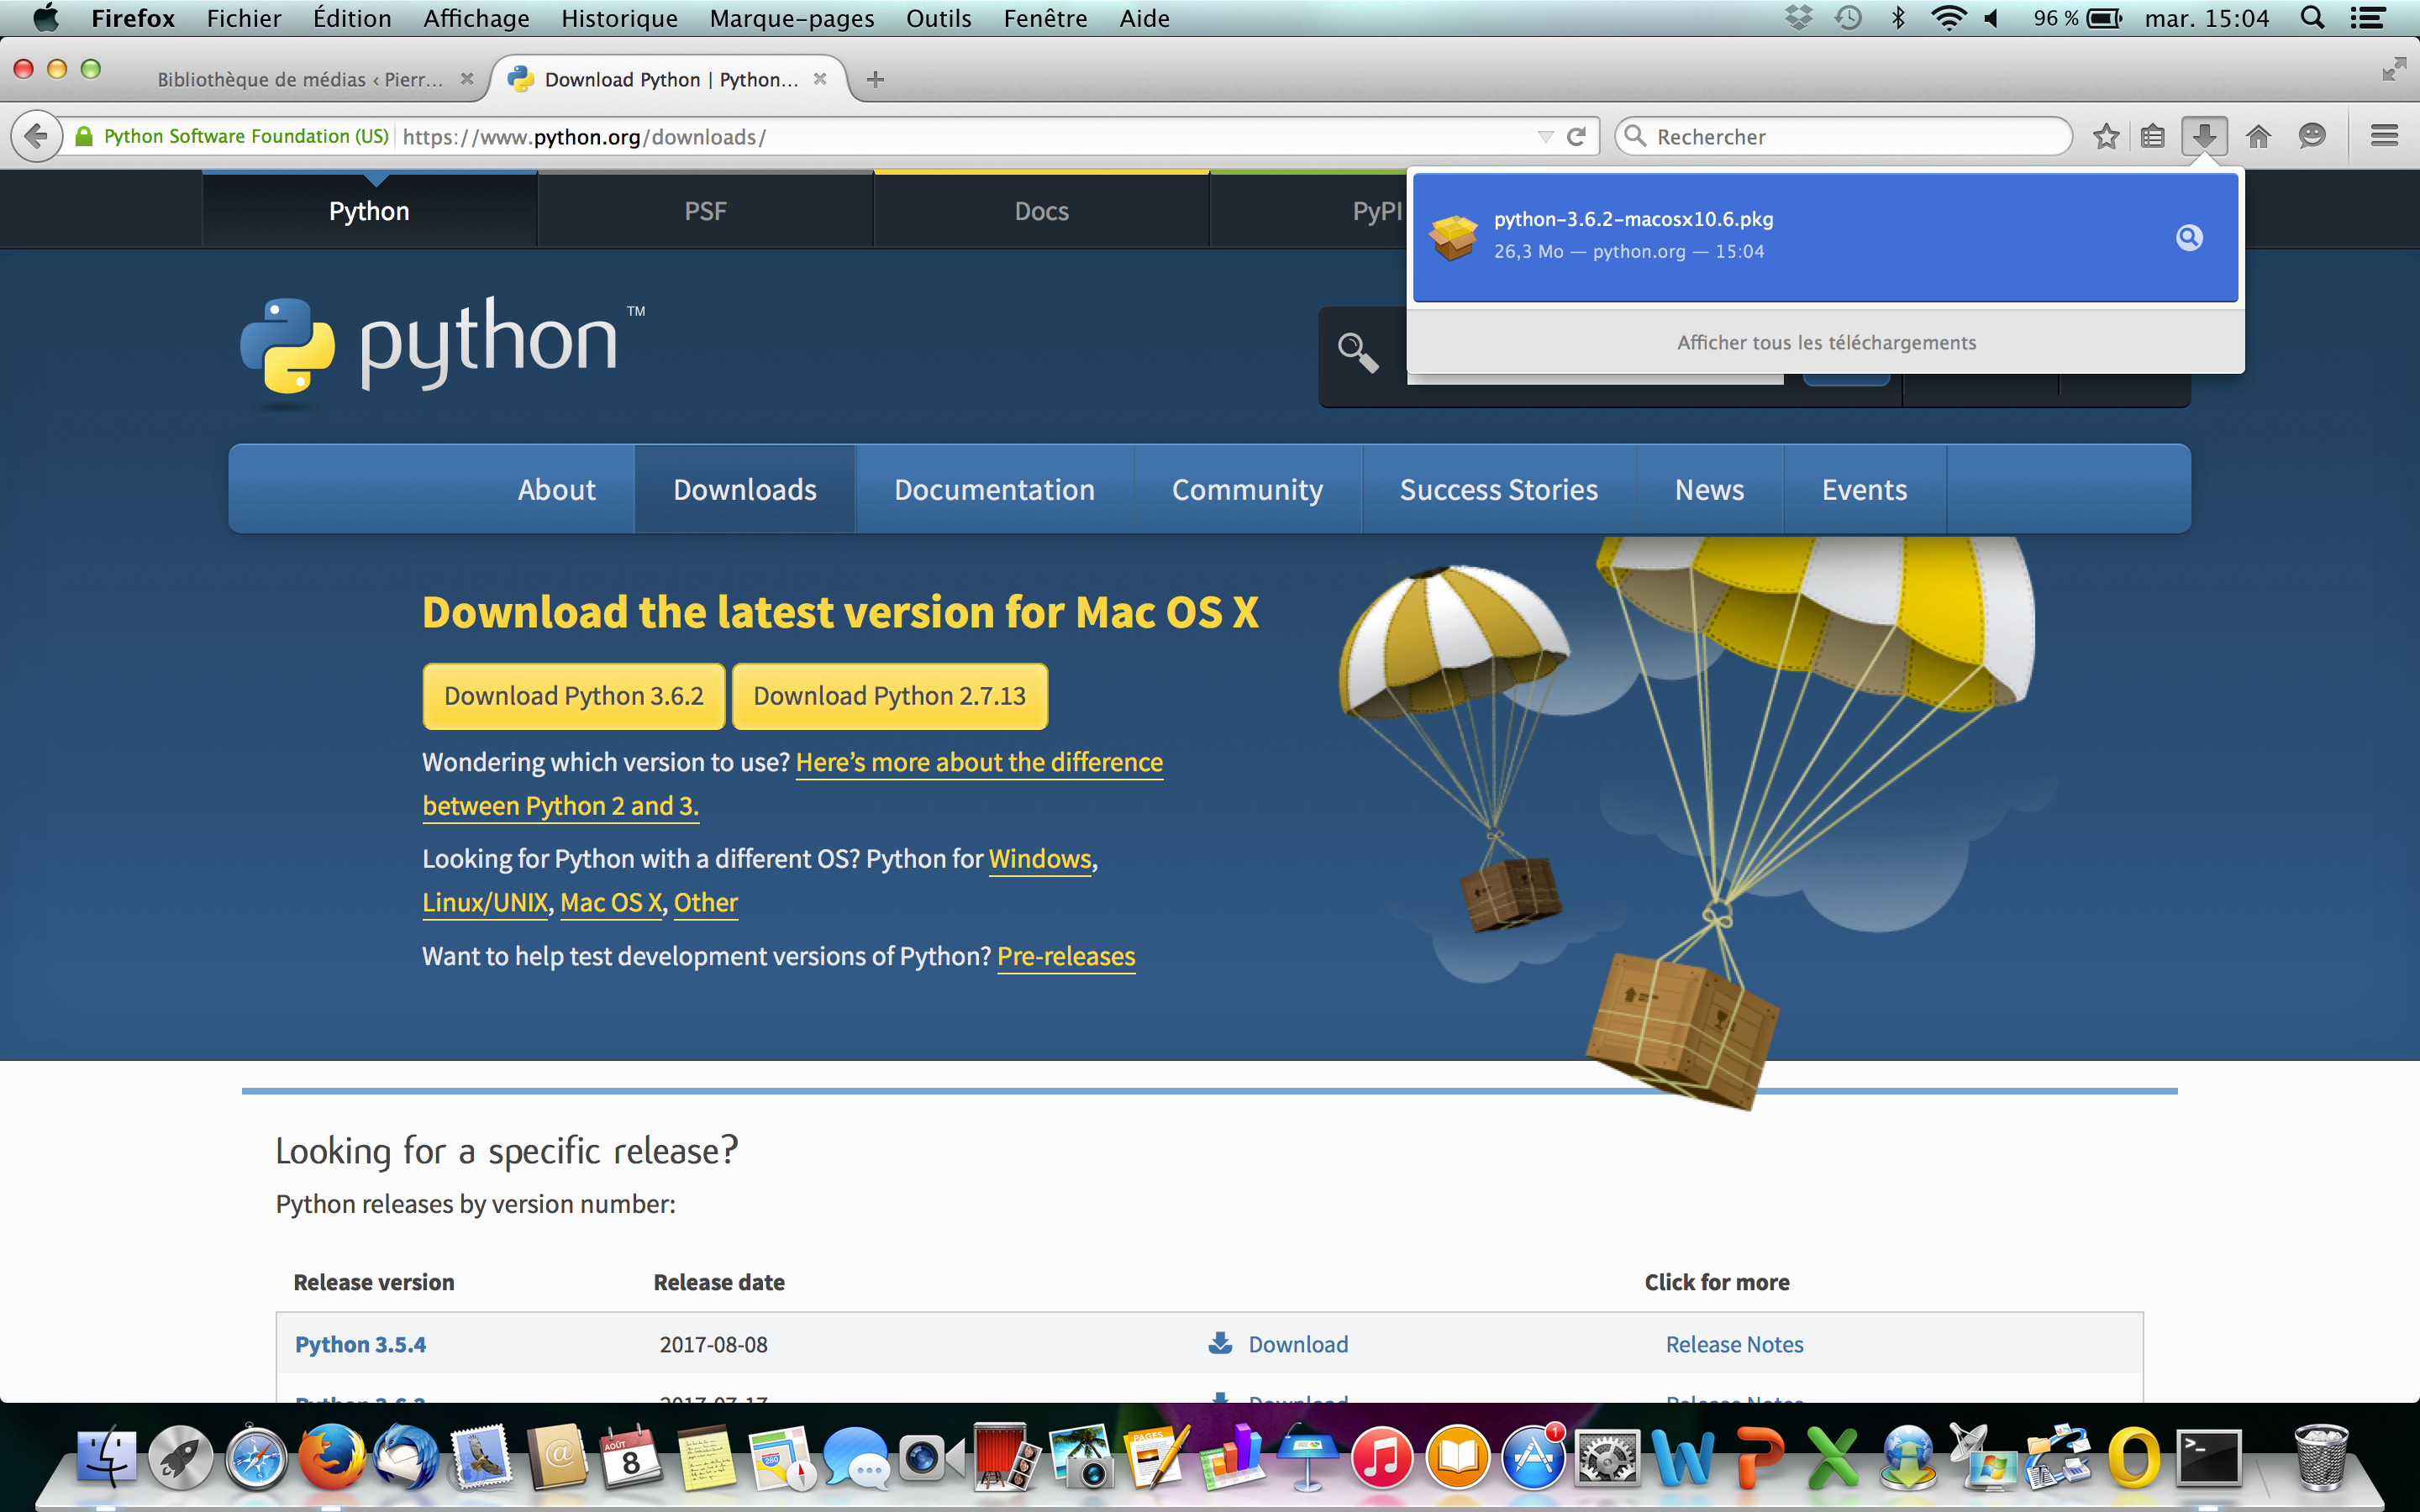


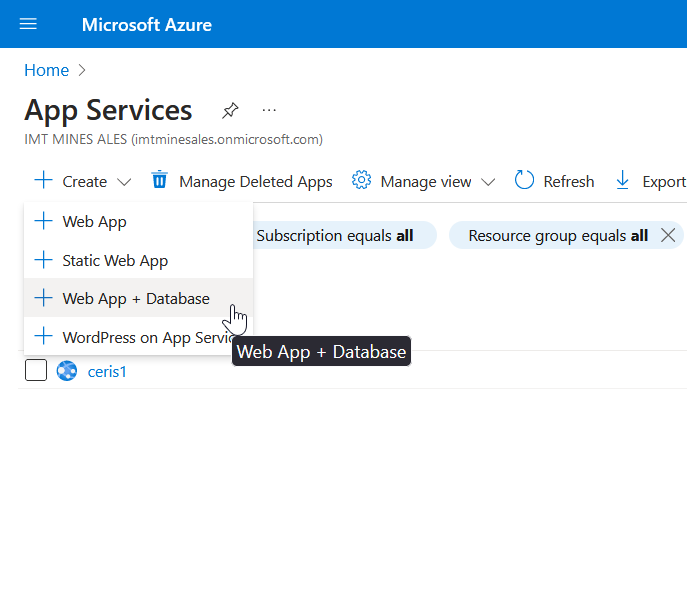


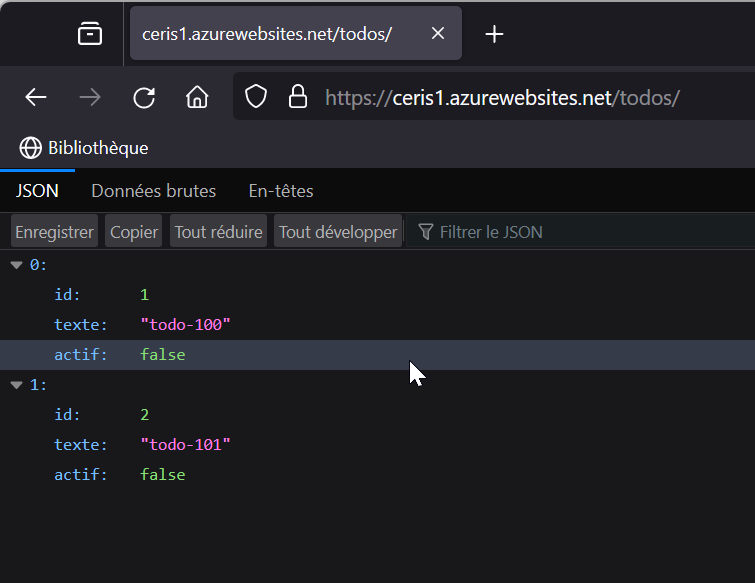


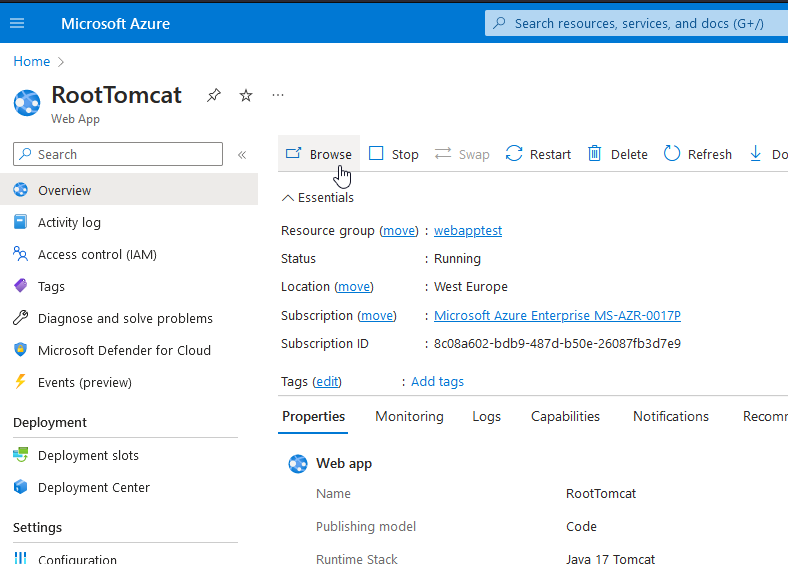


