Using GIT command is an important skill to acquire for a developer and even all « code user » generally speaking. I truly recommend the software/serious game, Oh my git ! to learn step by step from the beginning as not an expert but a quiet good deeper into GIT’s mechanisms.
Before create a French translation, I write here my vision of a solute and some additional explanation about this incredible software. On each lesson, you can choose to write the git command line on the top right as a computer terminal or to play one of card which represent git command :

You can find the courses from the level zero at top to advanced level at the bottom and event a sandbox area to train. You do not need to install git, it will package into a subfolder where you install the program. Version is compatible from Windows, Linux and MacOs.
List of lessons by category, first one is green because I succeed, and the small terminal symbol is to show I use no cards only terminal :

The final sandbox category offer you just to practice with no specific goal.
Time to work, it could be useful to use, Oh my git! not in full screen, you can create a text file named override.cfg with the following contains:
display/window/size/fullscreen = false
The game will be into a separate classical window.
1/ Living dangerously (levels\intro\risky)
The first lesson will just to show you how to edit a file into the game :
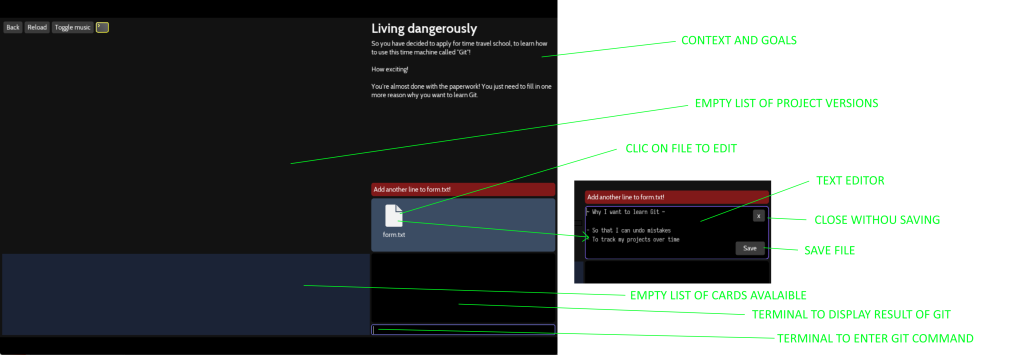
Only one file « form.txt » where you can edit the content and at any new line content to « win ».
The big dark grey area will be used to display a list of project version. A project with git is usually a folder contains files and even other subfolders. Into this lesson, there are no previous versions.
On the top right, the context and the goal of the lesson is detailed. There are usually not linked of any programming context, just small story on chains of operations on file.
At the bottom, the dark blue area will display cards (none at present) and on the bottom right, black are will display output from git commands (even if you use cards or terminal).
The most bottom right are is to enter git command, usually starting by git. Some additional commands are used commons on Linux system and macOS and most supported by Windows.
The red area just below instructions and goal will turn green if you succeed.
At the top left, 3 buttons to got « back » to the menu, « reload » the exercise, and « Toggle music ». If you succeed, a new button will appear « Next level », we are into a serious game ;- )
2/ Making backups (levels\intro\copies)
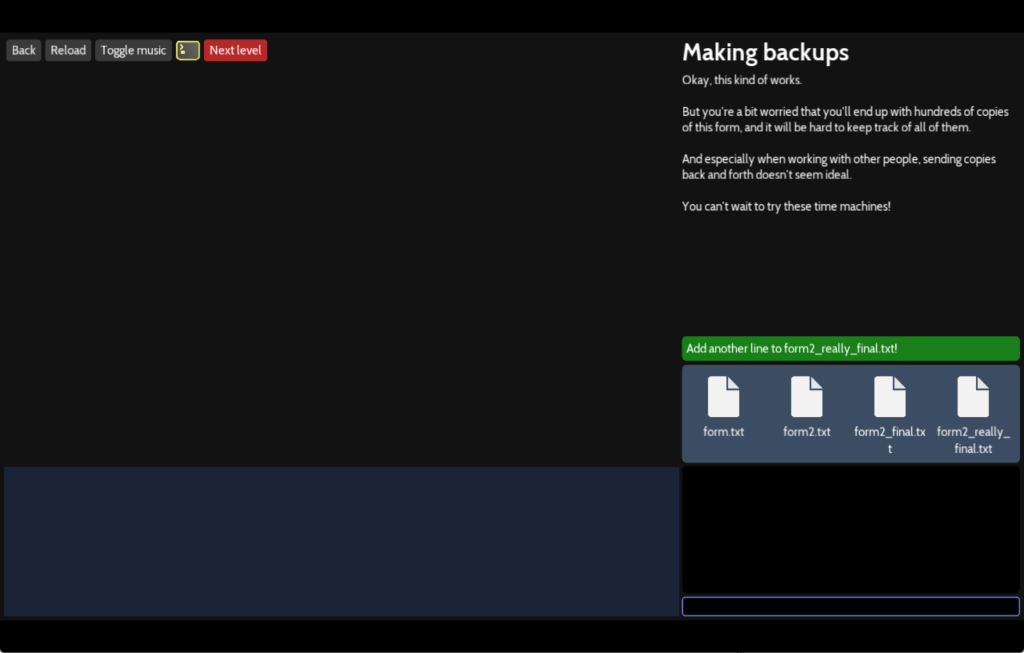
The next level is just to show 4 versions of a file, you should recognize a situation into a project with copies of the same growing content with a basic way to label versions.
Just add a content to the last form2_really_final.txt file, and you will learn how GIT will help you to avoid the mess if the number of version grows with collaboration.
3/ Enter the time machine (levels\intro\init)
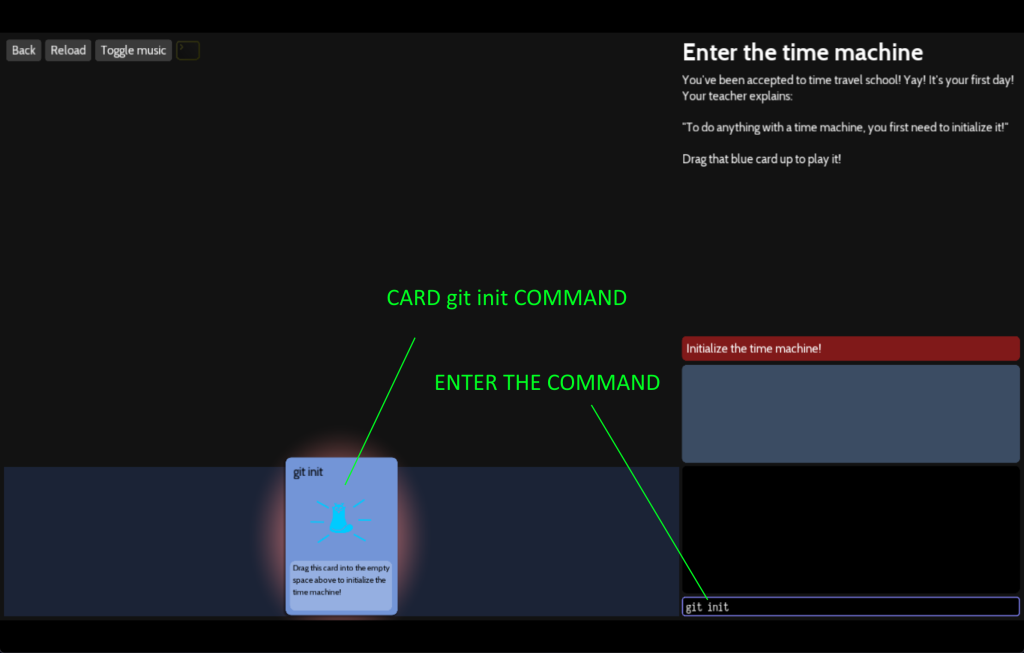
First playing part, you can even play the « git init » card or enter the « git init » command to start creating a hidden folder .git into your project and start using git. Let’s try :
The result display a « blue squirrel » which represent an important concept of GIT: the HEAD.
Suppose you have 3 versions of one project : V1, V2 and V3. GIT is supposed to reference one version with the HEAD. This is the version that your hard drive will store. If you change the HEAD from V3 to V2, you will see store into the folder of your hard drive files from the V2.
We can say it the cursor of the time machine slider.
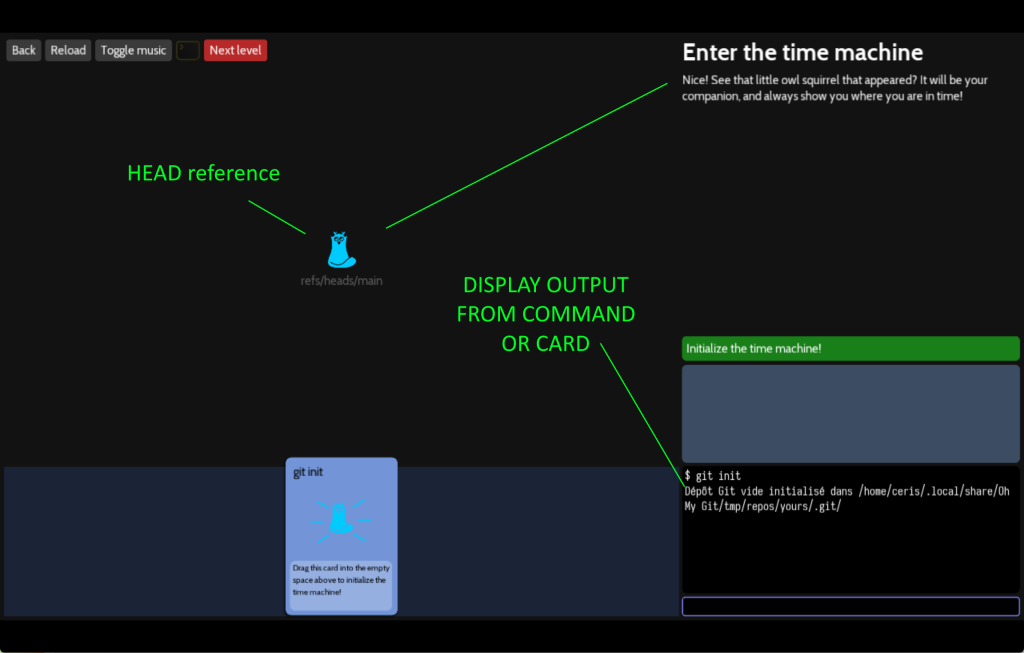
Output command of « git init » confirm everything is fine and working.
4/ The command line (levels\intro\cli)
At the bottom right, you can enter command line, and the interface will list you classical command you could use. Here you can see « git init » and « git add » command show. The TAB key will fill the terminal with the first choose.
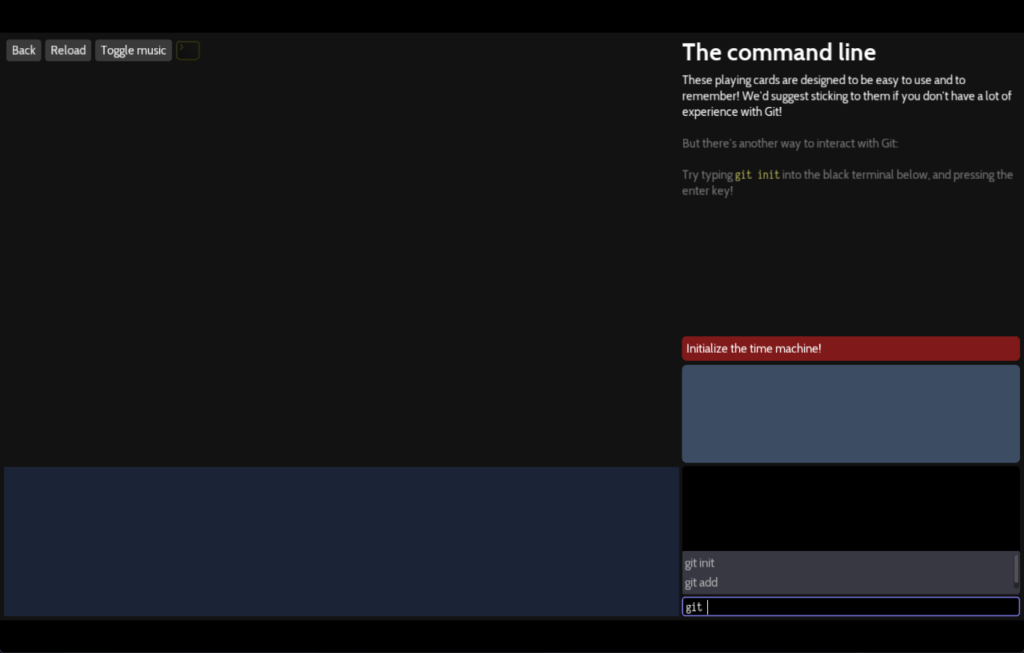
This level is just to enter command by hand if you want to succeed.
NOTE: you can press UP KEY to browse into the command history list of previous commands to avoid enter and enter command.
5/ Your first commit (levels\intro\commit)
The next level starts with an already initialized with « git init » command project (HEAD / blue squirrel visible). You are supposed to have a file named glass with one line of text :
The glass is full of water.
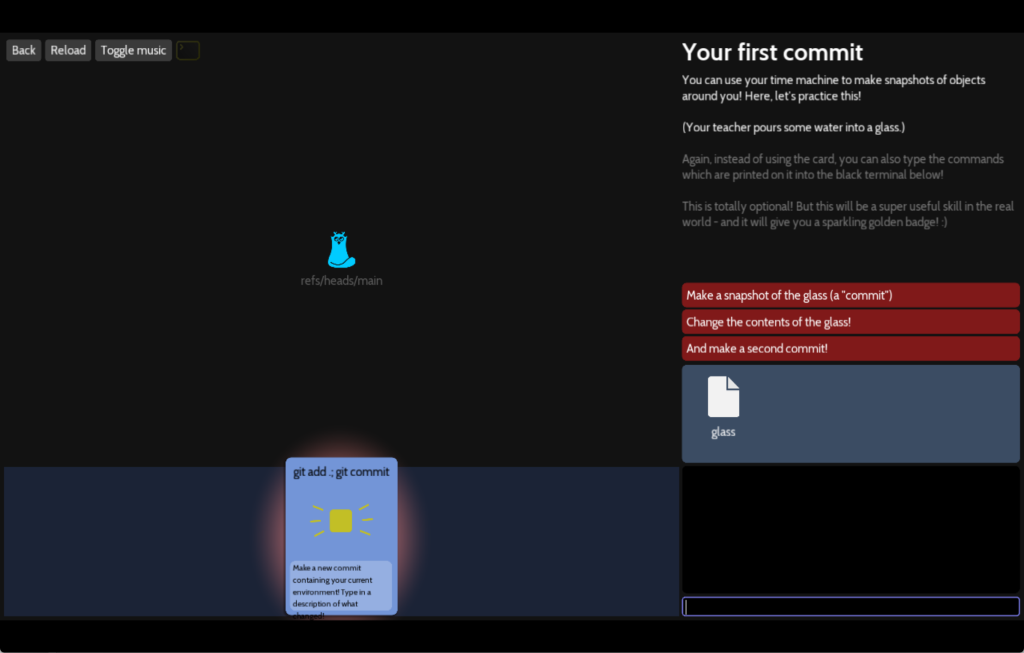
NOTE: even if the project included the glass file and even if the « git init » command is executed into this folder, GIT do not supervise the glass file.
So the card shows us in fact 2 commands: « git add . » and « git commit ». Those commands are used often together, but let dig in :
- git add . : will ask GIT to supervise all files and folders inside the project folder. In our case we can execute « git add glass » command to ask GIT to supervise the only glass file but in other lessons we will have different filenames and not only one file, the dot is the common way to ask GIT all files.
- git commit : This command is not enough, the correct command should be : git commit -m « Description message to this project version/commit version »
We can enter separate commands, but the one line version (separate by semicolon) is a good way to use GIT :
git add . ; git commit -m "Water inside the glass"
Now we will have a stored version of our project called a commit, that’s the yellow square and commit message will be display if you move your mouse over « Water inside the glass » :
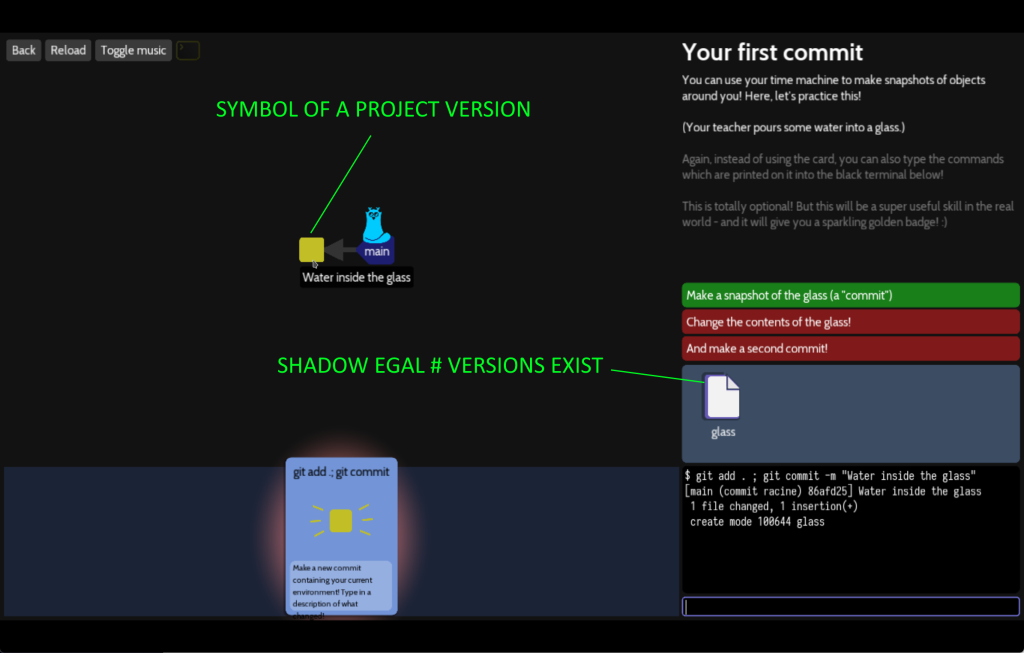
So now, I can edit the glass file, change content/remove everything, save it and GIT know how to bring me back the glass file at the moment I create the « Water inside the glass » commit.
NOTE: the dark blue label « main » symbolize the main branch of versions and HEAD reference the last version of this branch.
Now, I will edith the glass file, change content (« The glass is empty of water. »), save it and open again to check the content is really not the same :
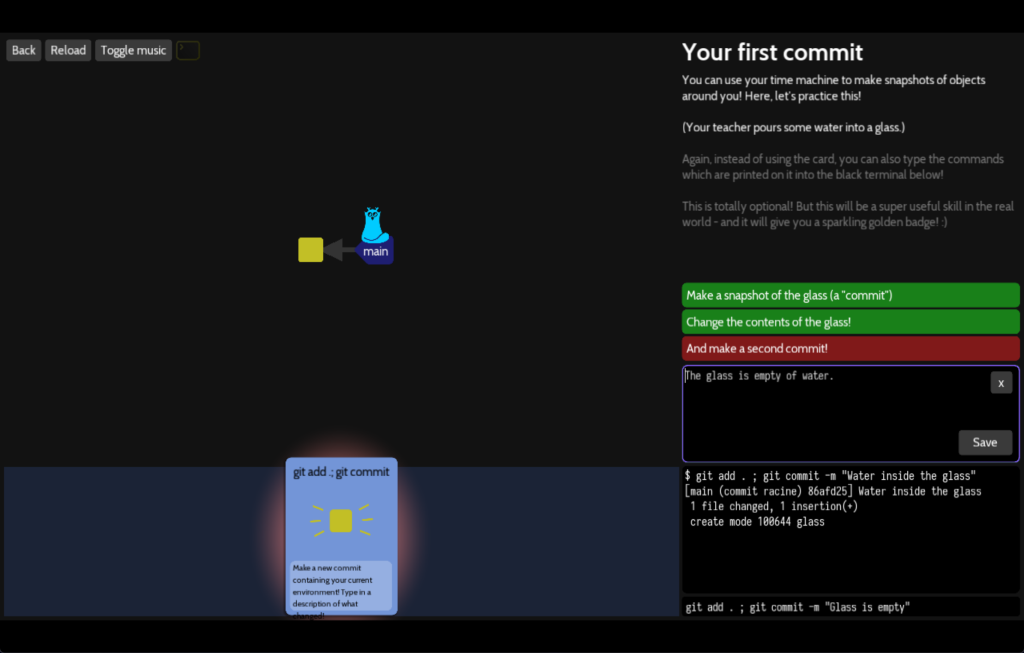
I can write the command to create a new commit version of the project with glass file modified :
git add . ; git commit -m "Glass is empty"
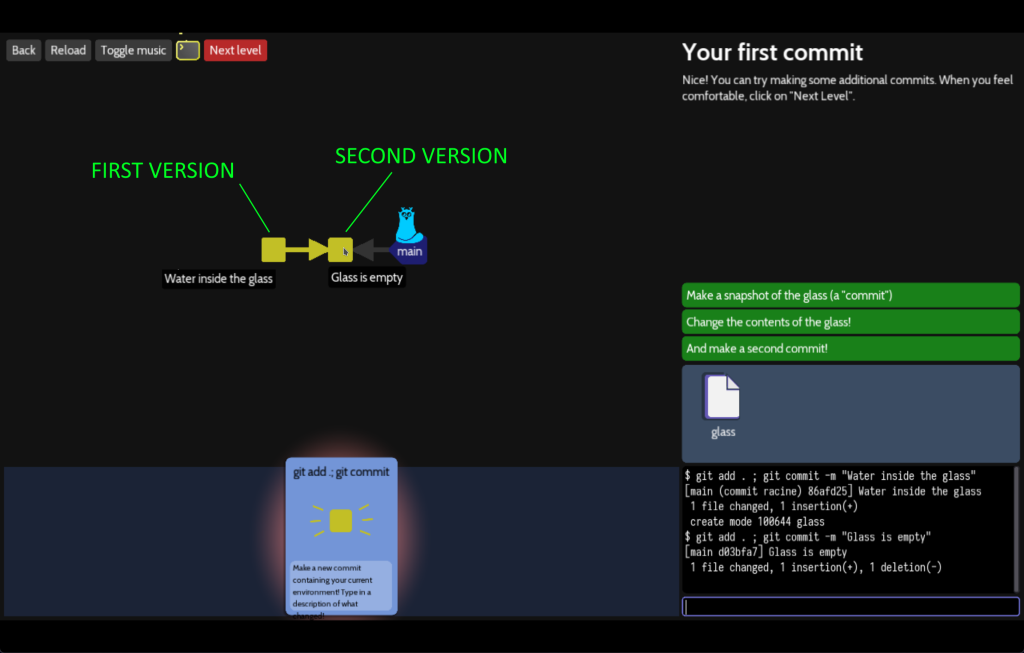
Then, we can see the first version of the project and the second version (only one message will be display with mouse over). The HEAD reference still moved to the last version.
You can use GIT on your computer to keep several versions of files without other command.
6/ Working together (levels\intro\remote)
Now we will work with a main feature to synchronize your project with a futur students file and an other GIT user named teacher into this example. The game will play the teacher, you are supposed to receive a students file, add you name, commit this version and send it back to the teacher :
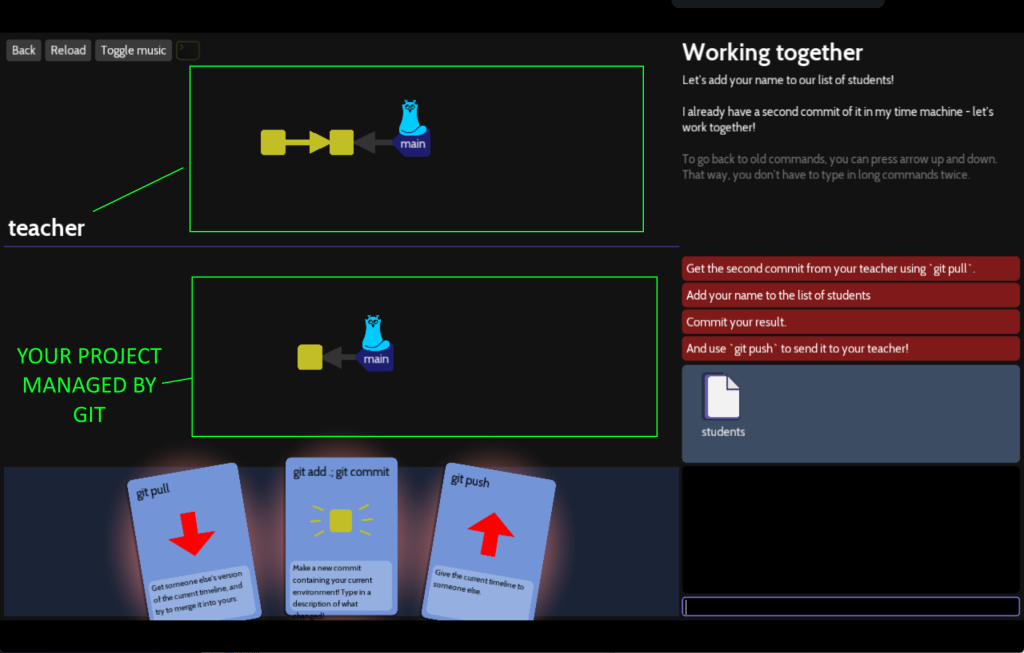
You can see a concept not
The first command is « git pull » to copy from the remote teacher repository the students file.
We have a teacher version of his main branch, include the students file.
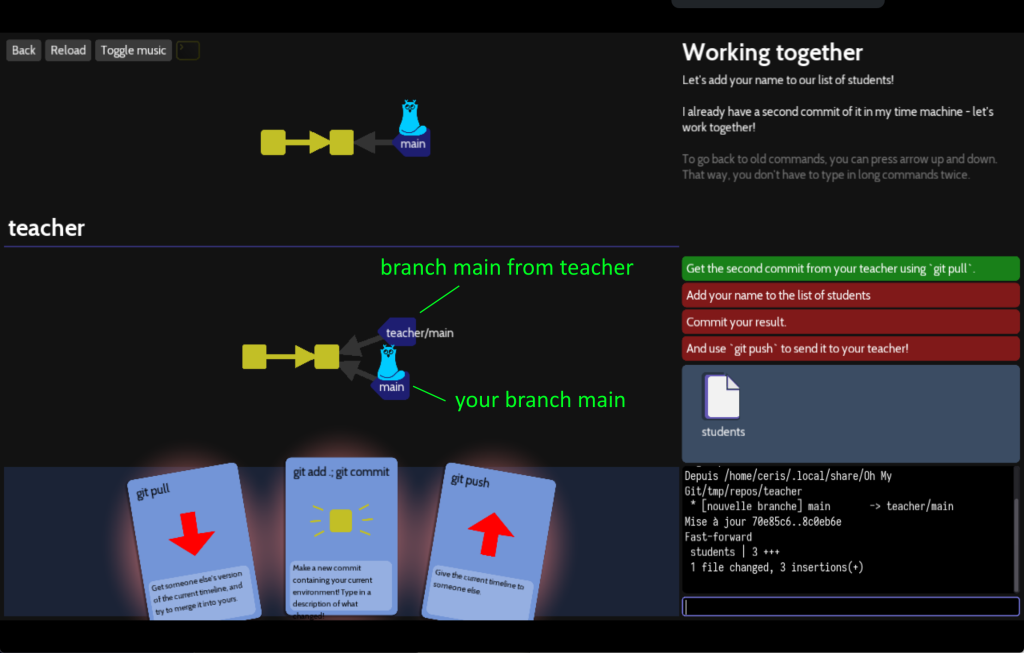
The file content now :
~ List of current students ~

- Sam
- Alex
So edit and save the students file by adding your name and commit
git add . ; git commit -m "3 students"
You see below the file content already save, and the command GIT prepared to be executed :
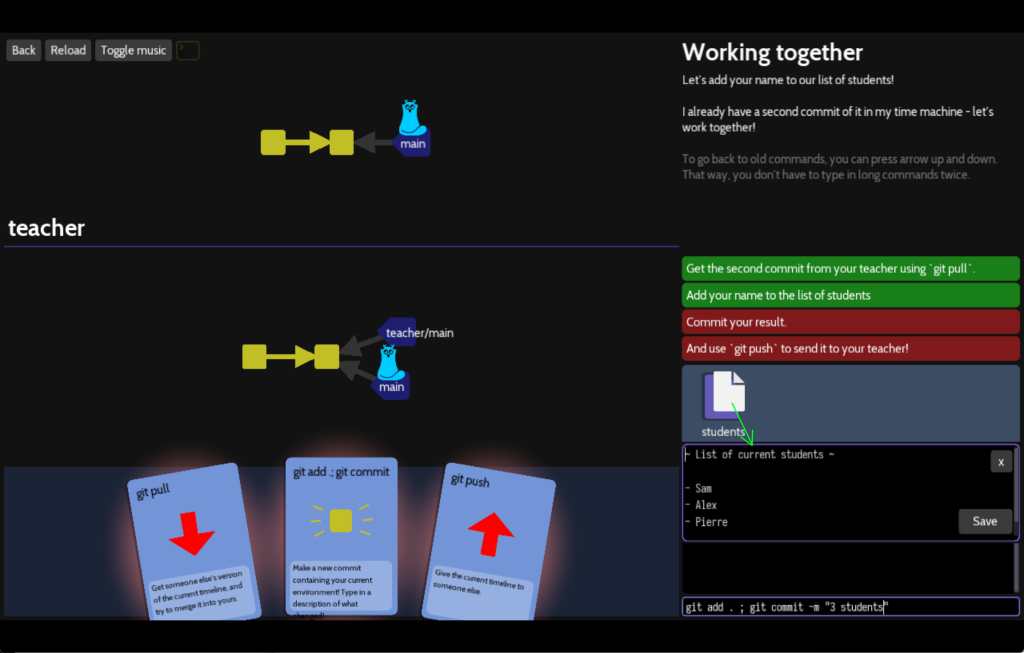
Now, you see below, your local version of the students file is the last version and this different of the teacher version. We can imagine got back for example to the previous version, the teacher one. In fact, we will send our version to the teacher repository.
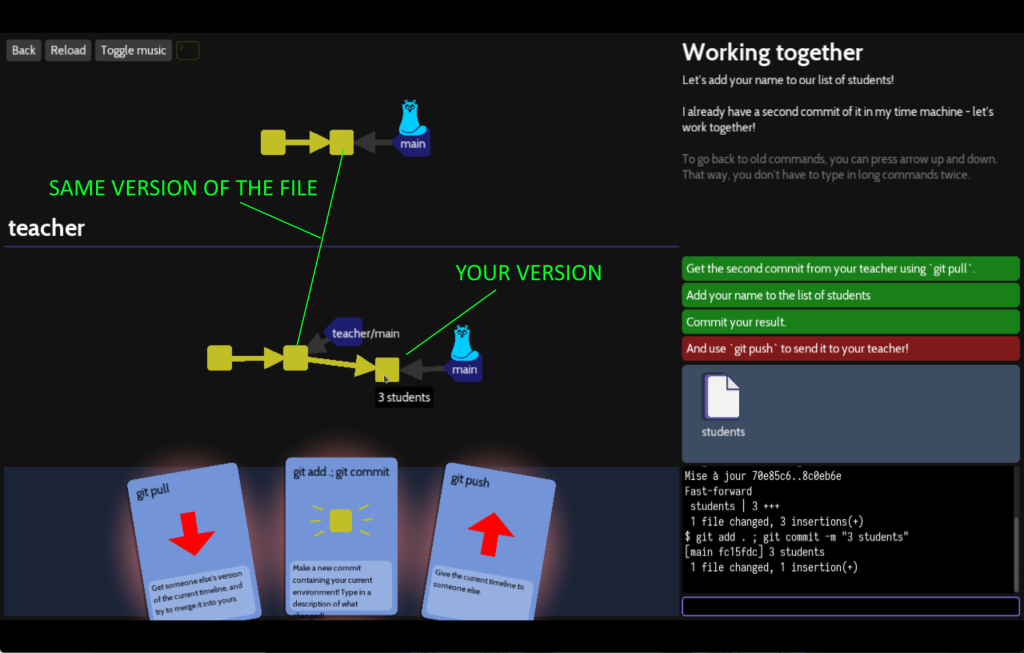
Now, the next command « git push » send your version to the teacher who automatically accept the modification. You see the result, the new version of the students file will be available to the teacher.
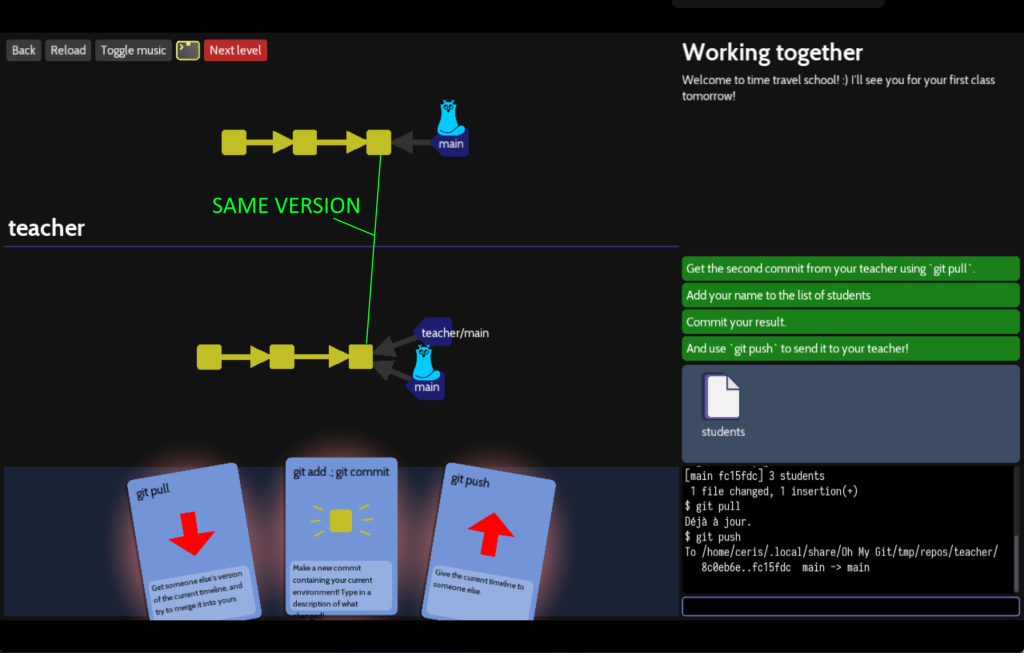
This the end of the first part of the game, let’s move to files catagory.
7/ Unexpected Roommates (levels\files\files-delete)
This level is just to learn how to remove files, option one enter command to remove all files with _web at the end of the filename :
rm *_web
Drag and drop the rm card on each file with _web into the filename.
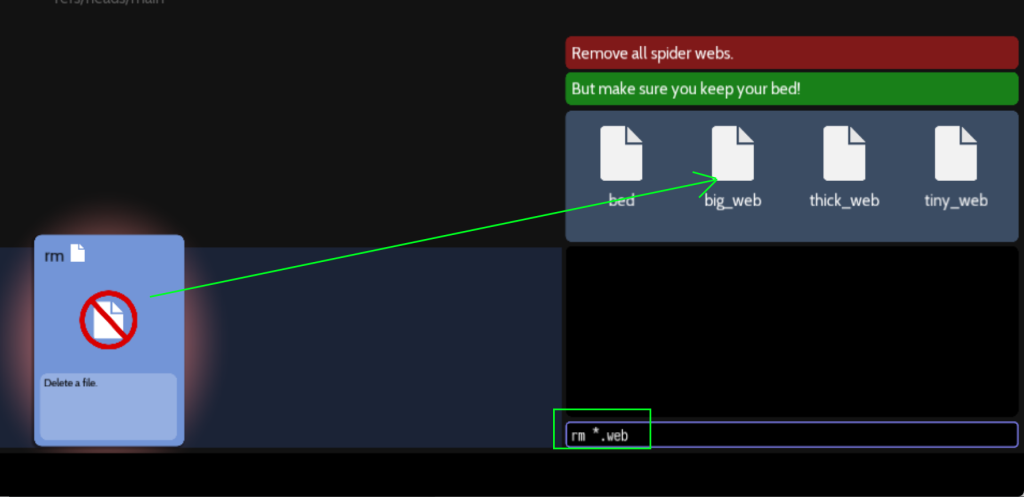
You should still have bed file.
8/ Interior design (levels\files\files-delete)
This level is to learn how to create file, you have a bed file contains « A yellow cozy bed. ». you are supposed to create 2 additional files with the word « yellow » inside.
The command will be just :
touch lamp
Or you can drag and drop the touch card and fill the table name as see below:
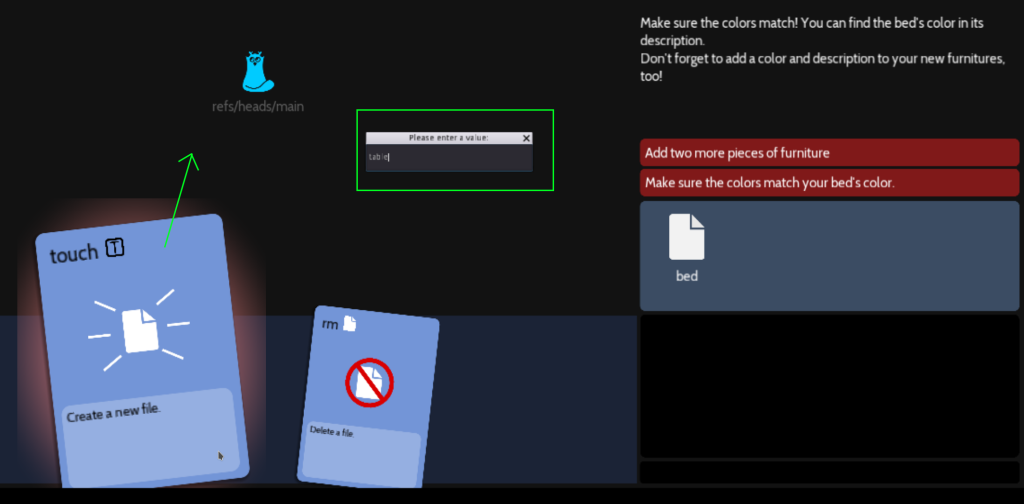
The edit content to add yellow word and save it. The following command creates a file with content :
echo "A yellow lamp" > lamp
You can also create a yellow chair :
echo "A yellow chair " > chair
The next category branches is really important.
9/ Moving through time (levels\branches\checkout-commit)
The « git checkout » command it is the most GIT important command to change the HEAD and navigate from version to version.
We have 3 commits of the project, with sometime one file, sometime two files.
First commit where the HEAD reference at start :
- Commit message « The beginning »
- a piggy_bank file with :
This piggy bank belongs to the big sister.
It contains 10 coins.
Second commit
- Commit message « Little sister comes in »
- a piggy_bank file with :
This piggy bank belongs to the big sister.
It contains 10 coins.
- a little_sister file with :
A young girl with brown, curly hair.
Third commit :
- Commit message « Little sister does something »
- a piggy_bank file with :
This piggy bank belongs to the big sister.
It is empty.
- a little_sister file with :
A young girl with brown, curly hair.
Has 10 coins.
So we understand the story and steps. Now the most important thing to understand with GIT, each commit version create has got a unique number call « chawouane ».
In my screenshot the « git log » command show the « chawouane » ddd8b8ca6fc2891c6311d3ed620d1a2acbb1b74f for the first commit (the HEAD commit)
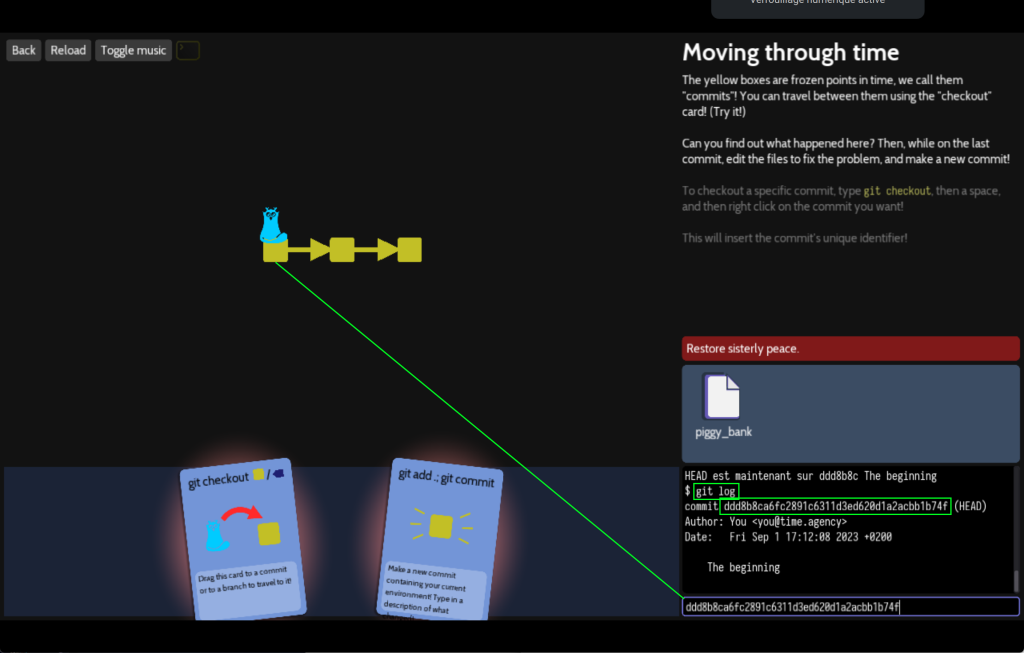
You can also right-click on the yellow square commit symbol to paste the « chawouane » code into the terminal.
NOTE: you can use the « chawouane » short version, indeed the 7 first characters « ddd8b8c » as equal as the long version.
Now to move forward, we can enter the « git checkout » command and right-click on the next commit to paste the « chawouane » code or play the card on the next commit :
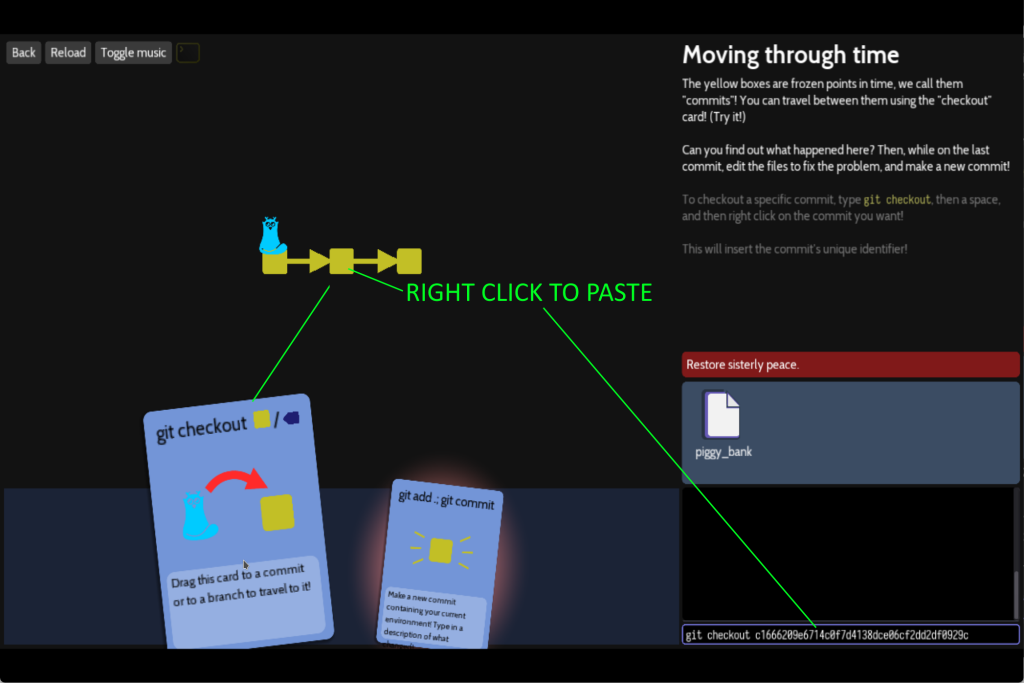
The now, the HEAD is on the second commit, we will see the second file little_sister inside this commit :
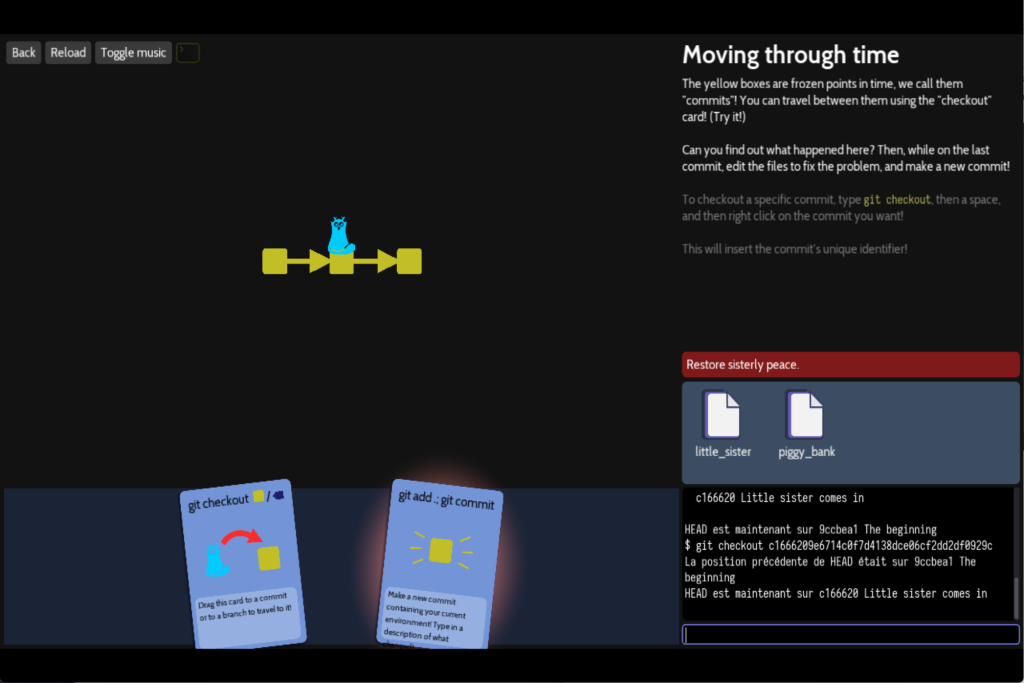
Of course, we can move to the last commit with the same method : « git checkout » command with the last « chawouane » code or again drag and drop the card on the rightest yellow square.
Then into this commit version, we will remove the « 10 coins » from the little_sister file and place the phrase « 10 coins » inside piggy_bank file (don’t forget to save file).
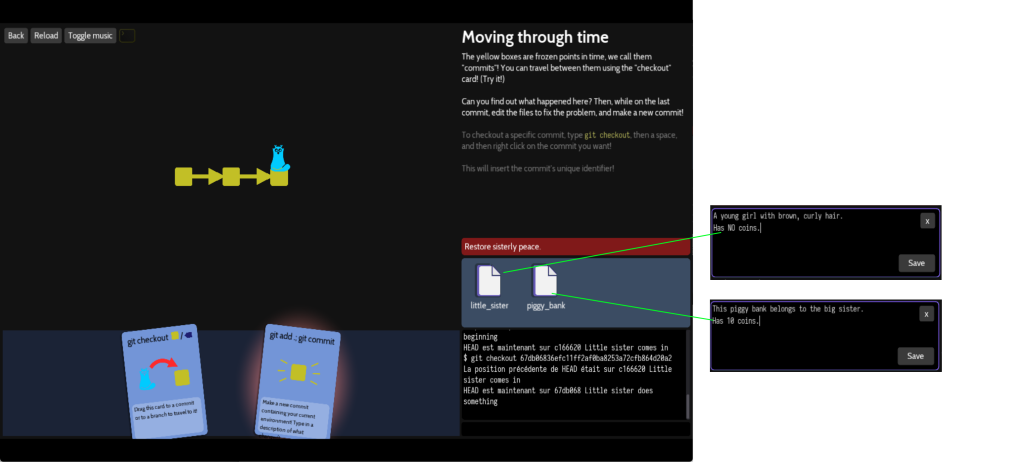
Then to validate this version, the command will be :
git add . ; git commit -m "Restore peace"
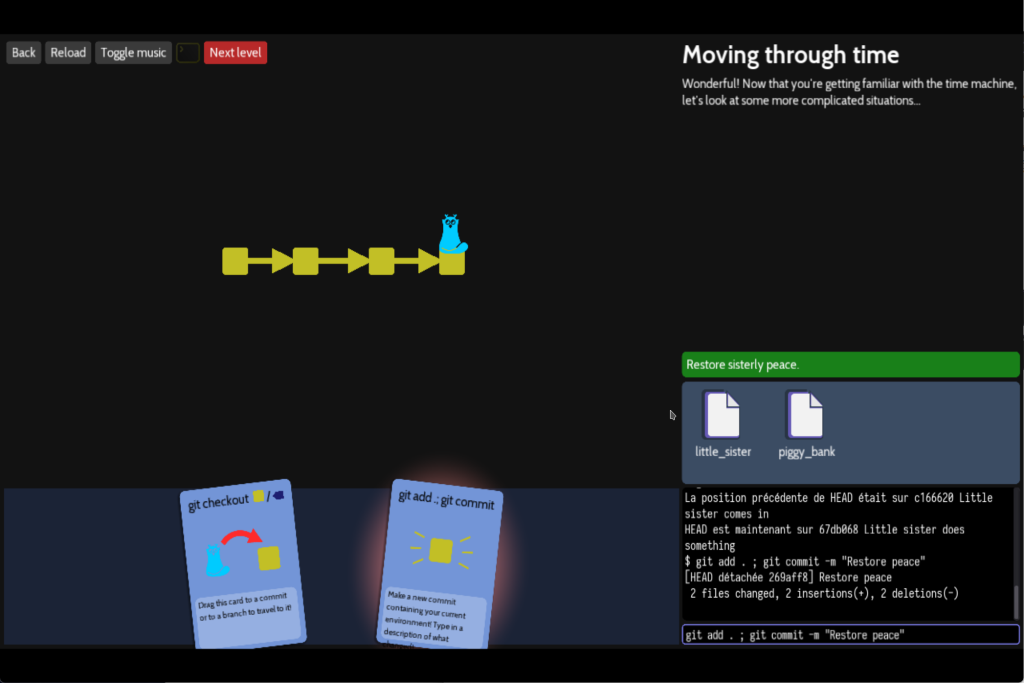
GIT shows several important information:
- 2 files changes with this new commit version
- HEAD reference move to commit « chawouane » code 67db068
10/ Make parallel commits (levels\branches\fork)
This level will let you move back and front into the timeline with « git checkout » command but you can also move backward with « git checkout HEAD^ » command. There is no move forward equivalence, you will have to use « chawouane » code.
Here the timeline of commit message to understand when something goes wrong:
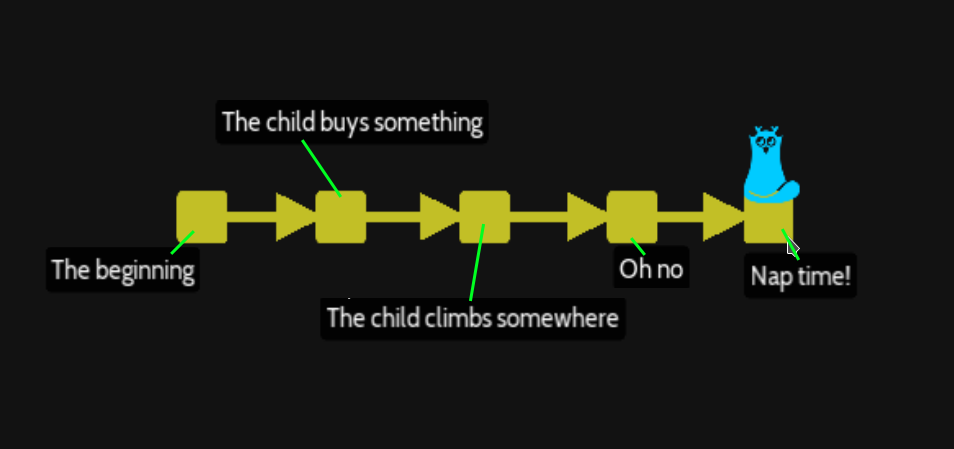
So we can move back from HEAD, as proposed the command could be :
git checkout HEAD~2
Now we have to edit, cage/child file with this content :
A small child.
It's really loves cats.
It's give a lion a lollipop.
Then edit also the cage/lion file with content :
Looks very happy with a lollipop.
Now time to commit to create a new story with :
git add . ; git commit -m "Happy ending"
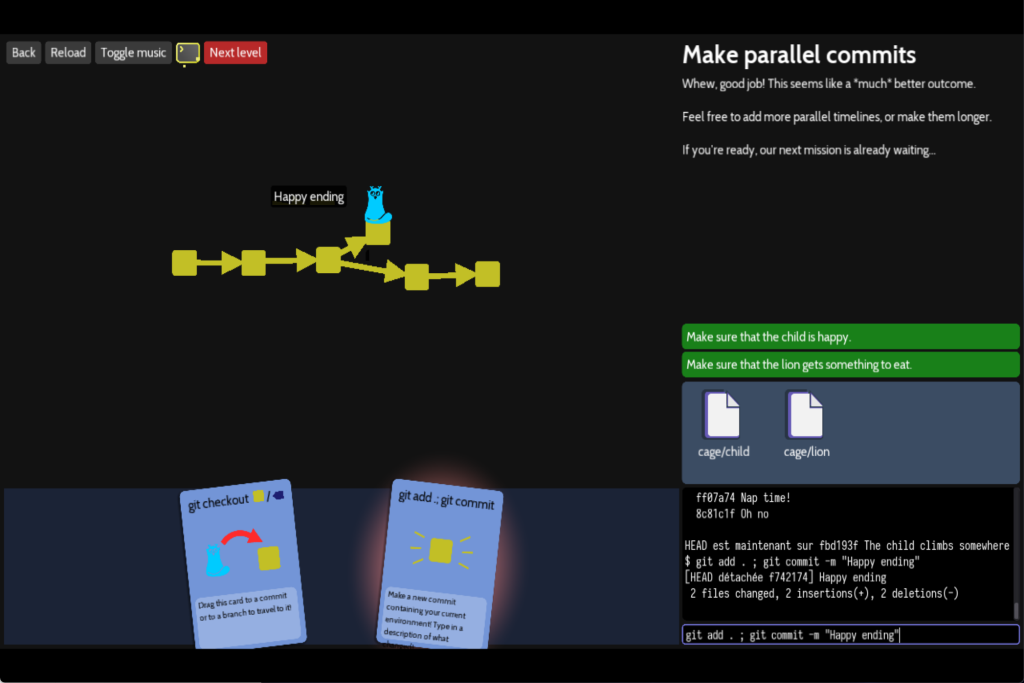
A new branch is created with a diferent story.
11/ Creating branches (levels\branches\branch-create)
Now we will manage the fork/branch to identify each way individually. We have 3 commits, the initial one where HEAD is placed, here is the name of other commits to understand :
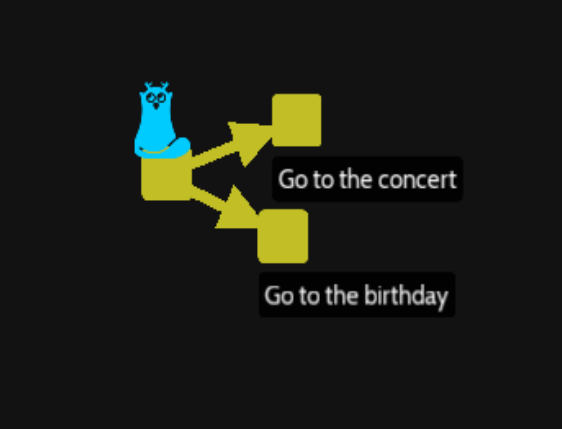
We want to create a name of each branch to easily checkout from one to an other. So move to the « Go to the concert » commit with the « chawouane » code then at this place create a branch :
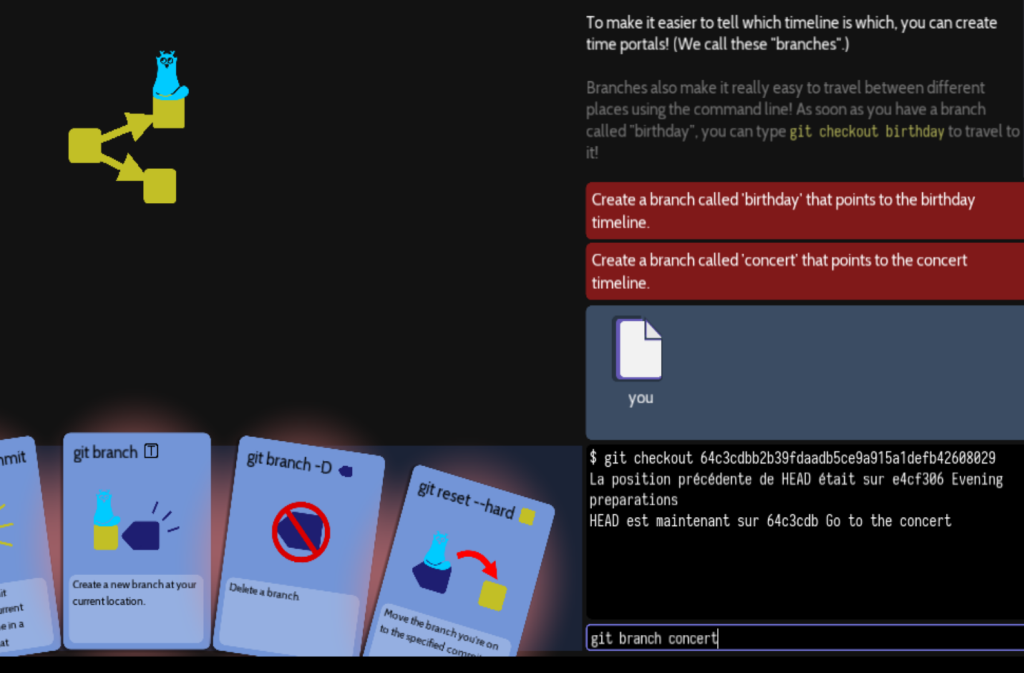
That will create a branch name concert reference this branch of versions :
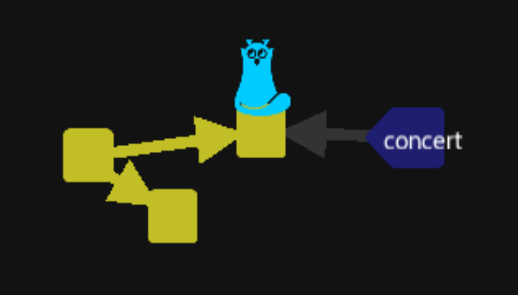
NOTE: HEAD is not linked to the « concert » branch only on the last commit of this branch. That could be tricky as we see later. The recent version of git accept a creation and a move of the HEAD with git switch — create new_branch, but we will see later also.
Now go to the birthday branch and create it as we did :
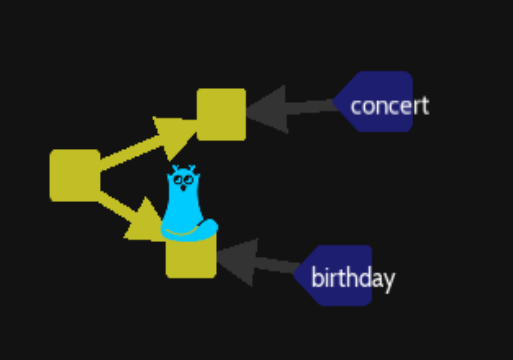
NOTE: we can also delete the concert branch with « git branch -D concert » if needed
ADVANCED TRICK: if you really want all the commit event at the starting point of this level when you are on the first one :
git cat-file --batch-check='%(objectname) %(objecttype)' --batch-all-objects | grep 'commit$'
This command will just display all the « chawouane »code then you can loop on to display comment on :
for chawouane in $(git cat-file --batch-check='%(objectname) %(objecttype)' --batch-all-objects | grep 'commit$' | cut -f1 -d' '); do git log --format='%s %h' -n1 $chawouane; done
In fact the first part, will extract the « chawouane » code from commit (and not for blob or three files of git) and remove the word « commit » :
git cat-file --batch-check='%(objectname) %(objecttype)' --batch-all-objects | grep 'commit$' | cut -f1 -d' '
Then we will loop with $chavouane variable do execute on each « chawouane » code
git log --format='%s %h' -n1 $chawouane
This will display the comment and the sort version of the « chawouane » code as :
Evening preparation 2090c72
Go to the birthday  24d1d4
Got to the concert  792b42f
12/ Branches grow with you! (levels\branches\grow)
This level use the previous configuration with 2 branches « concert » and « birthday ».
Do you reminder that we have to find the « chawouane » code to move at the end of a list of commit versions, now with named branches, to go at the end of the concert, just :
git checkout concert
To win this level, just edit the you file and add one line for example : « This is great » and commit as usual :
git add . ; git commit -m "This is great"
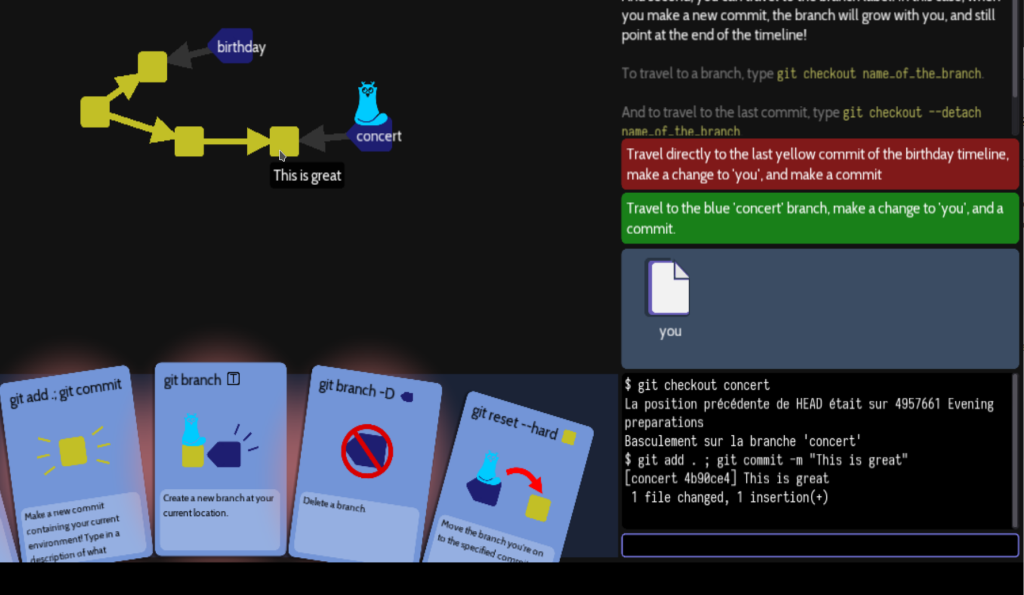
The HEAD reference is linked to the concert branch name, so a commit on the HEAD will let move branch name also.
Then you could go to the last birthday commit but not with the branch name only on the last commit, change you file and create the new commit :
git checkout <chawouane code>
Then edit you file and commit the new project :
git add . ; git commit -m "Go to birthday party"
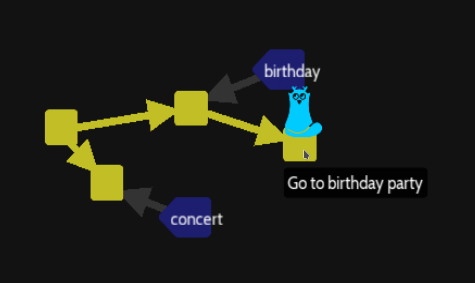
In this situation, our HEAD moves independently with the birthday branch name, creating a top commit not linked directly to the branch birthday.
So in the end, we can succeed the level with this kind of operation :
git checkout concert
echo "It is great to go to concert" >> you
git add . ; git commit -m "This is great"

git checkout birthday
git checkout $(git rev-parse HEAD)
echo "It is great to go to birthday party" >> you
git add . ; git commit -m "Go to birthday"
Command git rev-parse HEAD display the « chawouane » code of the commit referenced by the HEAD
To simulate an edition of the you file by adding content, we can use the following command :
echo "This is great" >> you
This example will use a detached HEAD to concert branch and explain how to managed detached HEAD
We will try something different to learn to manage an interesting case when your HEAD reference is not linked to the concert branch name :

Suppose, we use the « chawouane » code to checkout the last commit version (git checkout <chawouane code>). Then if we create a new commit with the following command :
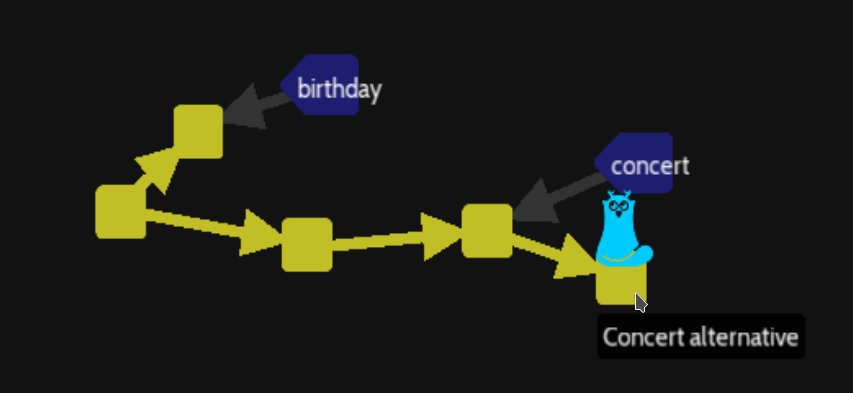
git add . ; git commit -m "concert alternative"
There will be into this situation with an HEAD reference creating a commit not really inside de concert branch :
To correct the situation, we have to move HEAD from « concert alternative » to « concert » branch with :
git checkout concert

But now we have to move « concert » branch name and HEAD to the last commit unconnected to any branch. There is a new command using with the « chawouane » code of this lonely commit :
git reset --hard 9b58db3
NOTE: We should usually not use git reset –hard because into Oh my git software we are able to find any commit from the graphic interface. Usually, move the HEAD and the branch name on a new commit could lead to lost a whole part. Or, you could maybe use git reflog to display the list of everywhere HEAD was, but it could be long to identify links between commits.

Yes, I used the small « chawouane » code and that will modify at the end HEAD reference and branch name :
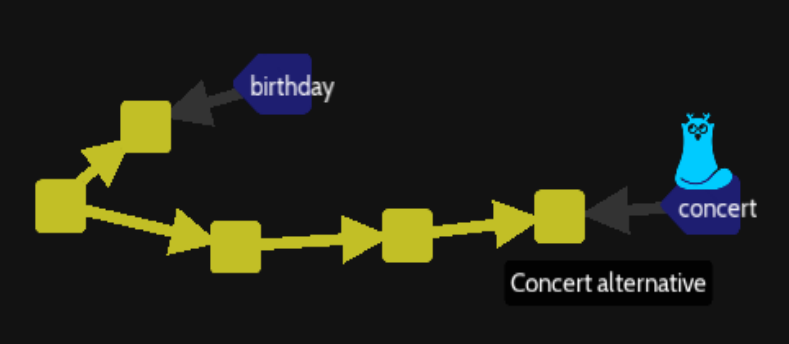
Try to avoid detach HEAD from the branch name is a classical way to work with GIT.
14/ Deleting branches (levels\branches\branch-remove)
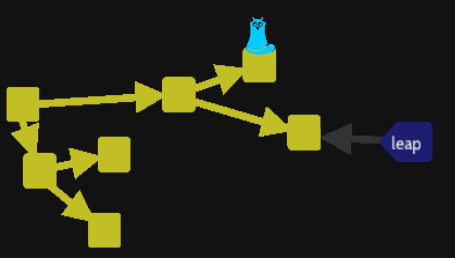
In this level, you have to find the only way where you arrive at school and delete other branch.
To help you avoid checkout, all commit and open file to find the correct way. The correct one is just leap branch.
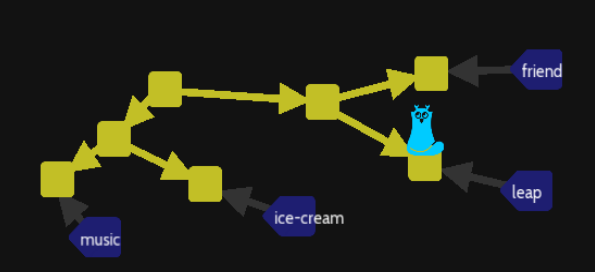
Just delete other branch with :
git branch -D friend
git branch -D ice-cream
git branch -D music
You can see, delete branch do not delete commit project version, you still can move HEAD to any commit with the correct « chawouane » code :
15/ Moving branches around (levels\branches\reorder)
This level will learn you to move branch name, at the begining ,the you file :
You do not have a baguette.

You do not have coffee.

You do not have a donut.
On each branch, there are one line slightly different :
- you file from baguette branch contains « You drank coffee. »
- you file from coffee branch contains « You ate a baguette. «
- you file from donut branch contains « You have a donut. «
So let’s start with just a modification for donut branch, using command sed to change content of the file (-i operation on the same file, ‘s/have/ate/’ regular expression to substitute have a donut by ate a donut ) :
git checkout donut
sed -i 's/have a donut/ate a donut/' you
git add . ; git commit -m "Donut eaten"
Then switch branch name with classical command, just store the initial « chawaoum » code of « coffee » branch into a chawaoum.txt (because the oh my git bash do not create variable) :
git checkout coffee
git rev-parse HEAD > chawaoum.txt
git reset --hard baguette

git checkout baguette
git reset --hard $(cat chawaoum.txt)
rm chawaoum.txt
Ok if we can use a simple bash environment variable, we could simplefy with :
git checkout coffee
chawaoum=$(git rev-parse HEAD)
git reset --hard baguette

git checkout baguette
git reset --hard $chawaoum
This is the end of the branch part of the game, let’s move to merge catagory.
16/ Merging timelines (levels\merge\merge)
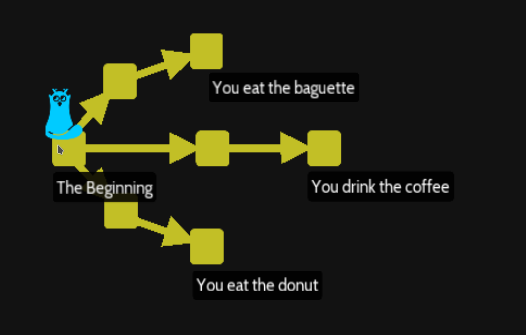
After split and move branch, we now learn to combine branches. The level start with the well-known 3 parallels situation:
- You eat the baguette
- You drink the coffee
- You eat the donut (HEAD pointing here)
You can merge without branch name, but it will be more common to at first create branches. It is OK for this training to use only chawaoum code.
The structure of the you file into the initial node ( via command git checkout HEAD~2 ):
You do not have a baguette.

You do not have coffee.

You do not have a donut.
You understand on each way, you eat or drink something and each file will have a different line. The baguette branch will be :
You ate a baguette.

You do not have coffee.

You do not have a donut.
The purpose of timelines is to regularly merge two branches into a new one. Of course, we hope that each different line on each separate file will be merged.
The most simple solution is just merge all the last commit of each « branch » into the HEAD:
git merge <chawouane of 'You eat the baguette'>
git merge <chawouane of 'You drink a coffee'>
But we will try to find a « chawouane » code from the comment message of a commit. I think at first use this command but that work only into HEAD ancestror :
git log --all --oneline --grep="baguette"We need to extract all the « chawouane » code from the git and cycle on each of them to display message, so find all « chawouane » code
git cat-file --batch-check='%(objectname) %(objecttype)' --batch-all-objects | grep 'commit$' | cut -f1 -d' '
Suppose we have a « chawouane » code we can display the message and the « chawouane » code with git log command only with the message contains baguette:
git log --format="%s %h" --grep="baguette" -n1 <chawoane code>
This will display the message (with %s) and the short chawouane code (with %h) only with baguette (with –grep) , -n1 switch is is just to avoid duplication.
Then loop on everything :
for chawouane in $(git cat-file --batch-check='%(objectname) %(objecttype)' --batch-all-objects | grep 'commit$' | cut -f1 -d' '); do
    git log --format="%s %h"  --grep="baguette" -n1 $chawouane; done
This will display :
You buy a baguette 43e1279
You eat the baguette 6a6e2a1
Now we know which « chawouane » code is associated to the final commit message, and you see the importance of a clear and explicit commit message.
So just merge HEAD with the final commit which « chawouane » code is 6a6e2a1 :
git merge 6a6e2a1
If you open the you file, you find the content merge with the final line changed :
You ate a baguette.

You do not have coffee.

You ate a donut.
Now merge with the coffee « branch » (no branch name) by finding the correct commit :
for chawouane in $(git cat-file --batch-check='%(objectname) %(objecttype)' --batch-all-objects | grep 'commit$' | cut -f1 -d' '); do
    git log --format="%s %h"  --grep="drink.*coffee" -n1 $chawouane; done
I use again regular expression to find the commit message « drink<zero to n caracters>coffee » and then find the only « chawouane » code and merge with :
git merge fa4af5a
Then the final merged file is :
You ate a baguette.

You drank coffee.

You ate a donut.
The final situation with merge commit default message, a merge create a new commit :
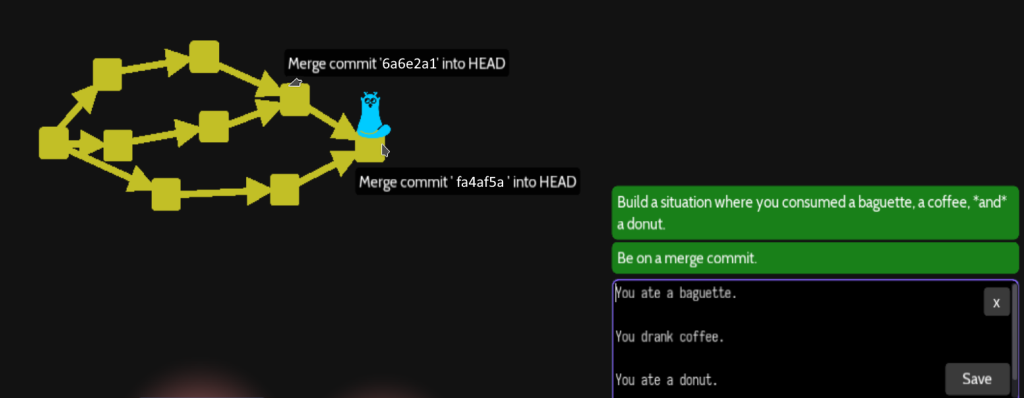
Of course, you can set a custom message with :
git merge fa4af5a -m "Merge coffee with baguette and donut"
17/ Contradictions (levels\merge\conflict)
This level has 2 different timelines muesli and pancakes, HEAD is on the main branch. For french user, I should rename chocolatine and pain au chocolat.
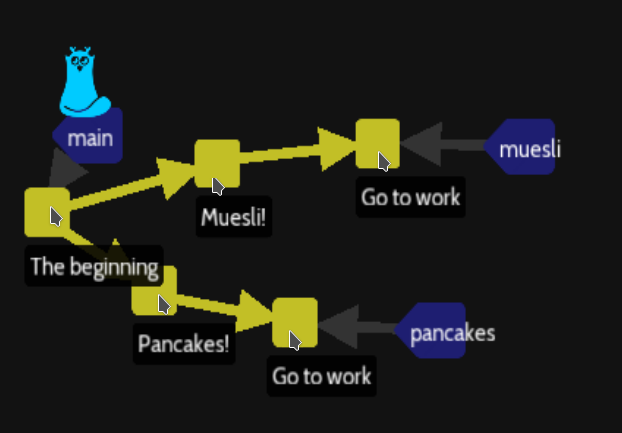
The sam file will store :
- At the beginning : « Just woke up. Is hungry. »
- At Muesli! : « Had muesli with oats and strawberries for breakfast. »
- At Pancakes! : « Had blueberry pancakes with maple syrup for breakfast. »
- At Go to work: previous message plus « Is at work. »
We can not merge as we did in the previous level, the sam file will be in conflict.
At first, I need to explain something about 2 very old Linux commands, diff and patch. Suppose a 1-3.txt file with :
one
two
three
Suppose a 0-2.txt file with :
zero
one
two
The diff command with -u for common line will be :
diff -u 0-2.txt  1-3.txt


--- 0-2.txt
+++ 1-3.txt
@@ -1,3 +1,3 @@
-zero
 one
 two
+three
Symbol minus is linked at 0-2.txt file and symbol + to the other file 1-3.txt. So we can understand the difference between two files and the common lines. If we remove the commons line and redirect to a file :
diff 0-2.txt 1-3.txt > patch-from-0-2-to-1-3.txt
We create in fact a file that the patch command could apply to patch the 0-2.txt with the same content as 1-3.txt file.
patch 0-2.txt  < patch-from-0-2-to-1-3.txt

cat 0-2.txt
one
two
three
So the GIT merging process is really similar, you can try git diff on the initial files 0-2.txt file and 1-3.txt to display the same output as diff :
diff --git a/0-2.txt b/1-3.txt
index af9184c..4cb29ea 100644
--- a/0-2.txt
+++ b/1-3.txt
@@ -1,3 +1,3 @@
-zero
 one
 two
+three
a/ and b/ are simply generic value to manage file with identical name a/sam and b/sam will be used in our future case.
So return to our case with a git diff to show difference on the unique sam file :
git diff muesli pancakes

diff --git a/sam b/sam
--- a/sam
+++ b/sam
@@ -1,3 +1,3 @@
-Had muesli with oats and strawberries for breakfast.
+Had blueberry pancakes with maple syrup for breakfast.
So we know the conflict that will create the git merge command, now how to manage :
git checkout muesli
git merge pancakes
A message explain the conflict, we can open sam file and try to understand this weird notation :
<<<<<<<< HEAD
Had muesli with oats and strawberries for breakfast.
=======
Had blueberry pancakes with maple syrup for breakfast.
>>>>>>> pancakes

Is a work.
So the HEAD at present is equal to muesli branch then just below HEAD you could see the line in conflict into HEAD then multiples equals separate the line from pancakes branch in conflict.
At the end, the sentence « Is a work. » is common, so no conflict.
GIT ask us to manage the situation, so delete/write and replace everything as and save the file :
Had muesli with oats and strawberries and blueberry pancakes with maple syrup for breakfast.

Is a work.
Then we need to commit the merge :
git add . ; git commit -m "Muesli and pancakes"
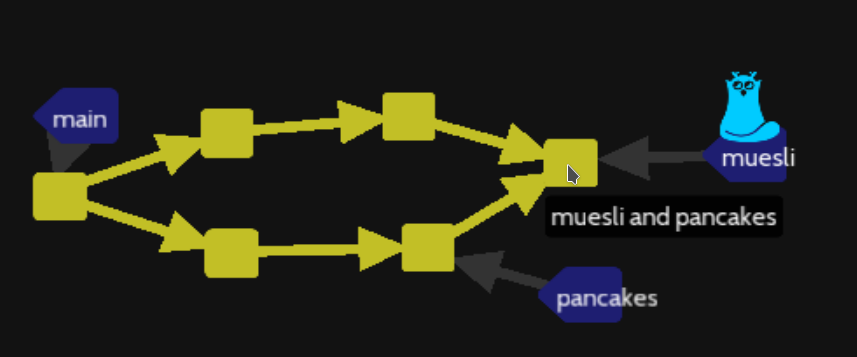
Of course, we need to move main branch to the final muesli commit with :
git checkout main
git reset --hard muesli
NOTE: It is clearly possible to at first move the main branch to the muesli with :
git reset --hard muesli
git merge pancakes
echo "Had muesli with oats and strawberries for breakfast." > sam
echo "Had blueberry pancakes with maple syrup for breakfast." >> sam
echo "Is at work." >> sam
git add . ; git commit -m "Muesli and pancakes"
18/ Abort the merge (levels\merge\merge-abort) Optional
My Oh my git version include into the folder levels/merge/ a level not visible by default, you have to edit the sequence file into this folder, then add merge-abort at the end of this file and restart the program.
This level is just to checkout to a « Main Lane » commit or to « Side Lane » commit then try to merge but a the end just cancel the operation with :
git merge --abort
This situation is just to understand how to undo the git merge in conflict :
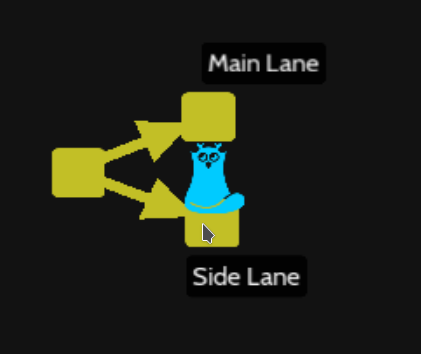
You can use the previous level : Contradictions to undo the merge conflict with :
git checkout muesli
git merge pancakes
cat sam
git merge --abort
This will cancel the merge. Now a new category : index.
19/ Step by step (levels\index\conflict)
The next level will go deeper into GIT command :
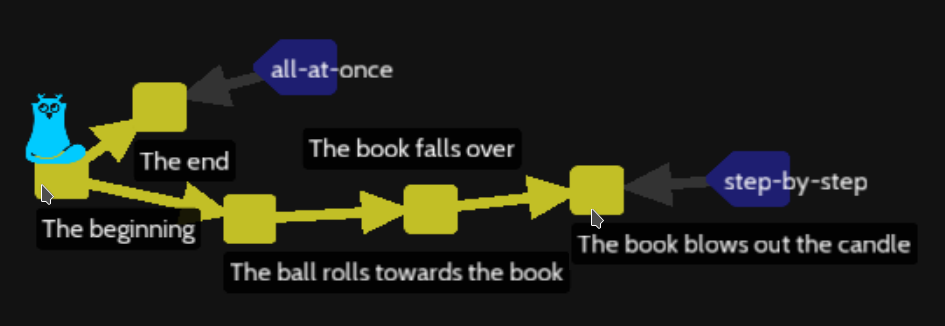
But in fact, I think there is a problem with this exercise, to win we have to change the content of smoke_detector file into step-by-step branch, remove « absolutely silent » and create a new commit.
git checkout step-by-step
sed -i 's/absolutely silent/absolutely noisy/' smoke_detector
git add . ; git commit -m "remove silent"
I think the purpose is to show several commits with step-by-step branch is better than the short lonely commit with all-at-once branch.
20/ Add new files to the index (levels\index\new)
The next level will learn how to add a file to the initial HEAD main. You can also find the label refs/heads/main, in fact into the hidden .git folder, a subfolder named refs store all references include branches, tags and all heads, the subfolder heads will store heads and branches names, then a file main. This file store the commit chawouane code.
This level contains only one candle file, so add it to the index and commit :
git add candle
git commit -m "Initial commit"
We can look into the .git folder, with command to see the content of file. But Git provides tools to manage some troubles, so we will use then on this basic sample. Restart the whole level and at first we will find the content of the folder .git/objects/ with this command :
ls .git/objects/
So the output, will display only two folders : info and pack. Then just git add candle and list again the folder
ls .git/objects/
pack
info
70
The new folder 70 will store the content of our candle file so we can output the ls content of this 70 folder into a candle_code.txt file with (note the folder name ) :
ls .git/objects/70/ > candle_code.txt
So now open the candle_code.txt file to discover the « chawouane » code of our file in my case 47e0416f37d1ce42a87358f2d7aa2aeb443af3 that can copy. So now I can open a content file with the concatenation of folder name (70) and the « chawouane » (47e0416f37d1ce42a87358f2d7aa2aeb443af3 ):
git cat-file -p 7047e0416f37d1ce42a87358f2d7aa2aeb443af3
This will display the content of the candle file.
NOTE: you can think to add any files and folder from the root git file with :
git add :/
21/ Update files in the index (levels\index\change)
The next exercise is to index the candle file with a simple modificaiton change the color blue into yellow :
sed -i 's/blue/yellow/' candle
git add candle
git commit -m "Initial commit"
22/ Resetting files in the index (levels\index\reset)
This level works with 3 files : blue_candle, green_candle and red_candle contains at first « It’s burning! » then into the second commit « It’s been blown out. ».
From the beginning, we used to follow files states from commit to commit. But suppose, we work on blue_candle and green_candle adding information :
echo "The small rope (the wick) of the candle is red" >> blue_candle
echo "The small rope (the wick) of the candle is red" >> green_candle
Now we want to come back to the last commit, but we are AT the last commit, so git checkout HEAD could not work, but we can restore files :
git restore blue_candle green_candle
But sometime, you want to keep the content of your working project folder but go back to a previous commit version, so let’s start again same level :
echo "The small rope (the wick) of the candle is red" >> blue_candle
echo "The small rope (the wick) of the candle is red" >> green_candle
git add . ; git commit -m "Blue and green candle wicks are red"
git reset HEAD^
This situation will be as a « move backward » into history of commits (green arrow) but if you open blue_candle and green_candle files, you fill find the new line about the wick.
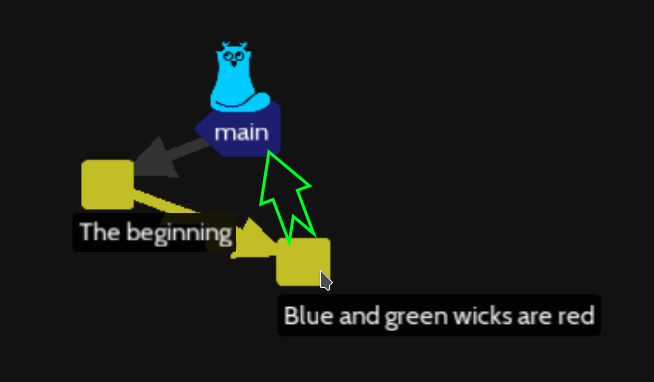
The git reset command work only on branches and HEAD index and preserve file content.
But we work only on the full project files, the level asks us to only preserve some files. Suppose a modification on red_candle, blue_candle and green_candle files :
echo "The small rope (the wick) of the candle is red" >> blue_candle
echo "The small rope (the wick) of the candle is red" >> green_candle
echo "The small rope (the wick) of the candle is red" >> red_candle
git reset green_candle blue_candle
git add red_candle; git commit -m "Only red candle will versionning"
But now move to the previous commit with git checkout HEAD^ :
cat blue_candle

It's been blown out.
The small rope (the wick) of the candle is red


cat red_candle

It's burning.


cat green_candle
It's been blown out.
The small rope (the wick) of the candle is red
So even if we move back into the commit history, we still have unsupervised blue_candle and green_candle files, which still the same content.
This is a situation, you work on a new feature and change all the 3 candles files, but the feature is canceled, and you want to go back and keep the blue_candle and green_candle files content.
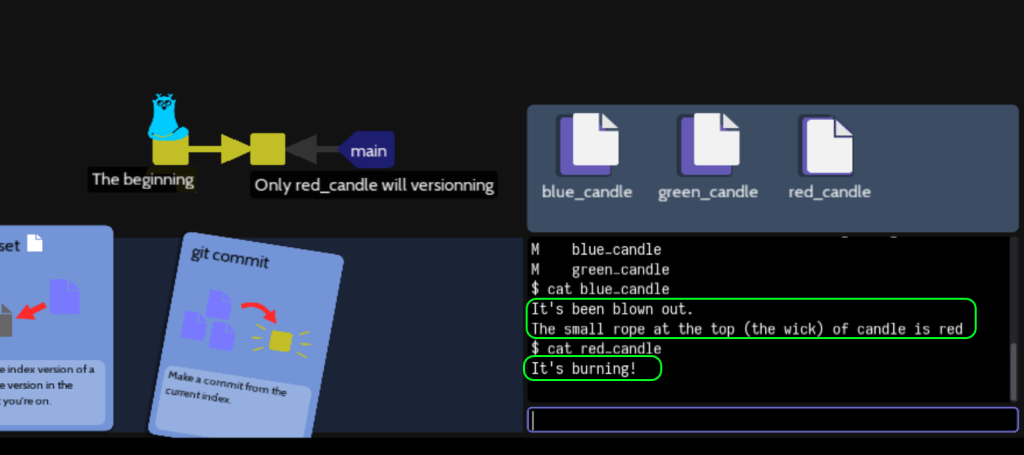
As you can see, the git reset remove the commit supervision on a file, red_candle file still supervised and its contain history could be checkout.
To solve the level, just again :
echo "The small rope (the wick) of the candle is red" >> blue_candle
echo "The small rope (the wick) of the candle is red" >> green_candle
echo "The small rope (the wick) of the candle is red" >> red_candle
git reset green_candle blue_candle
git add red_candle; git commit -m "Only red candle will versionning"
If you want to restore un-hide blue_candle and green_candle file , you can restore them with a basic git checkout HEAD^, you will see only the red_candle version of file is changed.
NOTE: to understand the git reset and the git checkout difference, please read the Stackoverflow content and study the diagram below :
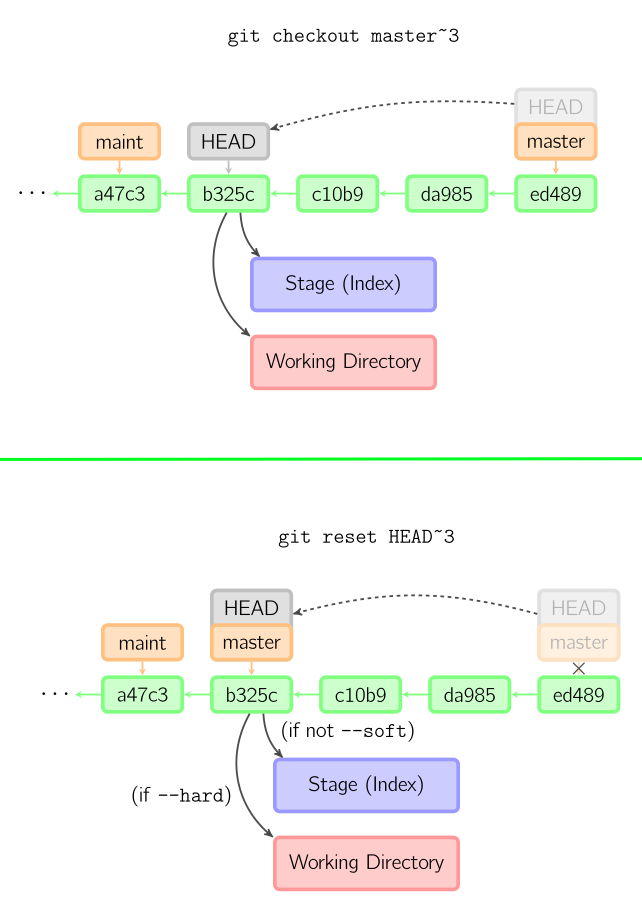
By my way :
- git reset –hard HEAD~3 : move the HEAD/master flag to 3 commits in the past, the working directory is from b325c, so it is git checkout HEAD~3 and move HEAD/master flag a true time machine.
- git reset HEAD~3 : same but also the list of managed/supervision files by git, so the working directory is from ed489 commit, but the list of files will be from b325c. So if you add a new file between c10b9 and ed489, the tracking by git into its index will be forgotten but the new file still exist
- git reset –soft HEAD~3: just keep the file from ed489 and keep the list of managed/supervision files by git from ed489 including a new file creates from c10b9 and ed489
- git reset file: this command reverse gid add file, should replace by git restore –staged file
- git reset –keep file: should be used instead of git reset –hard because preserve the working directory from ed489
- git reset –merge file: same of keep but also preserve not supervised file
If you want the list of managed/supervised files use on main branch :
git ls-tree -r main --name-only
NOTE: suppose your work on many files in a commit, and you want to reset to the initial situation, git reset –hard HEAD will cancel everything for this commit.
23/ Adding changes step by step (levels\index\steps)
This level contains 3 files :
- hammer file : « A hammer, balancing on its handle. »
- bottle : « A bottle, containing a clear liquid. »
- sugar_white : « A white sugar cube. »
In fact, our story misses several element included a candle_added file
echo "A candle burns the rope" > candle_added
echo "Hammer smashes the bottle" >> hammer
echo "Bottle explodes" >> bottle
echo "The sugar melts" >> sugar_cube

git add candle_added
git commit -m "First accident"


echo "The hammer explodes the windows " >> hammer
git add hammer
git commit -m "Second accident"

echo "The candle burns the carpet" >> candle_added
git add candle_added
git commit -m "Third accident"
But if you git checkout HEAD~2 (commit message is First accident), you will not find « Hammer smatchs the bottle » into the hammer file :
A hammer, balancing on its handle.
But you find inside the next commit :
git checkout main
git checkout HEAD^
cat hammer

A hammer, balancing on its handle.
Hammer smatchs the bottle
The hammer exploses the windows
The content of the file is not stores if you do not specify it each time with a git add command.
NOTE: Usually it is really common to add everything with git add . command to be sure to avoid different version control of file with index of git.
The new catagory will be remotes.
24/ Friend (levels\remotes\friend)
In this level, we find out again a remote friend repository as GitHub server.
Always start with a git pull command if you work with a friend who add regularly content.
git pull

cat essay

Line 1
Line 2, gnihihi
We need to correct the file and add a third line :
echo "Line 3," >> essay
git add . ; git commit -m "3 lines"
git push
Now the program will simulate a friend adding a fourth line, so :
git pull

cat essay

Line 1
Line 2, gnihihi
Line 3,
Line 4, blurbblubb
Add content and push again:
echo "Line 5," >> essay
git add . ; git commit -m "5 lines"
git push
You are lucky, you friend and you are not working on the same line of the same file.
25/ Problems (levels\remotes\problems)
There are two ways to manage this level:
- First option, you are supposed to finish edit the file and want to commit your new version
- Second option, start with a « git pull » before commit your work.
Let’s start with the first option, we are supposed to be in a middle of modification and change the file content from « The bike shed should be ??? » to your proposal : « The bike shed should green ».
So at first, create a commit of your version with :
git add . ; git commit -m "green"
Then you can try to push :
git push
But, you have got an error because, your local branch call friend/main is not update, so now :
git pull
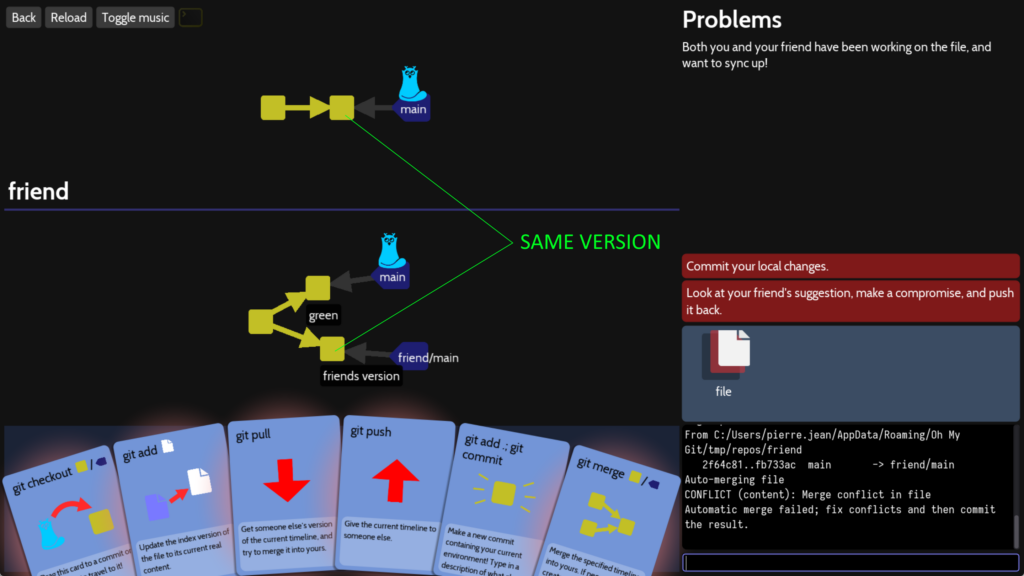
So our local main branch and our local friend/main branch are in conflict. A git pull included a git merge command, so you have a try to merge from the local version to your version.
You can compare from your version with git diff command :
git diff main:file friend/main:file

diff --git a/file b/file
index 076b9c8..60823c8 100644
--- a/file
+++ b/file
@@ -1 +1 @@
-The bike shed should be green
+The bike shed should be blue
Or of course open the file :
<<<<<<< HEAD
The bike shed should be green
=======
The bike shed should be blue
>>>>>>> fb733ac9b8d350147249588e849c4686b85c6a78
Now, it is not technical, it is a compromise with your friend to yellow :
echo "The bike shed should be yellow" > file
Then commit this new version :
git add . ; git commit -m "yellow"
The git push to upload your proposal and the compromise :
git push
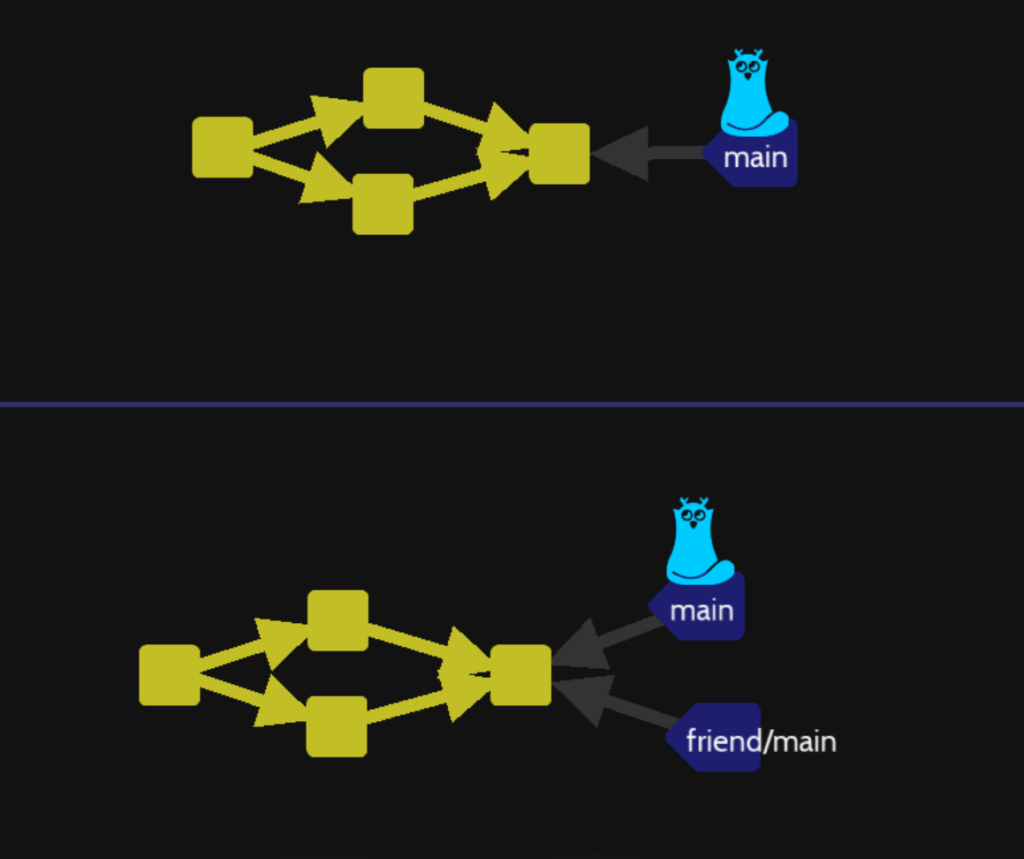
You can see there are all the proposal, your friend says blue, you say green and the final version is yellow. But you can also imagine going back because blue is OK.
Restart the level to try the second option. When you work with someone, you can at first get the latest version from the remote repository with :
git pull
And then, you know the local friend/main version is different of your working version.
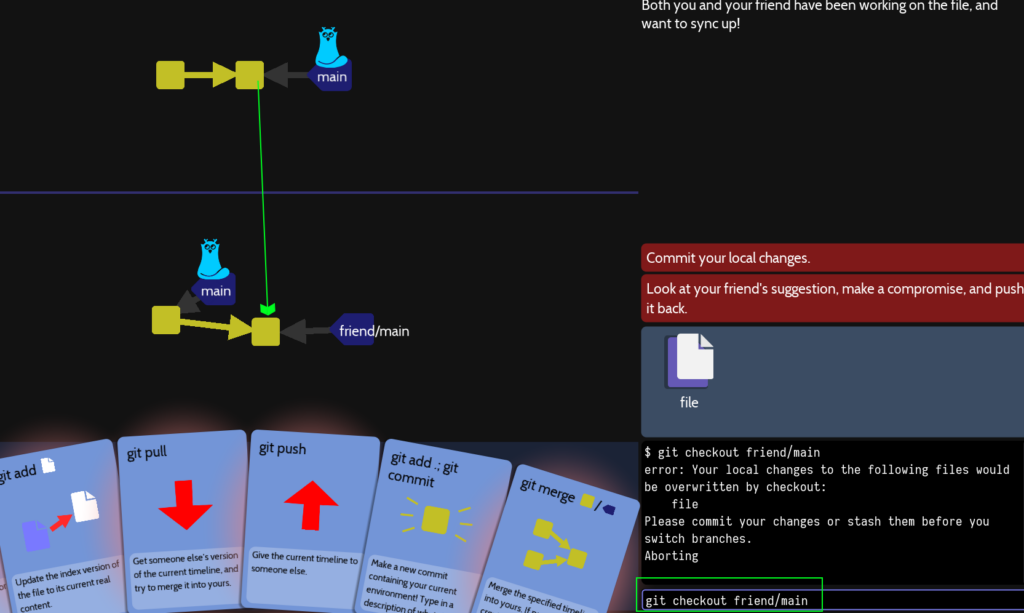
You can compare the last commit file content from main branch to the remote friend/main branch with :
git diff main:file friend/main:file
diff --git a/file b/file
index 076b9c8..60823c8 100644
--- a/file
+++ b/file
@@ -1 +1 @@
-The bike shed should be ???
+The bike shed should be blue
So change yellow to your color :
sed -i 's/green/yellow/' file
git add . ; git commit -m "yellow"
git merge friend/main
At this moment, the conflict about bike color appear :
cat file
<<<<<<< HEAD
The bike shed should be yellow
=======
The bike shed should be blue
>>>>>>> 9e15575465664addhbsjdsbhjqbsdhjdsq
Now we have to set our color, so edit the conflict file as you which, merge and push to the server :
echo "The bike shed should you be yellow" > file
git add . ; git commit -m "yellow"
git push
Now new category changing-the-past :
26/ Rebasing (levels\changing-the-past\rebase)
At the beginning, you file is close to lesson 16 with coffee, donut and baguette branch name :
You do not have a baguette.

You do not have coffee.

You do not have a donut.

On each branch, you eat or drink the corresponding element, but in this level we DO NOT want to merge. This is what we do NOT want to do :

The git rebase command will try to merge but on the same HEAD branch, suppose we check out to donut branch and rebase with branch coffeee, the situation will be :
git checkout donut
git rebase coffee

The donut branch is added to the coffee branch, adding content inside and of course the you file content is :
You do not have a baguette.

You drank coffee

You ate donut.
Again, git checkout and git rebase with baguette branch, to create one big donut or baguette branch with you file :
You ate a baguette.

You drank coffee

You ate donut.
Now, 2 ways to correct other branch names:
- create a final branch name, return to main commit and rebase it : git branch final ; git checkout main ; git rebase donut;
- Rename the main branch as the new branch: git branch final; git checkout main; git branch –move main initial; git checkout final; git branch main;
- Or move the main branch at the beginning as the future commit branch with git checkout main ; git reset –hard donut
27/ Reordering events (levels\changing-the-past\reorder)
This level is to learn how to use git cherry-pick command or git rebase -i command. The you file at the main branch commit contains :
You just woke up.

You are wearing underwear.

You are wearing pants.

You are wearing a shirt.

You are wearing shoes.
But the trouble is more with the commit order :

We are supposed to start with underwear then pants then shoes (shirt is not checked).
As explain, you can use git cherry-pick command with list of command and use the notation branch name~# to identify easily the order :
- main~1 : Put on underwear
- main~2: Put on pants
- main~3: Put on shoes
- main: Put on shirt
git checkout HEAD~4
git cherry-pick main~1
git cherry-pick main~2
git cherry-pick main
git cherry-pick main~3
git branch main-correct-order
git checkout main; git reset --hard  main-correct-order
The final solution creates a copy of each commit into a separate branch and move at the end the main branch name to the new created main-correct-order branch name.
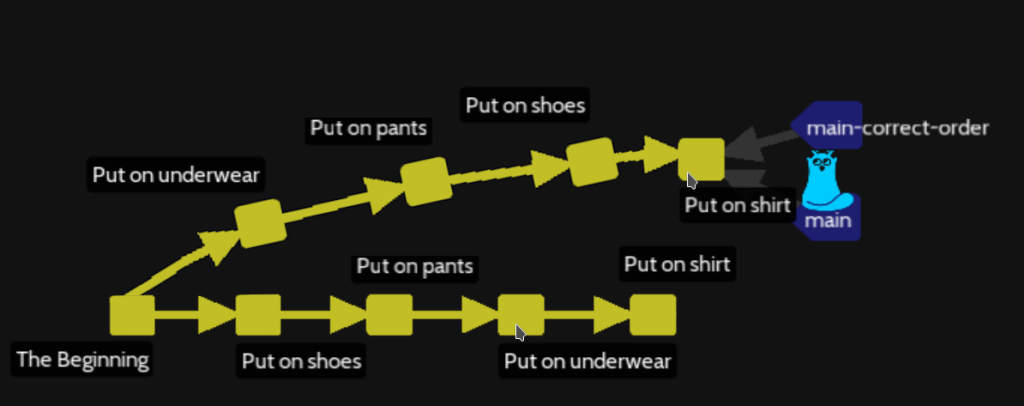
IS like if we copy/paste from on commit to another commit on a separate branch, just a the end we move the branch main and abandon the old one.
NOTE: to use the second version, Oh-my-git software misses somes setting, so we have to open the folder from outisde of the software with a git command. At first find the location on your drive of the correct folder with pwd command. in my case, it will be into the following folder:
C:\Users\pierre.jean\AppData\Roaming\Oh My Git\tmp\repos\yours
Then check the git log classical command with :
"C:\Program Files\Git\cmd\git.exe" log --oneline --graph --all --decorate
So you can work outside of the Oh-my-git software to manage additional operations.
Option number 2, use git rebase -i to open a file contains the list of operation so again, same starting point :

So our command will start on the very first commit to restart from scratch :
git rebase HEAD~4 -i
This command will display an editor to manage the content, you will see (chawaouan numbers are difference) the following content and remeber each line starting with # is a comment :
pick 044e7b9 Put on shoes
pick b4fcfbe Put on pants
pick 22446fb Put on underwear
pick 8f8d77c Put on shirt

# Rebase instructions ...
Just change the order from top to bottom as following example :
pick 22446fb Put on underwear
pick b4fcfbe Put on pants
pick 044e7b9 Put on shoes
pick 8f8d77c Put on shirt
Force update of Oh-my-git with a git log command and then you will have (without branch name main-correct-order) :

You can read instructions into the interactive editor of git rebase to learn how to change commits.
NOTE: instead of moving the main reference with git reset –hard, you can rename the branch with :
git branch -m main incorrect-order-main
git branch -m inccorrect-order main
Then a new category sh**-happens
28/ Restore a deleted file (levels\shit-happens\restore-a-file)
This level is really easy now you know git, just git restore essay to reload file from the last commit.
29/ Restore a file from the past (levels\shit-happens\restore-a-file-from-the-past)
This level is really easy now you know git, several way to reload file from the first commit.
You can also :
- git checkout HEAD^ essay; git add essay; git commit -m « Rescue good version »
- git checkout HEAD^ — essay ; git add essay; git commit -m « Rescue good version »
- git checkout HEAD^ ; git branch rescue ; git checkout rescue; git checkout main; git reset –hard rescue
- git branch -m main main_bad ; git checkout HEAD^ ; git branch main
- git reset –hard HEAD~1
- git reset –hard HEAD^
The first version is to rescue from the previous version the file into the actual working directory then add this version to the index then commit. The double dash — is to manage this example working with a file named main : git checkout — main will work.
The third version is go back into the past, create a new branch called rescue, then replace the flag main on the same rescue branch.
The fourth version is the best, rename the branch from main to main_bad then go back and create a new branch call main.
Fifth and sith versions are lightly worse but use the git reset –hard trick to move the reference main and HEAD on another commit.
30/ Undo a bad commit (levels\shit-happens\bad-commit)
In this level, the numbers file into the actual commit contains :
1 2 3 4 5 6 7 8 9 11
The last commit contains a typo « More numberrrrrs ». We want to preserve the numbers file content from the last commit, but we want to go back to the previous commit to start over to a next commit.
To go back preserve the file content with git reset HEAD^:
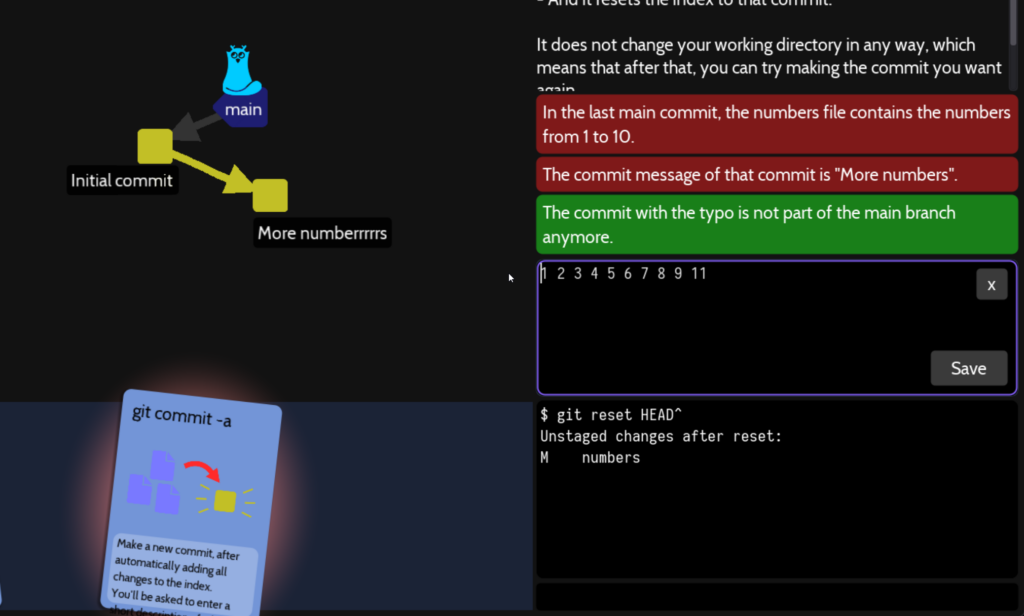
The solution would be git reset the previous commit, then correct the numbers file and at the end create a new commit :
git reset HEAD^
sed -i 's/11/10/' numbers
git commit -a -m "More numbers"
This example used a switch -a to automatically « git add » any previous file already follow by GIT. Many times we used git add . command to let know to GIT any new files into the current folder. I could be important to keep a git add <list of file or folder> command to be precise into the list of files and folder supervised by GIT. But if you know that you will work all the time with the same list of files, that could be better to use -a -m or -am switches.
31/ I pushed something broken (levels\shit-happens\pushed-something-broken)
In this level, a local and a team repository are used with 4 commits and only on text file.
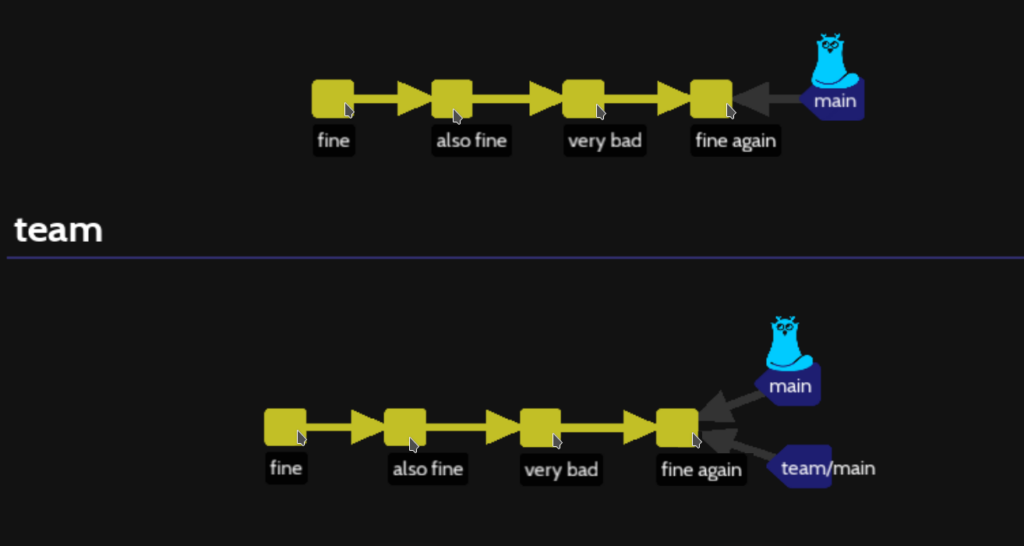
- First commit with message « fine » : file contains « this is fine » and empty line, new line with question mark and empty line, new line with question mark, and empty line, new line with question mark ( so 4 individual questions marks with an empty line previsouly)
- Second commit with message « also fine »: same contains of the previous commit file, but the first question mark is replaced by « this is also fine »
- Third commit with message « very bad » : same contains of the previous commit file but the next avalaible question mark is substitute by « this is very bad »
- Final commit with message « fine again », the text file contains :
this is fine

also fine

this is very bad

this is fine again
So we want to undo only the modification into text file the line with « this is very bad », we want the following file :
this is fine

also fine

?

this is fine again
The reverse of the merge processing will be :
git revert --no-edit HEAD~1
The option –no-edit avoid to open the interactive editor and create a new commit with the modification :
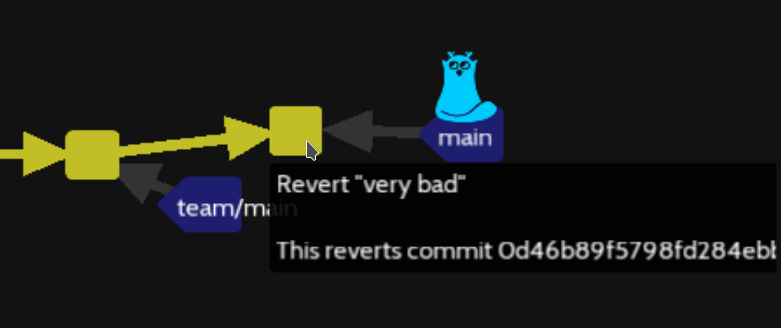
So now the text file is reverted as and you just push to the team repository.
We do not have on the git revert command line the option -m to edit the commit message (-m switch is for something different), but we can change the commit message with :
git commit --amend -m "Change the line 'very bad' into ? "
This will create a new commit with the new message « Change the line ‘very bad’ into ? « . If you do not push already to the team repository, you can go on with a simple git push. But if you did this scenario :
git revert --no-edit HEAD~1
git push
git commit --amend -m "Change the line 'very bad' into ? "
You are working into a previous version of the project but because this last commit is just a light « amend » commit, you can force the team repository with git push –force.
The « wrong message » commit is an orphan without impact but avoid to force for other users.
32/ Go back to where you were before (levels\shit-happens\reflog)
This level contains a very long list of commits (10 commits) and each commit has a diffrent branch name (same number) but no file :
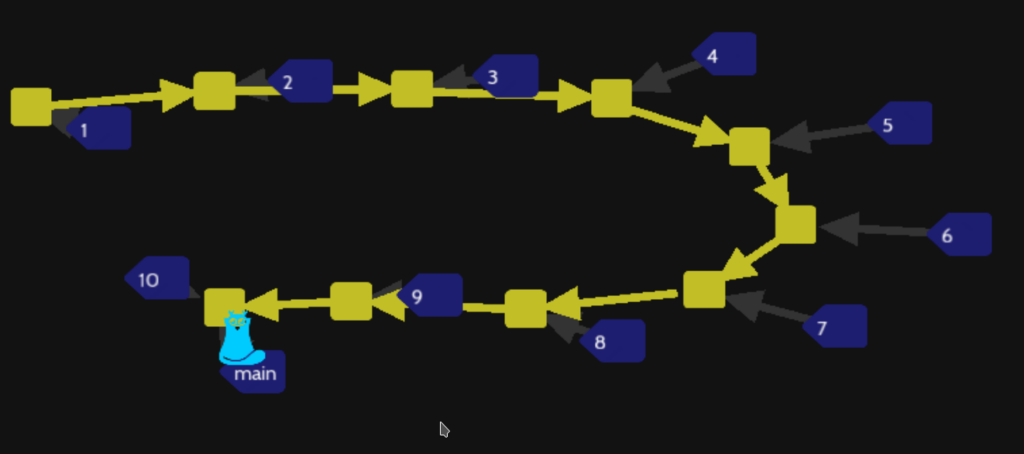
The git reflog command just shows the list of the previous position of the HEAD :
git reflog

d087659 (HEAD -> main, 10) HEAD@{0}: checkout: moving from 3 to main
64ef148 (3) HEAD@{1}: checkout: moving from main to 3
d087659 (HEAD -> main, 10 HEAD@{2}: commit:10
9ea5730 (9) HEAD@{3}: commit: 9
411e7a1 (8) HEAD@{4}: commit: 8
b7a475f (7) HEAD@{5}: commit: 7
a464650 (6) HEAD@{6}: commit: 6
75c829d (5) HEAD@{7}: commit: 5
64ef148 (4) HEAD@{8}: commit: 4
c372d04 (3) HEAD@{9}: commit: 3
046a26a (2) HEAD@{10}: commit: 2
75c829d (1) HEAD@{11}: commit (initial): 1
We have the history of operation on the HEAD reference, so just git checkout 3 to return to the commit reference by the « 3 » branch name as shows at the first line. You can also :
git HEAD@{1}
If you open the file levels\shit-happens\reflog into the software installation folder, you will find the list of operation to create the level into [setup] category :
[setup]

for i in {1..10}; do
    git commit --allow-empty -m $i
    git branch $i
done
git checkout 3
git checkout main
The setup will create from 1 to 10 commit, git checkout 3 to finish the level.
The next category is workflows.
33/ Cloning a repo (levels\workflows\pr)
This level is quite simple but include one important feature, cloning someone else repository.
But this level supposes that you can access to the repository directly from your hard drive. This is not the common situation, usually you access remotely to someone repository.
I try to copy everything (including .git folder) from the friend project folder, and it’s works until you have to send back to your friend modifications. The only option will be to erase everything I work to put your folder. This is not a very collaborative way.
The git clone will keep the link between the 2 repositories and will manage exchange. The clone will be from one folder ../friend to your actual folder ./ as a copy but link to update from and to each folder.
git clone ../friend ./
You can see origin/main and origin/HEAD into your git projet. The word origin symbolize this initial git folder from the clone folder was created .
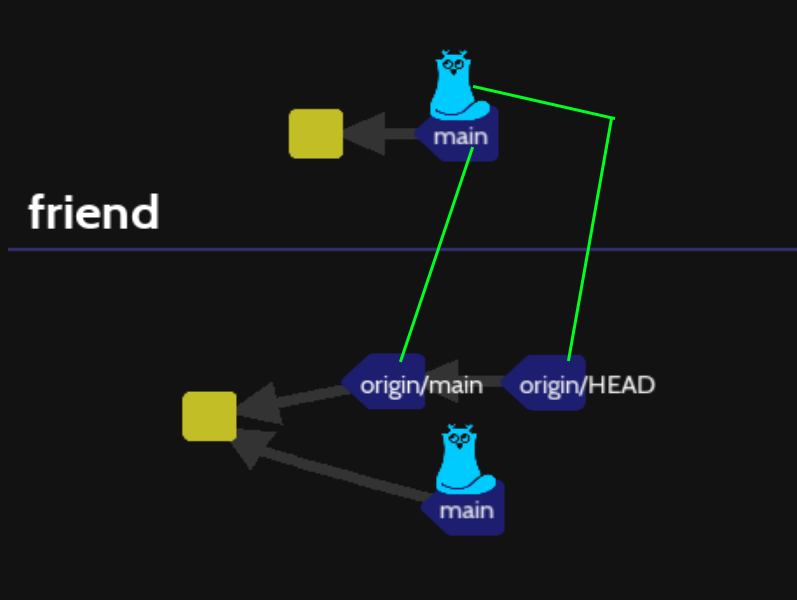
Now we can correct the file content, commit into your folder and create a separate branch.
sed -i 's/= /= 5/' file
git commit -am "Solution is 5"
git branch "solution"
This lesson needs a final command, that could be uses sometime just to make a kind of label associated to a commit. This is not a branch, just a label to symbolize a very important commit as a milestone of your project.
git tag pr
It could also be possible to push a tag remotely :
git push origin v1.0.0
NOTE: One additional lesson exists into the levels/workflows to manage .gitignore file, this lesson is just to add a chicken file into the .gitignore file. Then git add . command will ignore this file, that classical to avoid to import temporary generated files as .class .so, etc.
Next category will be bisect.
34/Yellow brick road (levels\bisect\bisect)
This level show 30 commits on the main branch with HEAD on the final commit. Each commit message is a number from 1 to 30 include a
Commits from 1 to 11 include a you file contains : « You still have your key. »
12th commit include 2 files :
- you file contains : « Your pocket is empty. »
- key file contains : « Is on the ground. »
13th commit include 2 files:
- you file contains : « Your pocket is empty. »
- bird file contains : « Is holding a key i its beak. »
Commits from 14 to 30 include a you file contains : « Your pocket is empty. »
We can image go front and back until finding the moment when something « wrong happen » that the mechanism includes into git.
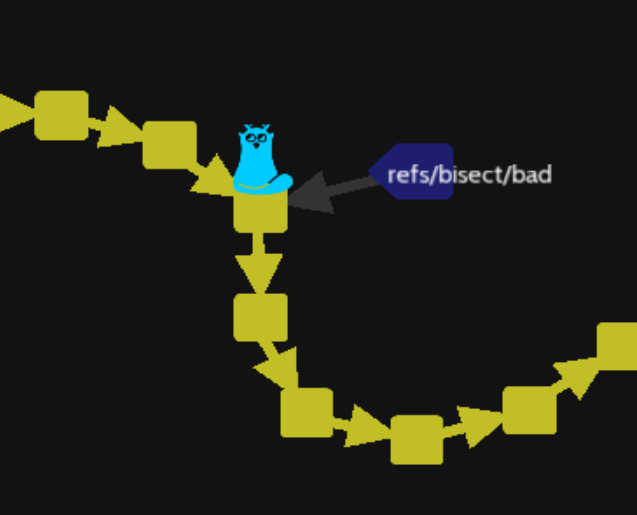
Let suppose we know something bad happen at the 20th commit, so we want to start searching by bijection from there:
git checkout HEAD~10
git bisect start
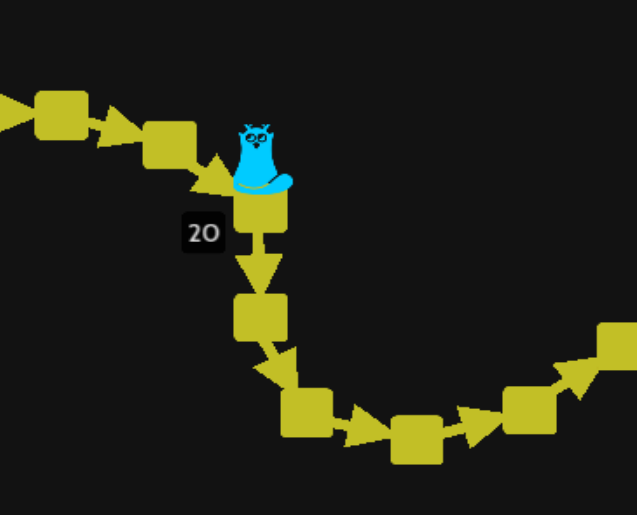
Now we declare this git commit as bad with :
git bisect bad
Then we will go to 10th commit because we remember this commit is OK.
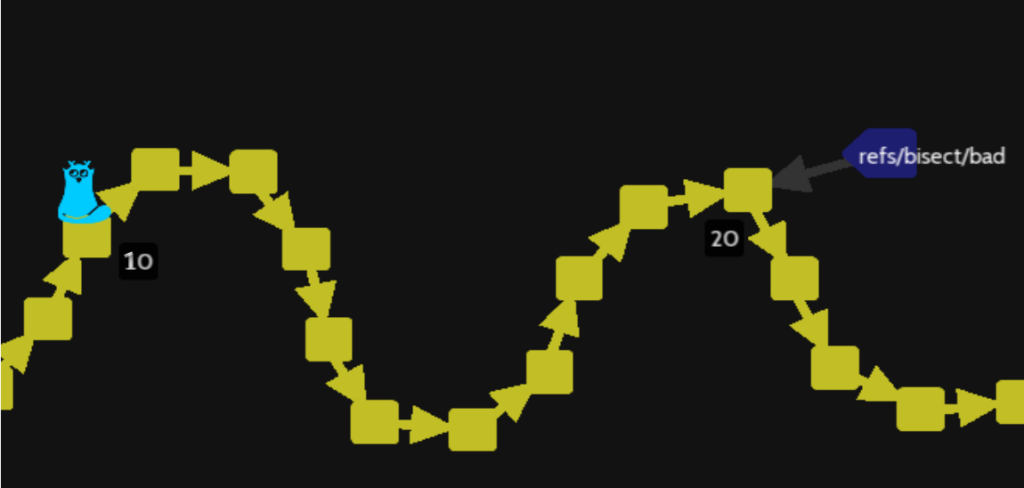
git checkout HEAD~10
git bisect good
The command git bisect good will check out to 15th commit in the middle between 20th commit and 10th commit. We see the actual HEAD between the 10th and 20th commits.
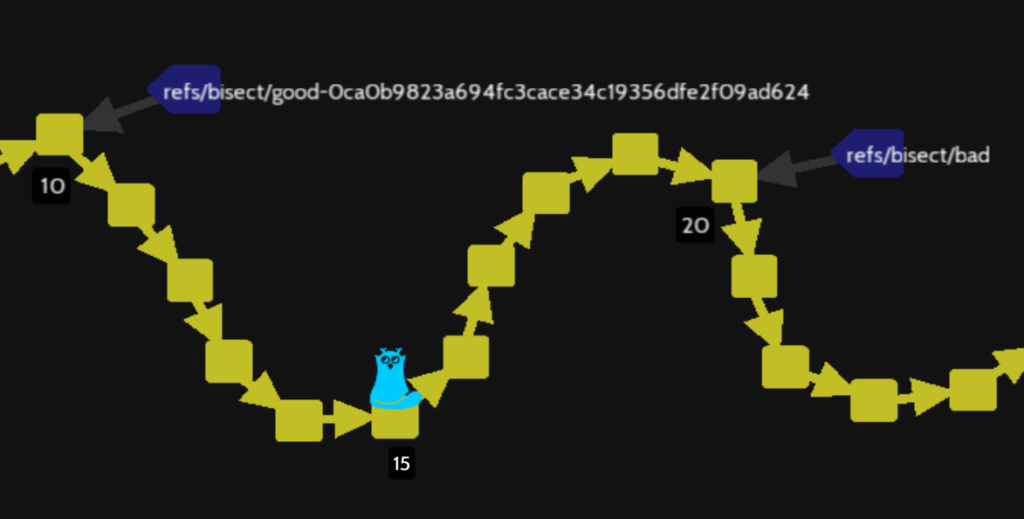
So the 15th commit the you file contains : « Your pocket is empty. », so we enter git bisect bad and check out another version :
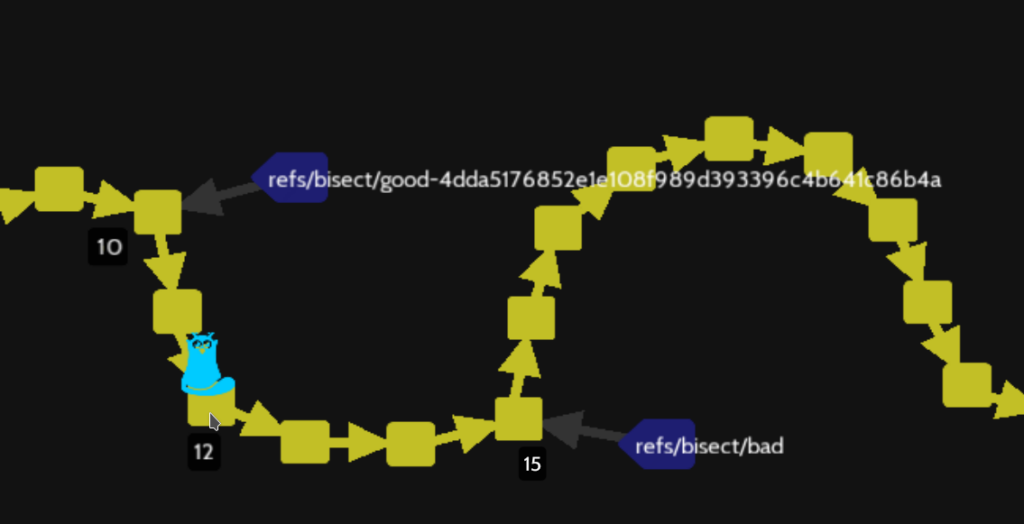
We can see the new refs/bisect/bad label is now on the 15th commit, not on the 20th commit.
The 12th commit is not event good the you file contains « Your pocket is empty. » so git bisect bad command again.
We are on the 11th git commit with a valid you file contains « You still have your key. »
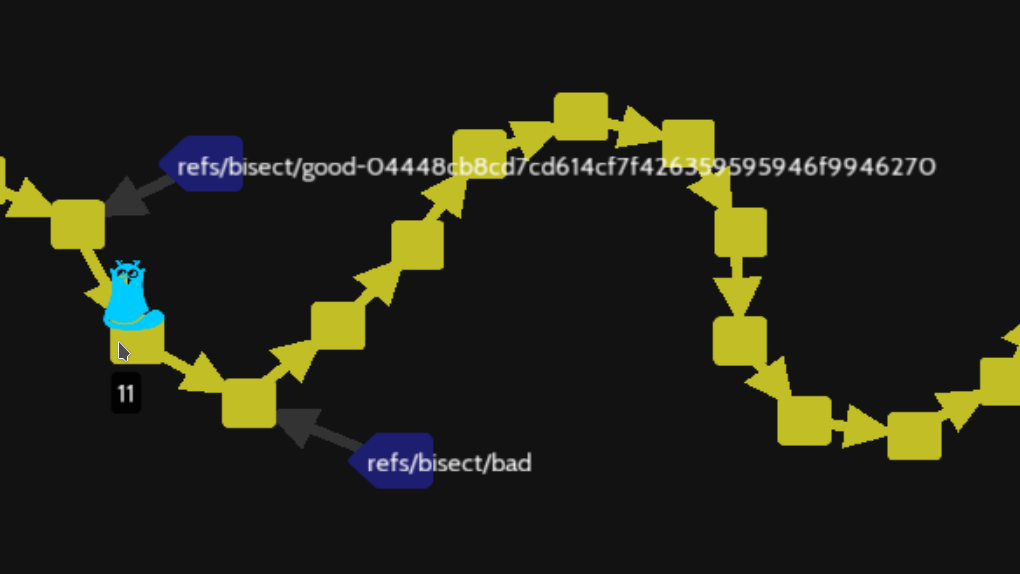
Now we can move the main branch name to this commit, but we have threes options to mark the good place (because we will not easily use the generated name from the git bisect good (refs/bisect/good-04448cd8cd7cd614cd7f42635959946f9946270)).
We will create a new branch named main-key-is-ok (with option -b to attach HEAD to this new created branch), then rename main branch as main-lost-key and rename main-key-is-ok as main :
git checkout -b main-key-is-ok

git branch -m main main-lost-key
git branch -m main-key-is-ok  main
or we can use the new git switch –create main-key-is-ok to create a new branch and place HEAD on and I the end I will use it again to keep two branch main and main-key-is-ok for historical information
git switch --create main-key-is-ok
git branch -m main main-lost-key
git switch --create main
or we can use a tag to flag the position with :
git tag key-into-pocket
git branch -m main main-lost-key
git switch --create main
If you do not want to preserve the main branch, you can just move the main and HEAD with git reset –hard using the reference
git checkout main
git reset --hard refs/bisect/bad~1
or before return the HEAD to the main branch :
git tag key-into-pocket
git checkout main
git reset --hard key-into-pocket
Next category is « stash »
35/Stashing (levels\stash\stash)
This level begin to let you use the concept of stash, you can imagine that you start from initial commit and work on files, but you are far from the moment you want to commit. You have to think that commit with a project into a team could trigger deployment and unit test, so you do not commit often.
You have a recipe file with the following content :
Apple Pie:
- 4 Apples
- 500g Flour
Add a new line like :
Apple Pie:
- 4 Apples
- 500g Flour
- Secret ingredient
The command, git stash push, will create two temporaries commits to let you work on something different.
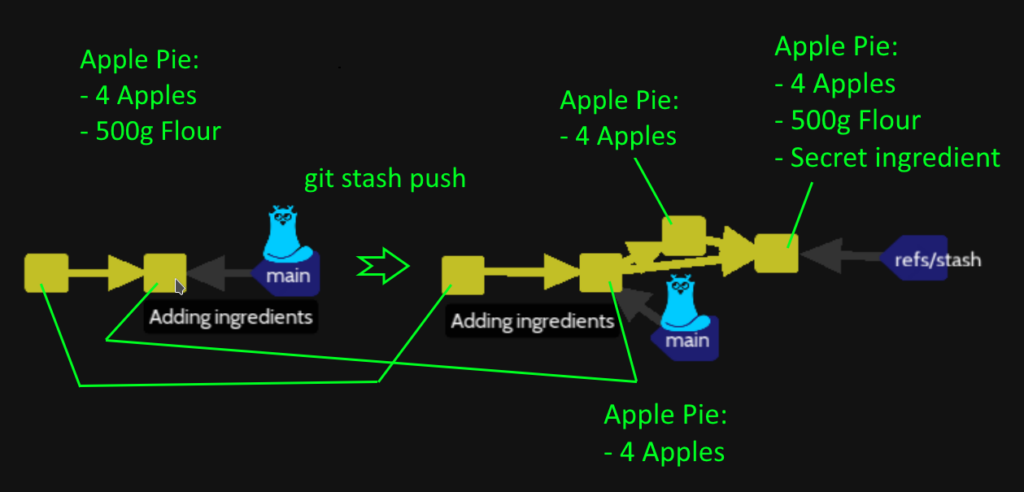
The important element is the HEAD on the main branch contains only recipe file with the following content as the initial commit was created:
Apple Pie:
- 4 Apples
You can use the git stash command as well
36/Pop from Stash (levels\stash\stash-pop)
The next level works with the previous example (without the secret ingredient line).
The git stash pop command is just the « undo » from git to reverse the situation to the initial one but preserve commits create to temporary stash.

The git stash apply command will just keep the branch reference of the stash in case of need:

You can remove the stash with git stash drop command to keep the initial situation ( the green area is supposed to be black to hide the previous refs/stash temporary branch):

37/Clear the Stash (levels\stash\stash-clear)
If you have so many stashes, you can list then, clear them or clear one :
- git stash list: to list all stashes
- git stash clear: to clear all stashes
- git stash drop : this command must be follow with the stash id stash@{0} for the last one, stash@{1} for the previous, etc
I think it is better to preserve one stash and avoir this situation.
38/Branch from stash (levels\stash\stash-branch)
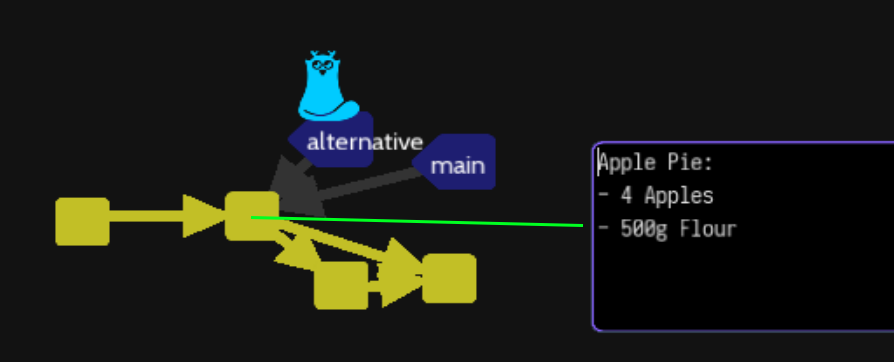
A more common situation is to transform a stash commit into a new alternative branch to go on with :
git stash branch alternative
39/Merging popped stash (levels\stash\stash-merge)
A classical situation, you want to merge content from the recipe main branch commit and the recipe main into the stash commit :
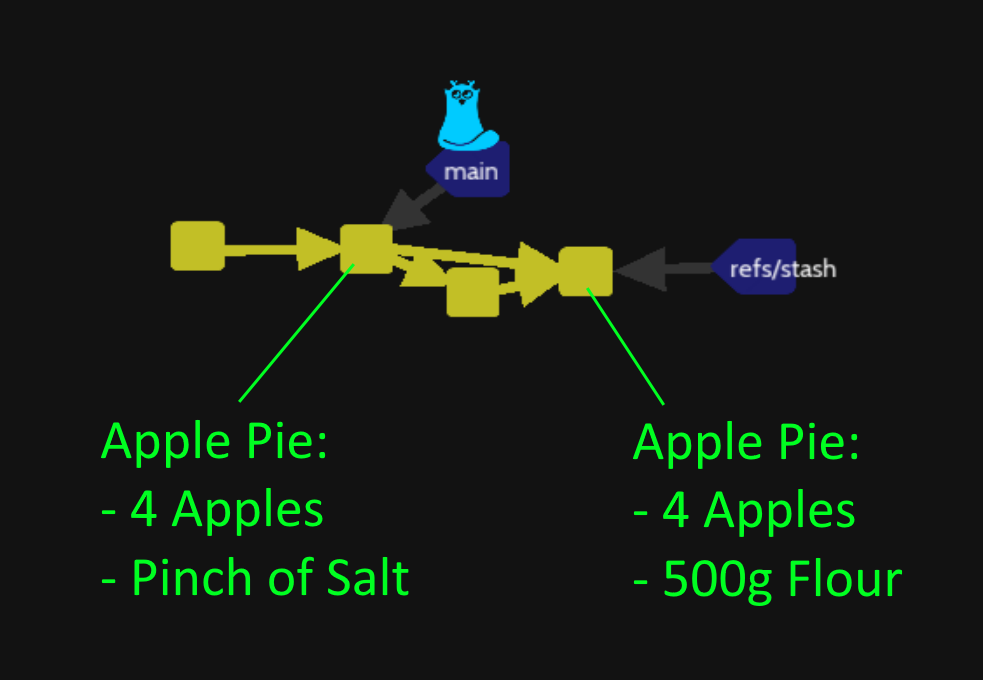
The git stash pop command will create a conflict into the recipe file :
Apple Pie:
- 4 Apples
<<<<<<<<< Updated upstream
- Pinch of Salt
========
- 500g Flour
>>>>>>>>>> Stashed changes
Just edit the file to correct the situation, as for example :
Apple Pie:
- 4 Apples
- Pinch of Salt
- 500g Flour
The following command will create a classical situation:
git add . ; git commit -m "Include salt and flour"
Do not forget to clear the stash with git stash drop command.
The next category will work with tags.
40/Creating tags (levels\tags\add-tag)
This level is just to create a tag with the classical git command. The feature-list file contains :
Adding feature 1
Adding feature 2
Adding feature 3
git tag v3
I suggest creating a tag to indicate version is 3
41/Removing tags (levels\tags\remove-tag)
The next level contains 3 tags to remove as :
git tag -d v1
git tag -d v2
git tag -d v3
42/Tagging later (levels\tags\add-tag-later)
This level is just to understand that you can tag previous commit into the history of commit with :
git tag v1 HEAD~1
43/Remote Tags (levels\tags\add-tag-later)
This level manage to push your tag that are not usually suppose to be share (branches are supposed), but this is the initial situation :
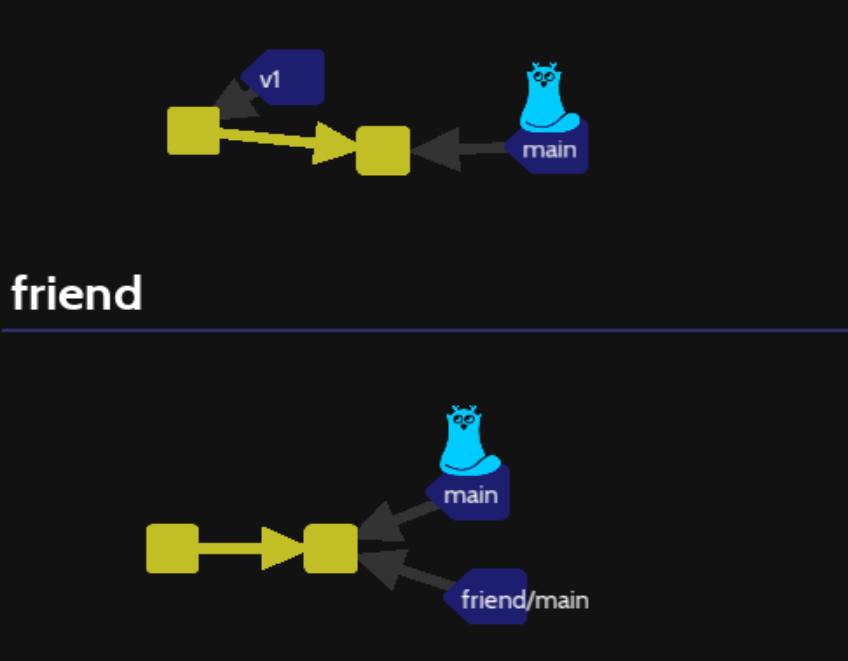
If you create on local HEAD a new tag v2 you can share with the remote friend repository :
git tag v2
git push friend v2
Then you can delete it remotely :
git push friend --delete v2
You can also rescue the v1 tag from friend repository with :
git fetch friend
If you wan to delete you local tags if there are not into your friend repository :
git fetch friend --prune --prune-tags
The next category is sandbox.
44/ Sandbox (levels\sandbox\)
There are 3 levels without goals just to work on git with 3 differents situations. Name of exercises are explicit :
- Empty sandbox
- Sandbox with a remote
- Sandbox with three commits
Do not forget you can add your own exercice into Oh my git a very good tool to create situation to learn git.
Using Github with Oh-My-git
The Oh-my-git software is design to train you using git on your computer, but you can manage to let it works with the GitHub.com website. Github is not the only website providing git server storage, Gitlab software could be installed, Amazon, Sourcesup (Renater), Bitbucket, etc. provide also git server storage.
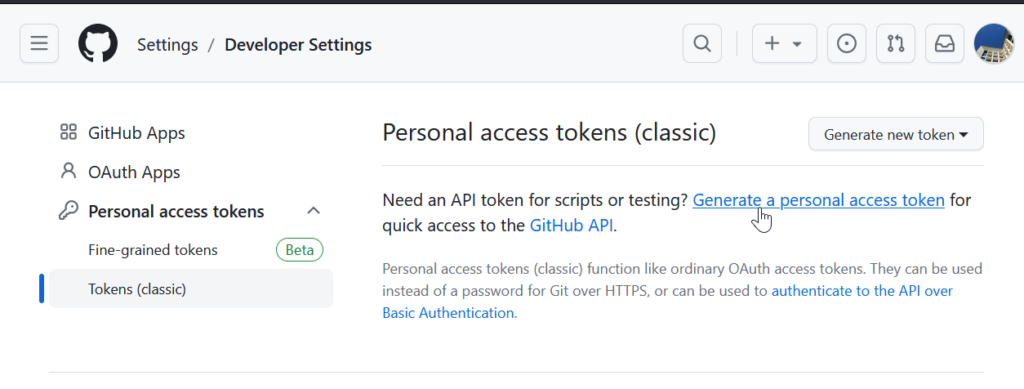
At first, you have to create a Github account, then open You Menu > « settings » > Developer settings > Personal access tokens > Tokens (classic) or just follow https://github.com/settings/tokens , then « Generate a personal access token » :
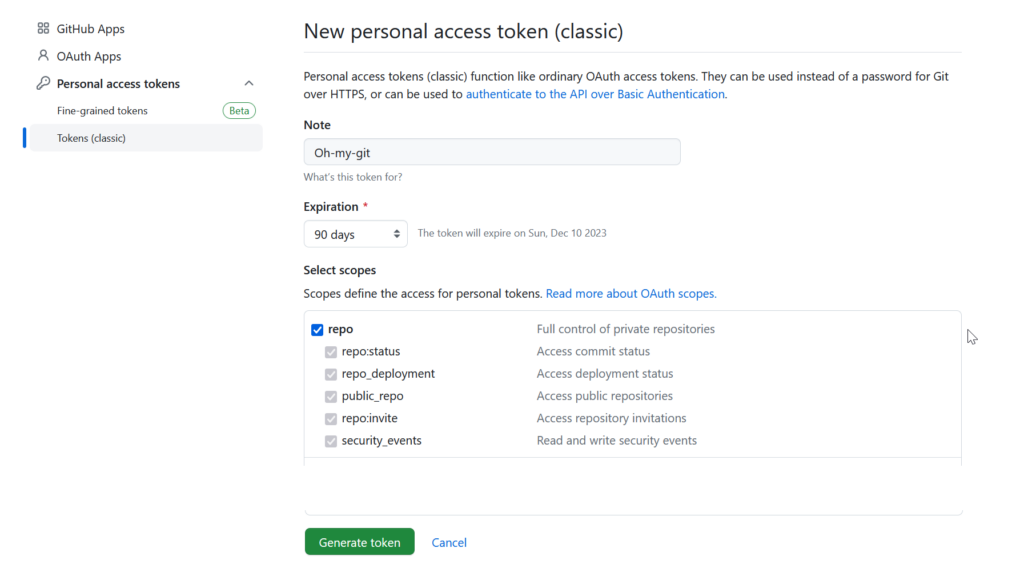
Then you can provide a name of this token, give an expiration date (not perpetual), give right at least on repo rights and press the bottom button « Generate token » :
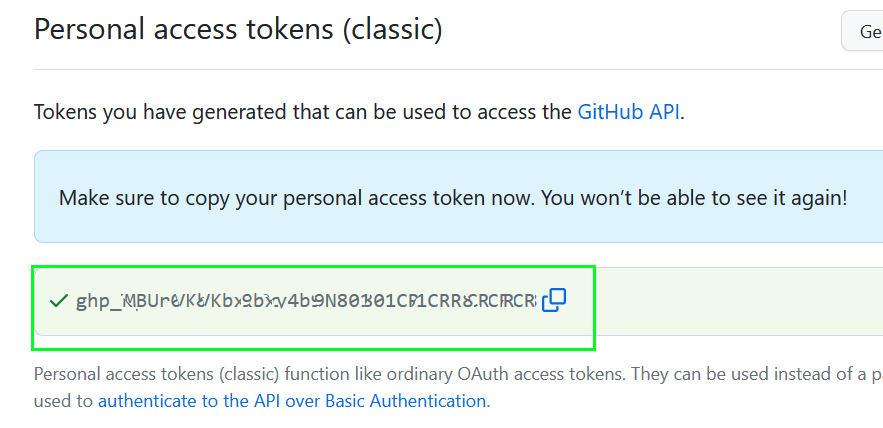
Then you have to copy the generated token, please be sure to copy the token because there is no way to give you back this one. If you lost it, you have to create a new one.
Github website provides the basic start we need on the first page you see after login creation.
At first, create a new private repository to practice :
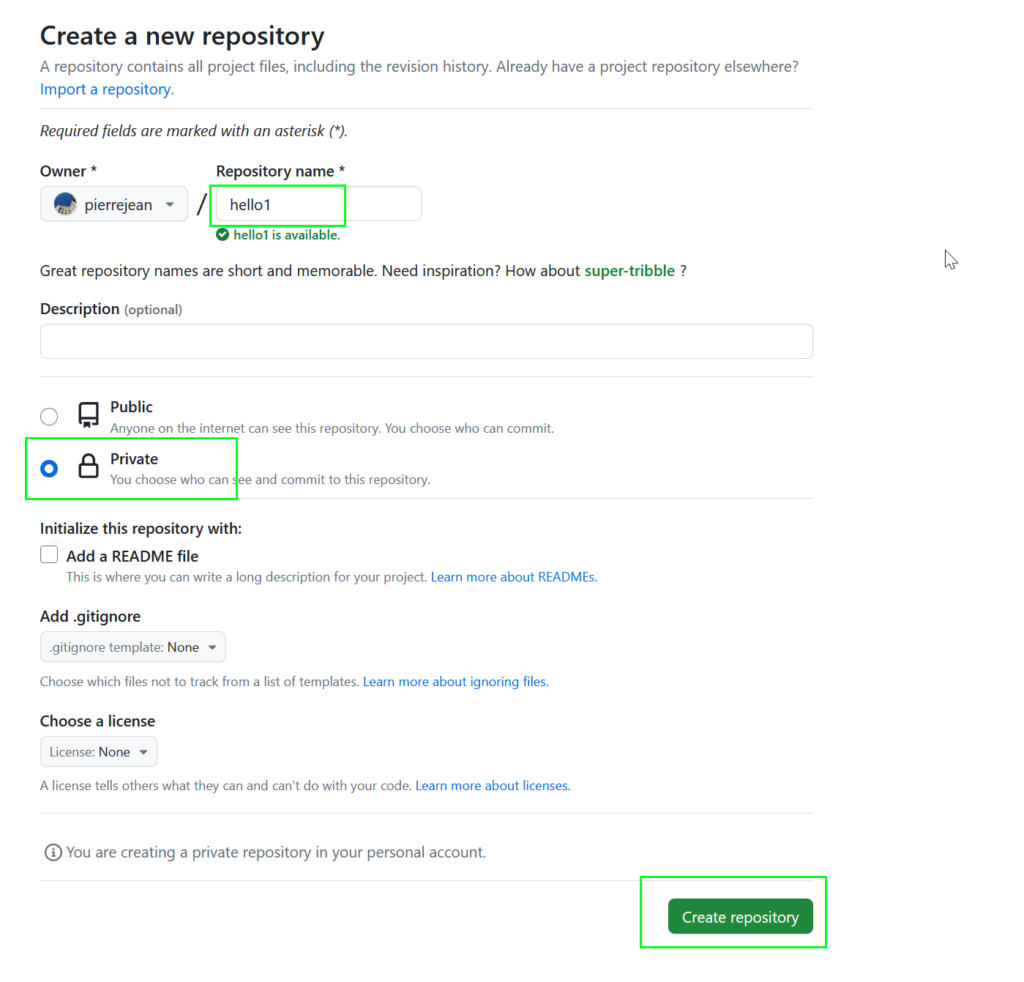
Then you have the quick setup listing commands to Oh-my-git could use with the token modification :
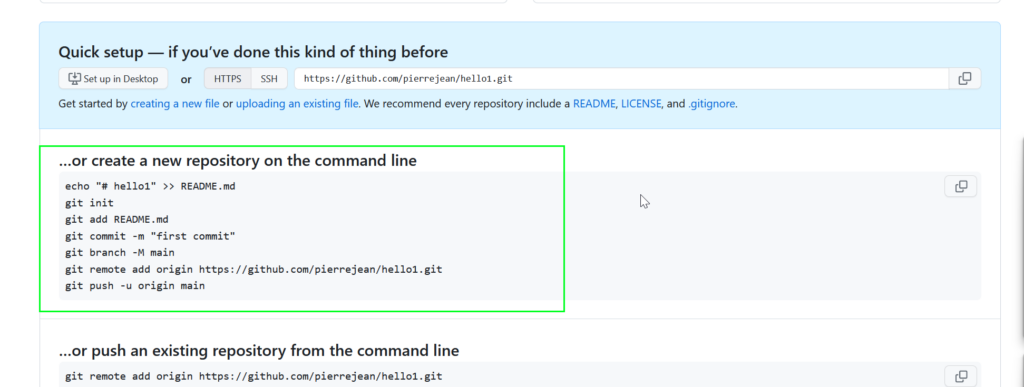
Let’s start to use GitHub with Oh-My-git, open the « Empty sandbox » level and delete the initial configuration :
rm -rf .git
Then you can enter the quick setup commands, except adding your token into the URL :
echo "# hello1" >> README.md
git init
git add . ; git commit -m "First commit"
git branch -M main
git remote add origin https://<token>@github.com/pierrejean/hello1.git
git push -u origin main
This will create the README.md file into your Github repository.
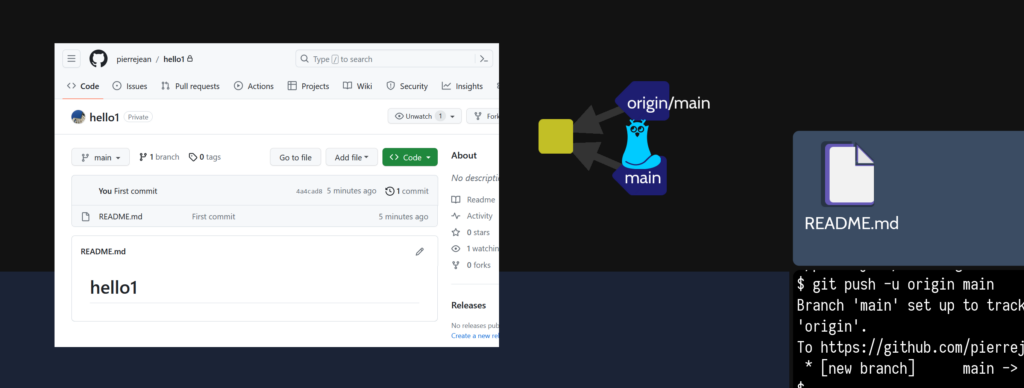
More important information about remote connection :
The following command creates an alias origin to link git push command to a server :
git remote add origin https://<token>@github.com/pierrejean/hello1.git
We saw the remote repository as friend or teacher in previous levels:
git remote add friend https://<token>@github.com/pierrejean/hello1.git
If you want to change the URL to use origin as classical alias, the command is :
git remote set-url origin https://<token>@github.com/pierrejean/hello2.git
In fact, Oh-Myt-git do not provide a secure way to login/password from https/ssh default solution with Git/GitHub so using a token is a simple solution also for integration but keep the token as safe and secret as any password.
But please add default user and email for your local account :
git config --global user.name "pierrejean"
git config --global user.email "pierre.jean@mines-ales.fr"
You can create prefill a new github repository from your browser with this URL :
https://<token>@github.com/new?name=hello2&owner=pierrejean&visibility=private
More stuff
After train with Oh-my-git, you should use a more advanced tool to work with Git as GitHub Desktop, Git Kraken, IDE plugin for git, but it is important to know what GIT commands do.
But if you want to display into the terminal as close as Oh my git, you could use this command :
git log --oneline --graph --all --decorate
To output branches, commits, commits messages in parentheses, tags (here all version vX ), etc.
* 2a6cf7f (deadend) v6
* 06c61e4 (HEAD -> main) v5
| * b8b1318 (alternative) v4
|/
*   1fe4f31 v3
|\
| * 7dc37f1 (first) v2
* | 58d7bb0 v2.a
|/
* 598c50e v1
You can add color, date of commit and email with
To avoid to all the time call git log with all options, you can create an alias with :
git config --global alias.lg "log --oneline --all --decorate --color --graph --pretty=format:'%Cred%h%Creset -%C(yellow)%d%Creset %s %Cgreen(%cr) %C(bold blue)<%ae>%Creset' --abbrev-commit"
The new git lg command will produce :
* 2a6cf7f (deadend) v6 (19 hours ago) <pierre.jean@mines-ales.fr>
Two more stuff
You can add one file or one folder with git add . or git add README.md or you can :
git add :/
This will add all file from the top folder where you enter git init command.
And more important, two commands to compare difference on one file, suppose one file equipe1.txt file, one version is :
Equipe1
********
The other version is :
Equipe1
------
The classical conflict will show :
Equipe1
<<<<<<< HEAD
**********
=======
-------
>>>>>>> 50b69dcb7523fbe3e051e695ae5f3ffb21068013
To show difference on the HEAD and the 50b69dc, I can :
git diff HEAD 50b69dc .\equipe1.txt
to show difference :
diff --git a/equipe1.txt b/equipe1.txt
index c62584c..8856277 100644
--- a/equipe1.txt
+++ b/equipe1.txt
@@ -1,2 +1,2 @@
 Equipe1
-**********
+-------
Or we can use a word difference on the same line to display more nicely :
git diff --word-diff=color HEAD 50b69dc .\equipe1.txt
Then on the same line difference are visible :
diff --git a/equipe1.txt b/equipe1.txt
index c62584c..8856277 100644
--- a/equipe1.txt
+++ b/equipe1.txt
@@ -1,2 +1,2 @@
 Equipe1
**********-------
We can see the difference more easily, but a better way is to show in parallel :
git difftool -y -x sdiff HEAD 50b69dc .\equipe1.txt
To display just side by side difference :
Equipe1                      Equipe1
**********                  | -------
Evolution of git with git switch
The initial git checkout command covers so many different operations that git try to create new commands that cover some as an alternative. This link provides some corresponding conversion: https://stackoverflow.com/questions/57265785/whats-the-difference-between-git-switch-and-git-checkout-branch
Mainly, you can understand :
| git initial command | new git alternative command |
| git branch new_branch && git checkout new_branch | git switch –create new_branch |
| git checkout — <file> | git restore — <file> |
