
First, you can download slides from Web Development course, which include detailed explanations of Servlet/JSP development using MVC pattern. Feel free to review them regulary to refresh your understandoing of the features.
Development tools and software are free and/or open source. Tomcat 9 and Eclipse J2EE are provide regarding of your OS on this website to fast download http://www.dev.lgi2p.mines-ales.fr/install/, but you can also download online anyway :
- Eclipse IDE for Enterprise Java and Web Developers (not another version of Eclipse IDE and NOT any version from some others trainings) : https://www.eclipse.org/downloads/packages/release/2025-03/r/eclipse-ide-enterprise-java-and-web-developers
- Java JDK 21 from Oracle : https://www.oracle.com/java/technologies/downloads/#java21 unzip the file could be the easy solution to manage several version of Java
- Apache Tomcat 9 Core version https://tomcat.apache.org/download-90.cgi common for any operating system
- Web Browser for Web Development as Chrome/Chromium/Edge or Firefox with embedded DevWeb Tools (CTRL+MAJ+I) mainly tab /Network, Inspect and Source will be used
- Some other library and tools will be downloaded as databases tools and JARs libraries later (Junit, Log4J, etc.), you can find into the folder : http://www.dev.lgi2p.mines-ales.fr/install/Jar/
TP 0 Installation Eclipse and Tomcat to adapt regards your OS and specific configuration
Somes requirements to avoid some of complex errors (real-world feedback, trust me):
- No folder with space and special symbols: please avoid letters/symbols outside range a-z, A-Z, 0-9 and « -«
- No so long path, please avoid to install into c:/Utilisateurs/A-very-long-name-as-the-user-of-the-computer/Documents/Courses-IMT-Mines-Ales/Computer-Sciences/Web-Developpement/… Windows and MacOs could be limited into the long path
- No import from an other friend/server/ old contents without explains (ie: import a web.xml file is not a good idea while using annotations)
- No tools into an othere tools, please try to have this classical folder structure :
c:/DEV
|
+--|
   +---apache-tomcat-9.0.106
   ¦   +---bin
   ¦   +---conf
   ¦   +---lib
   ¦   +---logs
   ¦   +---temp
   ¦   +---webapps
   ¦   +---work
   +---eclipse-jee-2025-03-R-win32-x86_64
   ¦   +---configuration
   ¦   +---dropins
   ¦   +---features
   ¦   +---p2
   ¦   +---plugins
   +---jdk-21_windows-x64_bin
   ¦   +---bin
   ¦   +---conf
   ¦   +---include
   ¦   +---jmods
   ¦   +---legal
   ¦   +---lib
   +---Workspace
Please at first install an Oracle Java JDK version 21 for compatibility purpose, and check the folder where installation is done. JDK update process could also change the folder path.
If needed, look on your computer to find a software call javac.exe or javac to be sure to find a Java JDK not the Java JRE. The Java JRE is not design to manage Tomcat, and errors will be find later into the process. So please it will better to double check and write down the path to a full standard Oracle Java JDK.
Download and unzip Apache Tomcat 9 core version into a subfolder without space or not classical characters as accents or special characters. Usually with Windows OS, I am please to find a folder call c:\Developpement or c:\DEV to easy managed software programs. With Tomcat is common to unzip C:\DEV\apache-tomcat-9.0.75\ (but it is better to avoid C:\DEV\apache-tomcat-9.0.75\apache-tomcat-9.0.75\)
Download and unzip the Eclipse IDE for Enterprise Java and Web Development, later called Eclipse J2EE into a specific folder without space or not classical characters as accents or special characters. Usually with Windows OS, I am please to find a folder call c:\Developpement or c:\DEV to easy managed software programs. I usually unzip everything into C:\DEV\eclipse-jee-2023-12-R-win32-x86_64\ (but it is better to avoid C:\DEV\eclipse-jee-2023-12-R-win32-x86_64\eclipse\)
NOTE: don’t use another Eclipse software provide by another courses, Eclipse Plugins could be in conflict and version of settings could lead to troubles in this training and orthers.
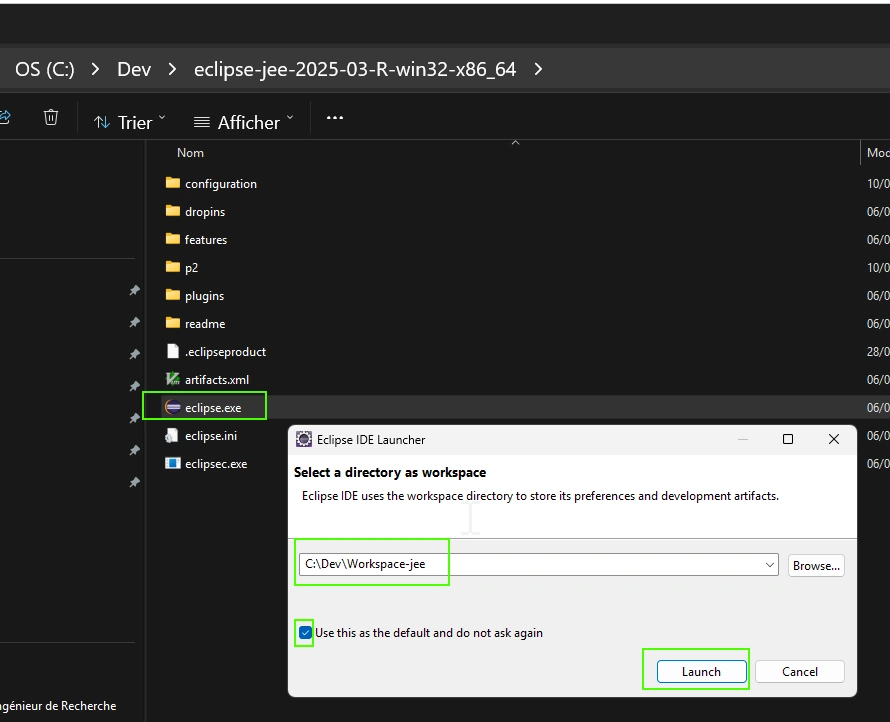
Start Eclipse with eclipse.exe or eclipse program, then answer settings as bellow :
- The folder Worskspace (as Windows path C:\DEV\Workspace) will store all settings and projects, so it is important to backup this place regularly.
- Tick « Use this as the default and do not ask again » prevent Eclipse to popup this dialog each time Eclipse start. You can switch Workspace in case with Menu File > Switch Workspace.
Then you can close the « Welcome » tab windows, not really useful at this moment.

The next step is to remove the default Java JRE from Eclipse J2EE and provide our Oracle Java JDK. Technically, Eclipse J2EE could manage several Java versions but we will keep simple with only one JDK.
- Menu « Windows » > « Preferences » > « Java » > « Installed JREs »
- Select the unique « jre(default) » installed by default by Eclipse
- Press buton « Edit » to provide « JRE Home » directory is the full path of the initial Oracle Java JDK noted at the first step.
- And change the « JRE name » to « jdk-21 » and « Apply and close » to record everything

Eclipse IDE provide several tabs organizations call perspectives. We will use mainly Java EE perspective and Debug Perspective. Please use Menu « Window » > « Open Perspective »> > »Other » and activate « Java EE » perspective (top right button).
Java EE Perspective is the only perspective with « Server » Tab so if you do not find this tab please switch perspective or right click on « Java EE » perspective button to reset this perspective to its initial configuration.
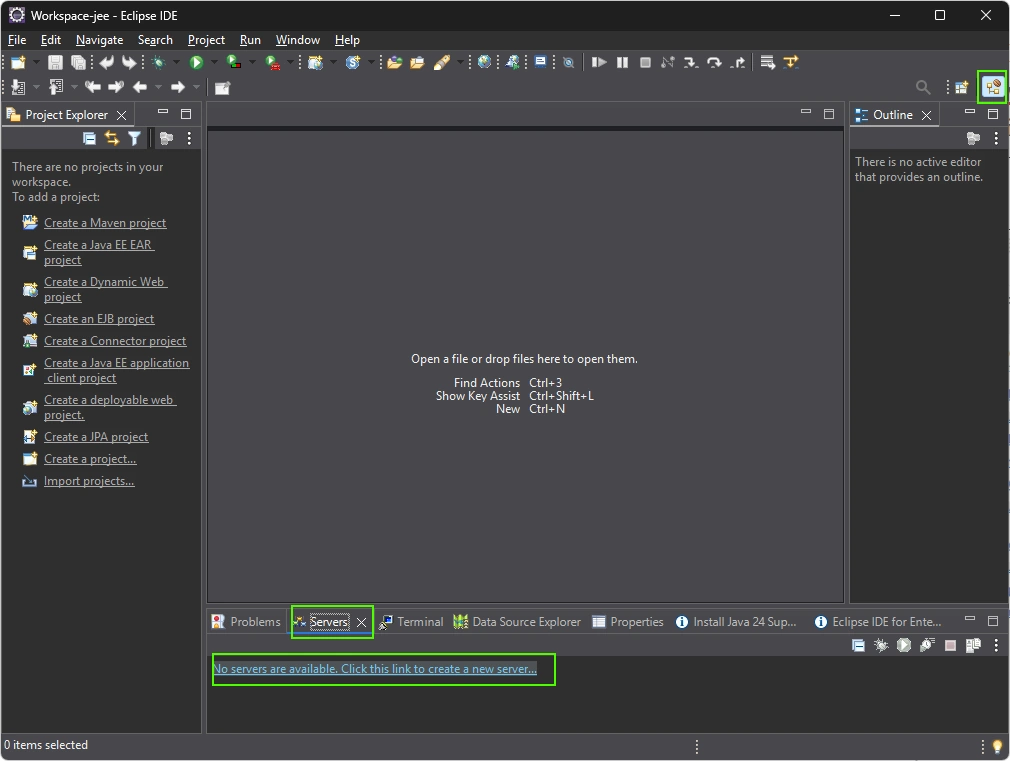
Then click on « No servers are available. Click this link to create a new server »
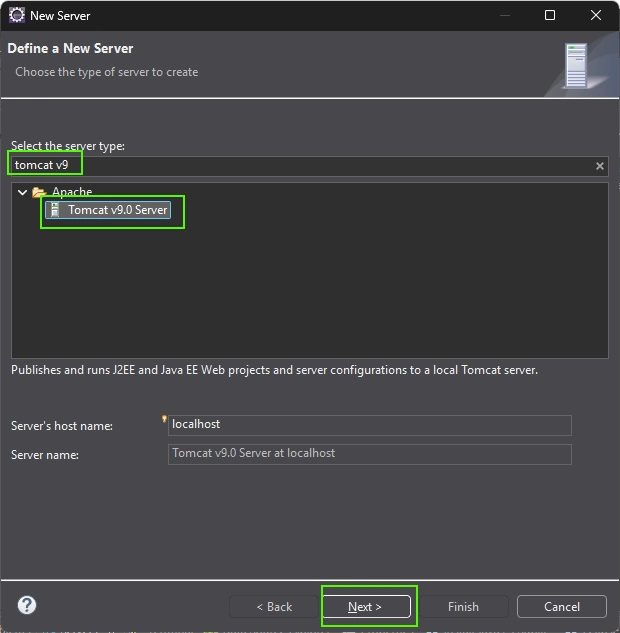
The first step is to select the « Tomcat 9 Server » version (enter « tomcat v9 » to filter)
Please provide, the full path to find the Apache Tomcat previously download and unzip as below. I like to choose the correct JDK installed previously. Eclipse will trigger an error if any update change the JDK provide by default (when your OS updated Java for example):
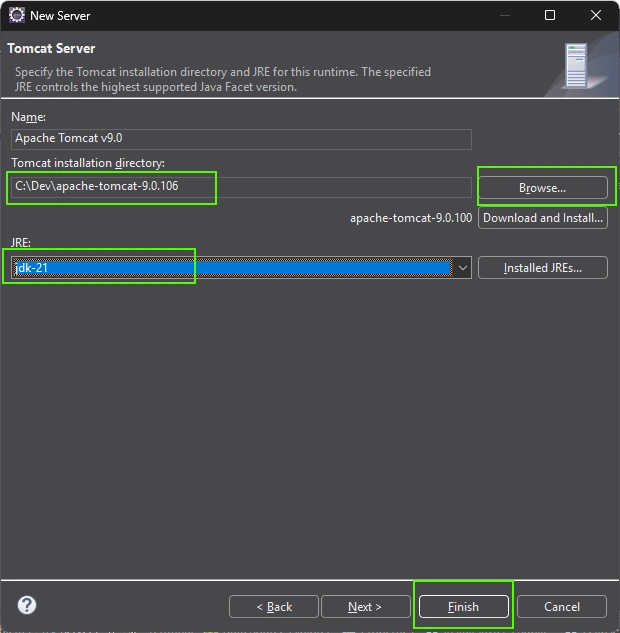
When press « Finish » you will return to the main interface, and then you can open tab « Server », right click to open the menu and start in Debug Mode this Apache Tomcat server from Eclipse.
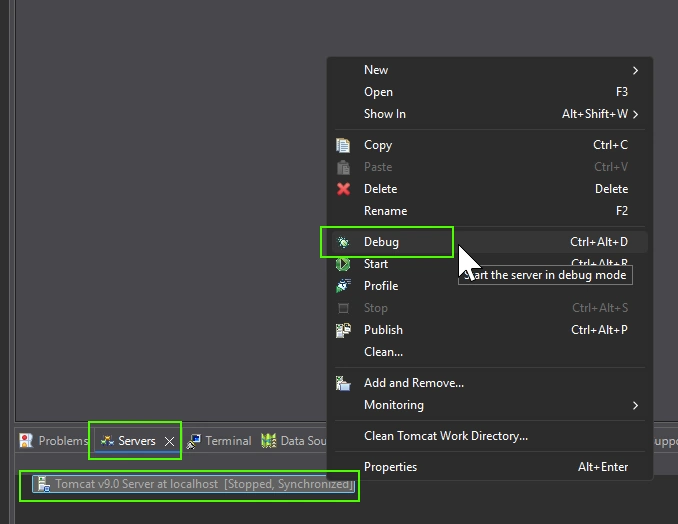
On Windows, the firewall dialog should be open to ask you the authorization to give access to the network to Java and Eclipse, so please answer yes.
Open « Console » tab to consult all output from Tomcat server, the last sentence should be « The server startup took [xxx] milliseconds » to inform you the configuration is correct.
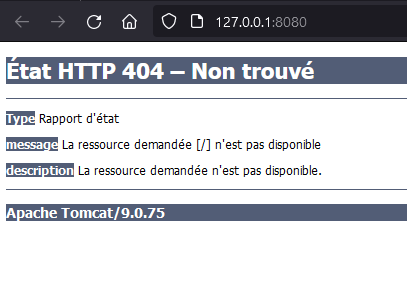
To confirm, please open a web browser and consult http://127.0.0.1:8080/ , you could be surprise by :8080, the default settings for Tomcat in development is to listen the 8080 port instead the default http port 80 or the default https port 443.
The front page will be 404 page because no content will be at present deploy by Tomcat but this page with « Apache Tomcat/9.0.xxx » (xxx could a security update) shows everything is fine just there is no content:
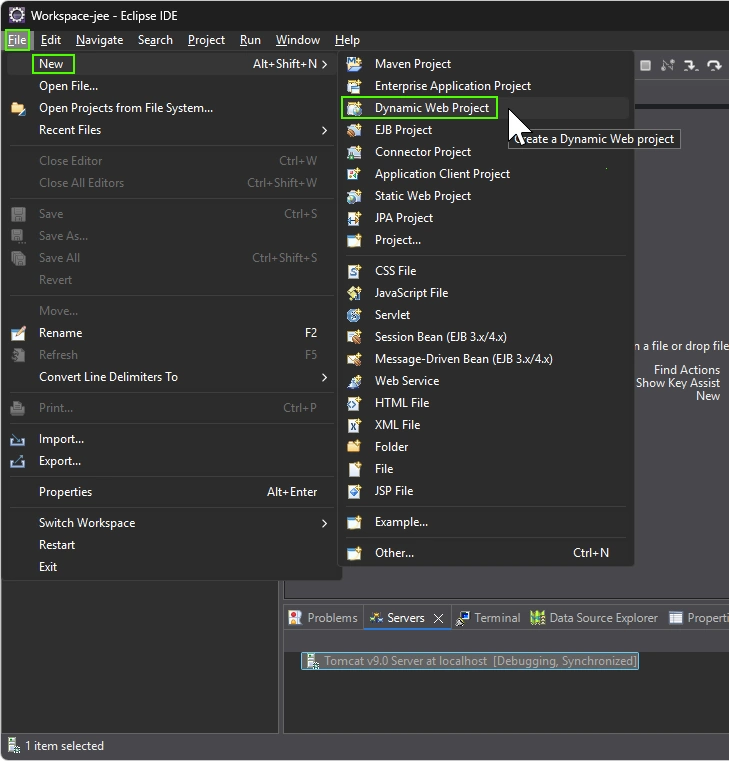
So now, we will create a new project to deploy content into Tomcat. With Eclipse, use Menu File > New > Other > Web > Dynamic Web Project:
Then provide a Project Name without space or specific characters as accents. DevWeb will be ok . Please check:
- The workspace folder where your code will be store, please backup the whole folder
- The « Target runtime », sometime Eclipse do not provide the server configuration, so check
- Check « Configuration » sometime Eclipse do not provide any configuration, so please check

When everything is OK then press « Finish » button (You can press Next to see default settings but please do not change then).
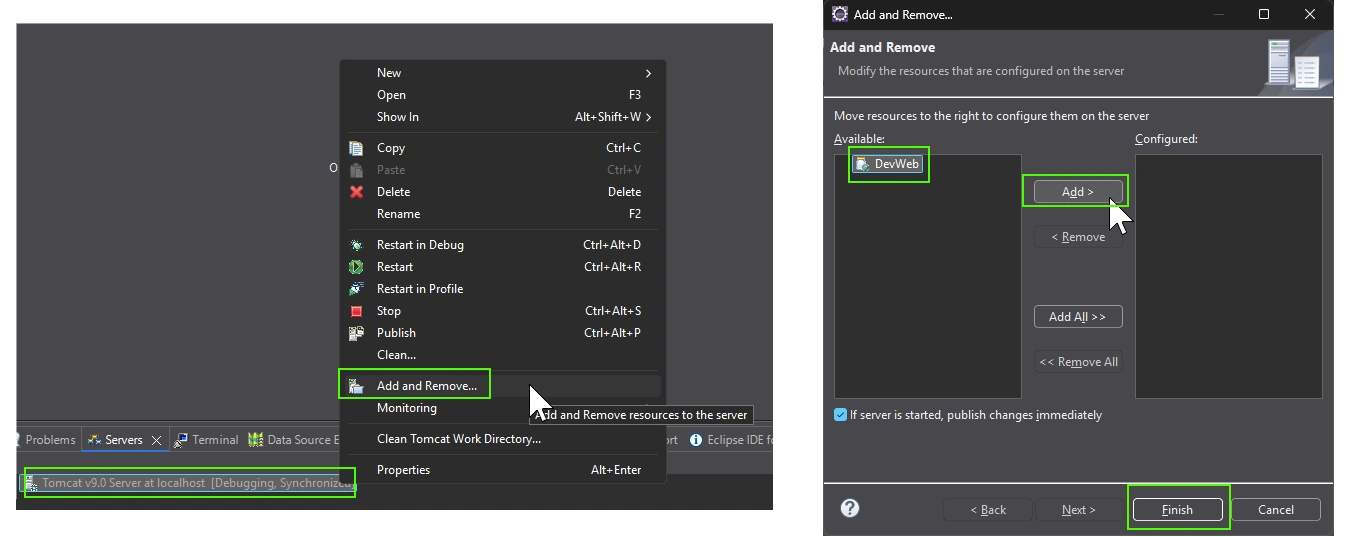
Then you have to add this project to our fresh new Tomcat server.
With the « Server » tab, right clic on the Tomcat Server and select « Add and Remove », with the new dialog windows, press « Add all>> » to add this project then « Finish » button :
Tomcat will automatically deploy the Dev Web project on Tomcat Server. So now download the IMT Mines Ales logo PNG image (https://upload.wikimedia.org/wikipedia/commons/thumb/2/2e/IMT_Mines_Al%C3%A8s.svg/640px-IMT_Mines_Al%C3%A8s.svg.png) into the desktop.
You can drag and drop the image from the desktop to the src/main/webapp/ folder and choose « Copy files » or you can place the image into the disk at C:\DEV\Workspace\DevWeb\src\main\webapp\ but after you have to « Refresh » the project by pressing F5 key :
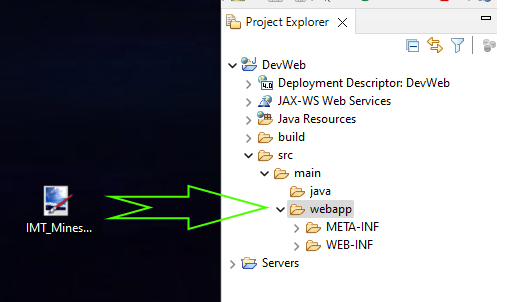
Now try to correct the URL http://127.0.0.1:8080/ by adding the project name and the image filename to display this image into the browser. The default form should be « http://127.0.0.1:8080/DevWeb/<image_name>.png »
By default, some Web server could display the content of the folder, but the default configuration of Tomcat is to hide the folder content.
Now we can add HTML and CSS content from the CSS Zen Garden website, you can download the HTLM file and the CSS file and place those file into the webapp folder. You should restart Tomcat Server to force deployment of file 217.css and « CSS Zen Garden The Beauty of CSS Design.htm » file and consult the URL http://127.0.0.1:8080/DevWeb/CSS%20Zen%20Garden%20The%20Beauty%20of%20CSS%20Design.htm
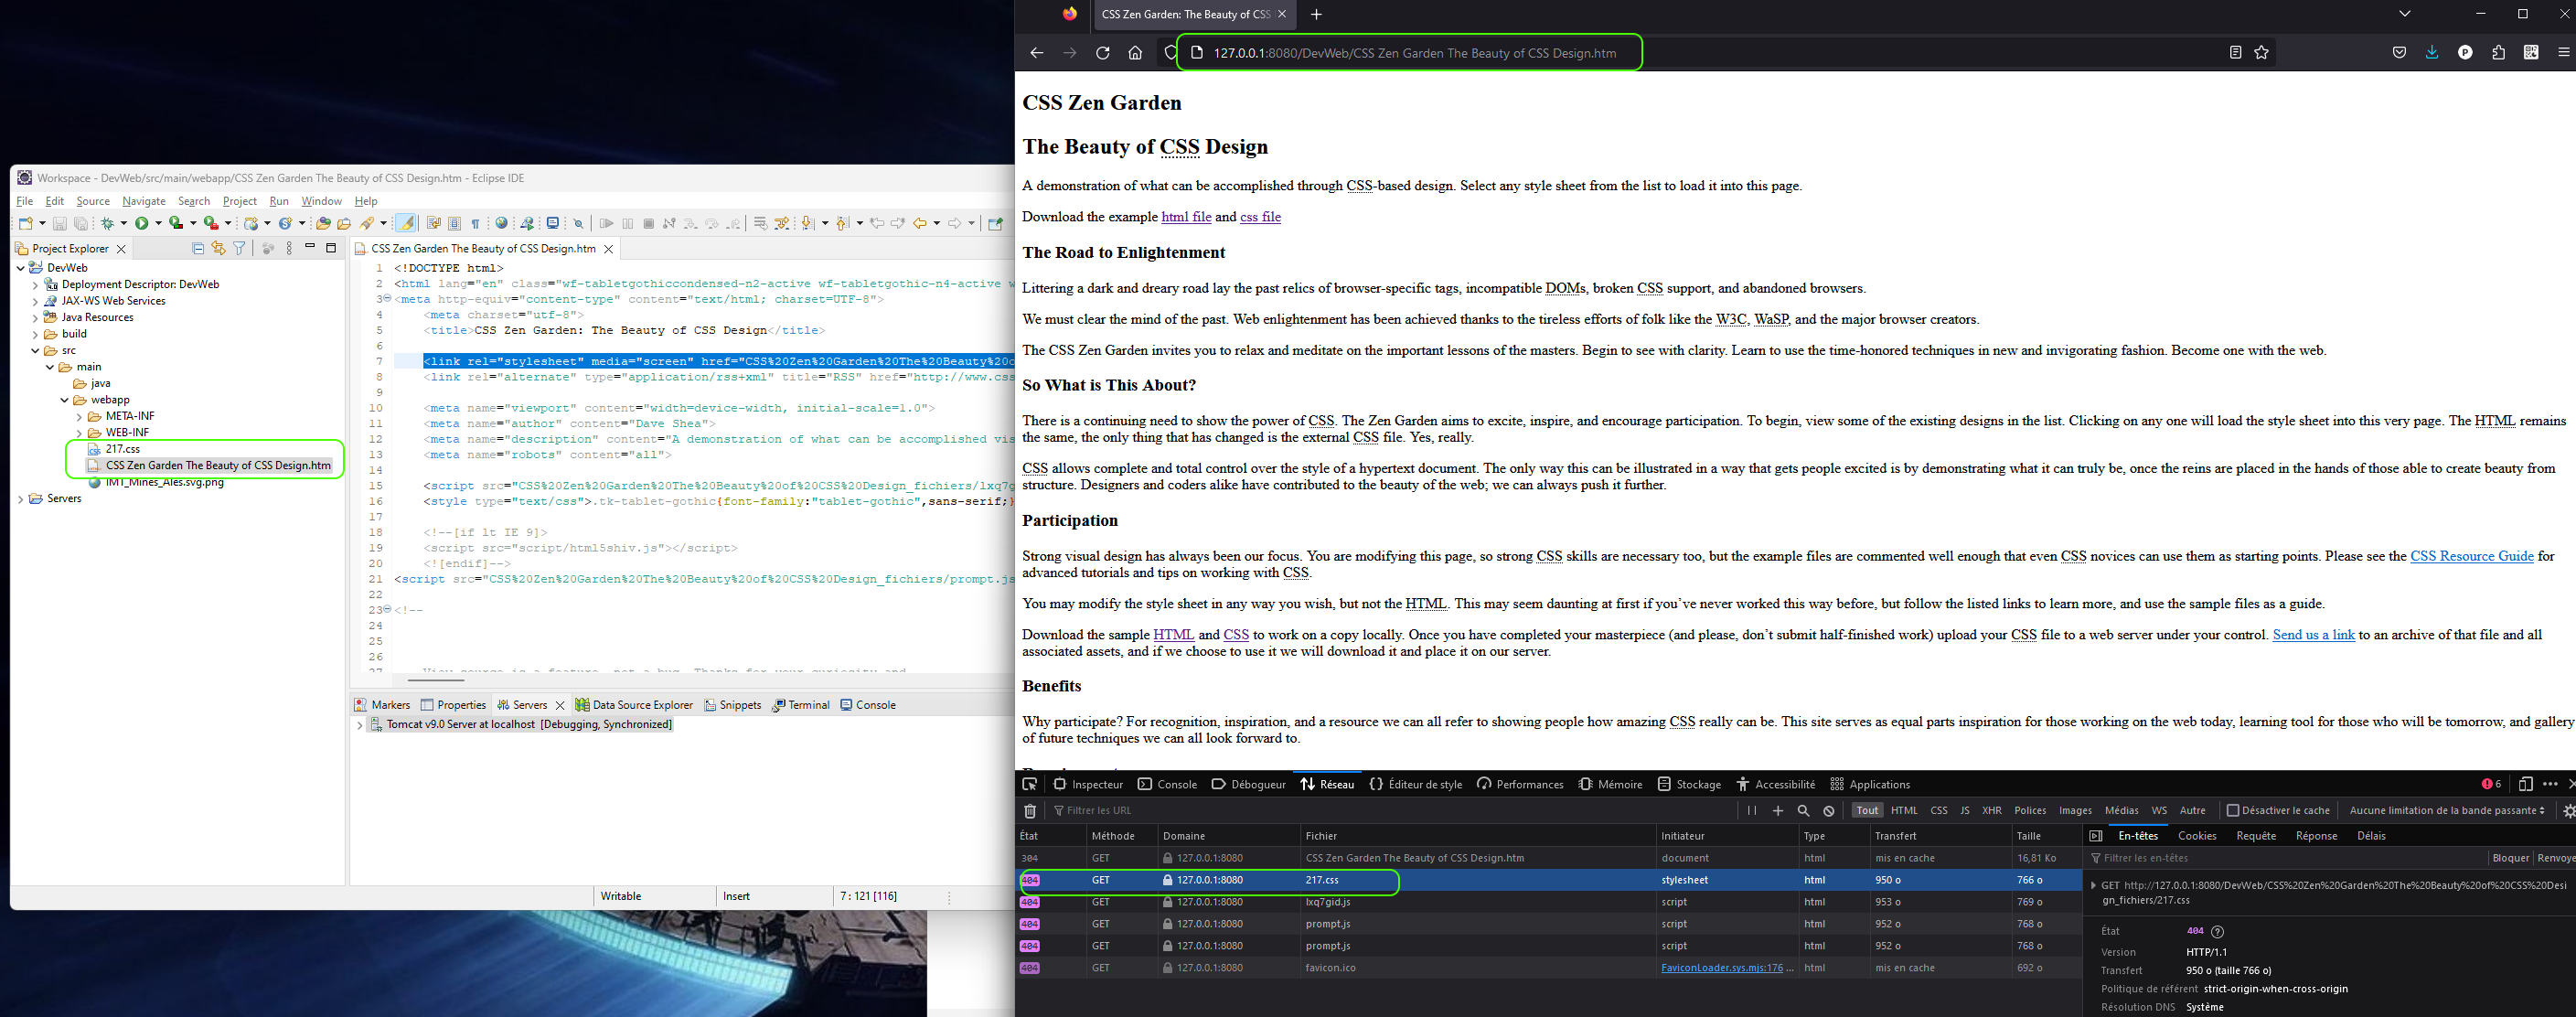
You can see with the DevWeb tool of Firefox/Chrome Browser (CTRL+ALT+I key) there are trouble with the 211.css file. The Network tab show the browser is not able to download the 211.css file. You have to correct the « CSS Zen Garden The Beauty of CSS Design.htm » file to match the URL.
NOTE: anytime you find %20 is the encoding URL value for space, please correct the HTML file to help the browser to download and apply the stylesheet file. The way to open « Network » tab with DevWeb Tools into the Web Browser is the correct way to look of trouble with Web Development, key this way of working in your mind.
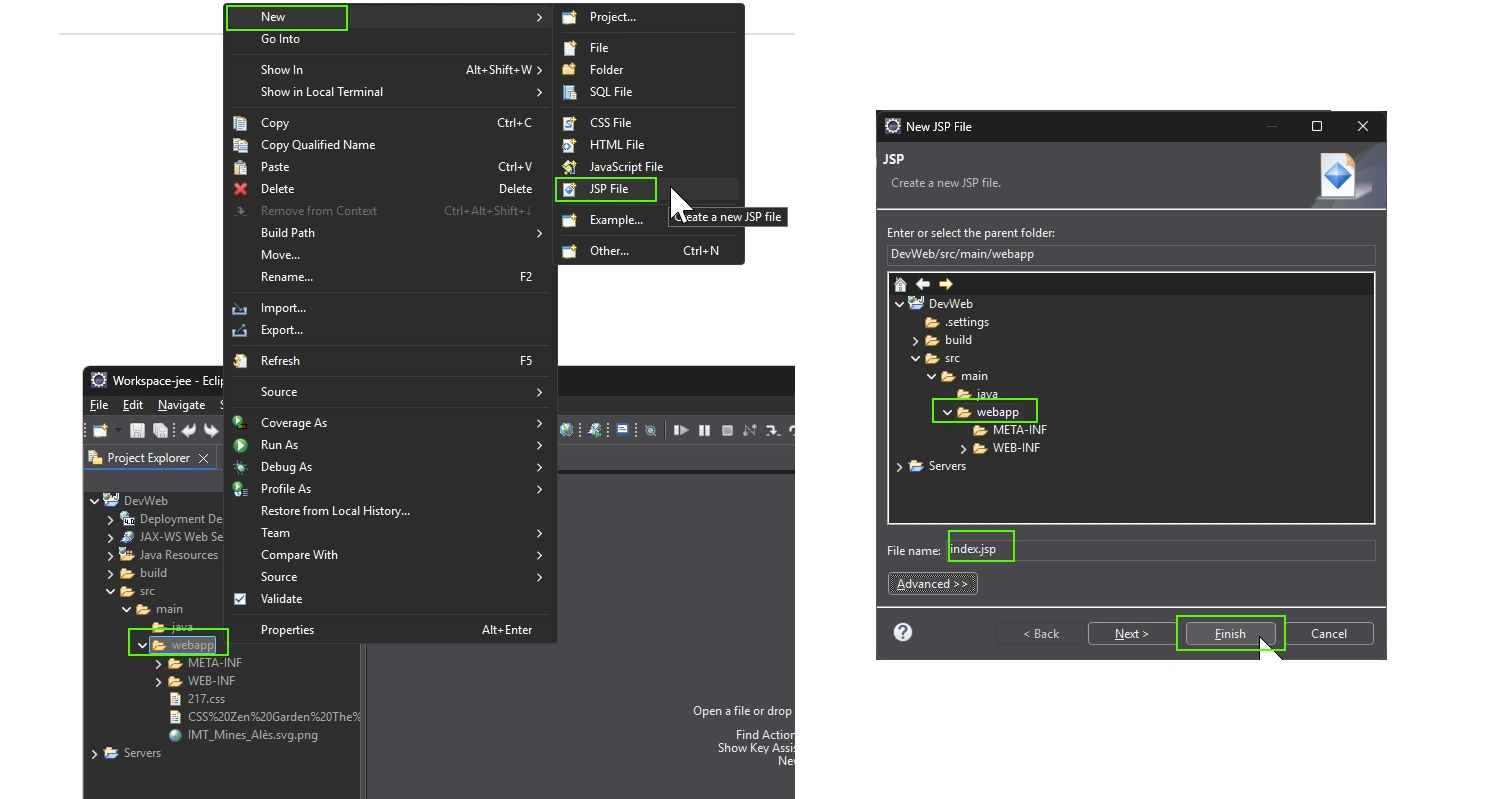
Next step is to create index.jsp page with right clic on the « webapp » folder then File > New > JSP File, you have to provide the filename as index.jsp and the parent folder should be src/main/webapp by default.
Then add the folowing code to display display number from 0 to 9 :
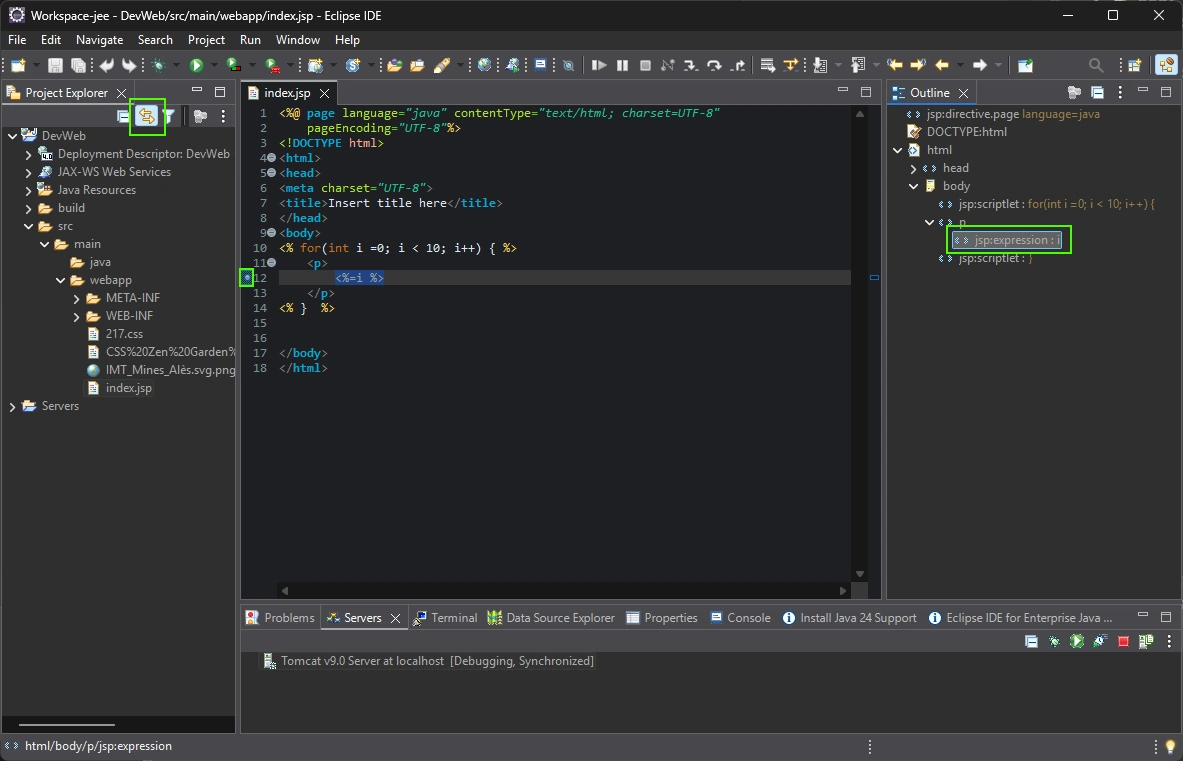
Severals informations from this interface :
- A breakpoint is created with a click on the left of the line number 12. You can remote it by double clic but keep the breakpoint to debug
- On the left interface « Project Explorer », « two arrows » icon link the visible file to the « Project Explorer » to display which file is edited
- On the right « Outline » sumerise the tree of HTML/JSP content
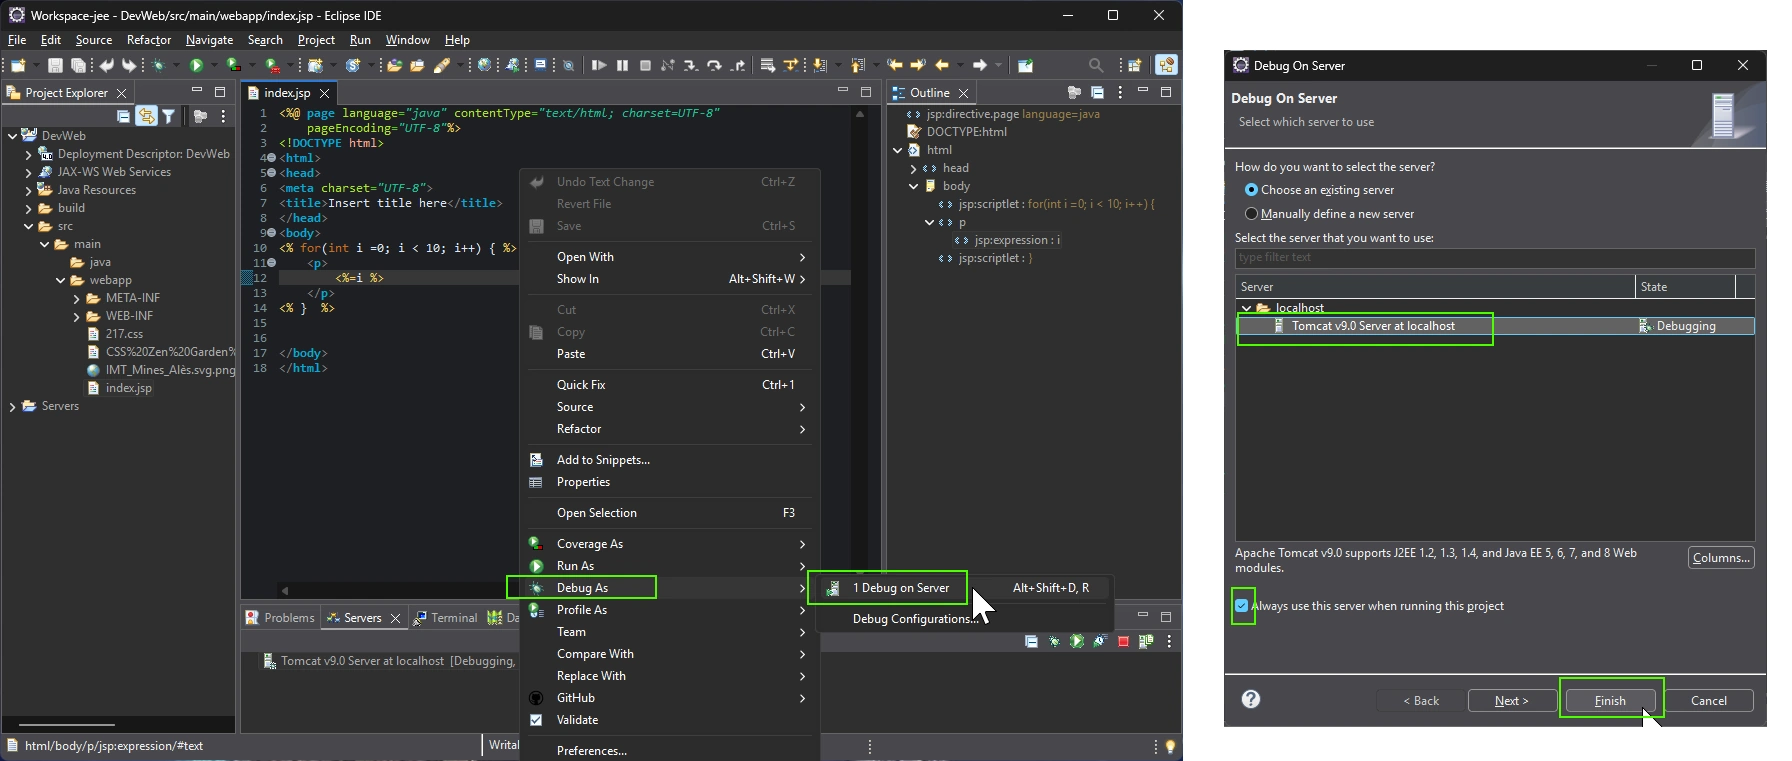
You can add a title to your page and click on the left of line number to add (or remove if needed) a breakpoint, then click on the source code to open the menu to Debug As > « Debug on Server » then choose « Tomcat 9 server » and check « Alway use this server when running this project » to avoid this step later, then click on « Finish ».
You should have an Eclipse dialog to ask you two questions:
- Server: Yes we want to « restart server » everytime we start a « debug » session
- Confirme Perspective Switch: Yes we want to switch perspective to debug to have specific area for debug
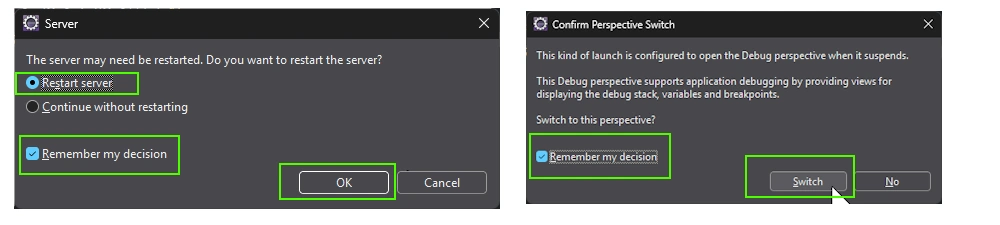
You should check « Remember my decision » and button Switch to prevent this step later.
Eclipse then open the default browser for your OS (we can change easily with Menu Windows > Preferences) and start to debug the JSP at the line marks by the breakpoint.
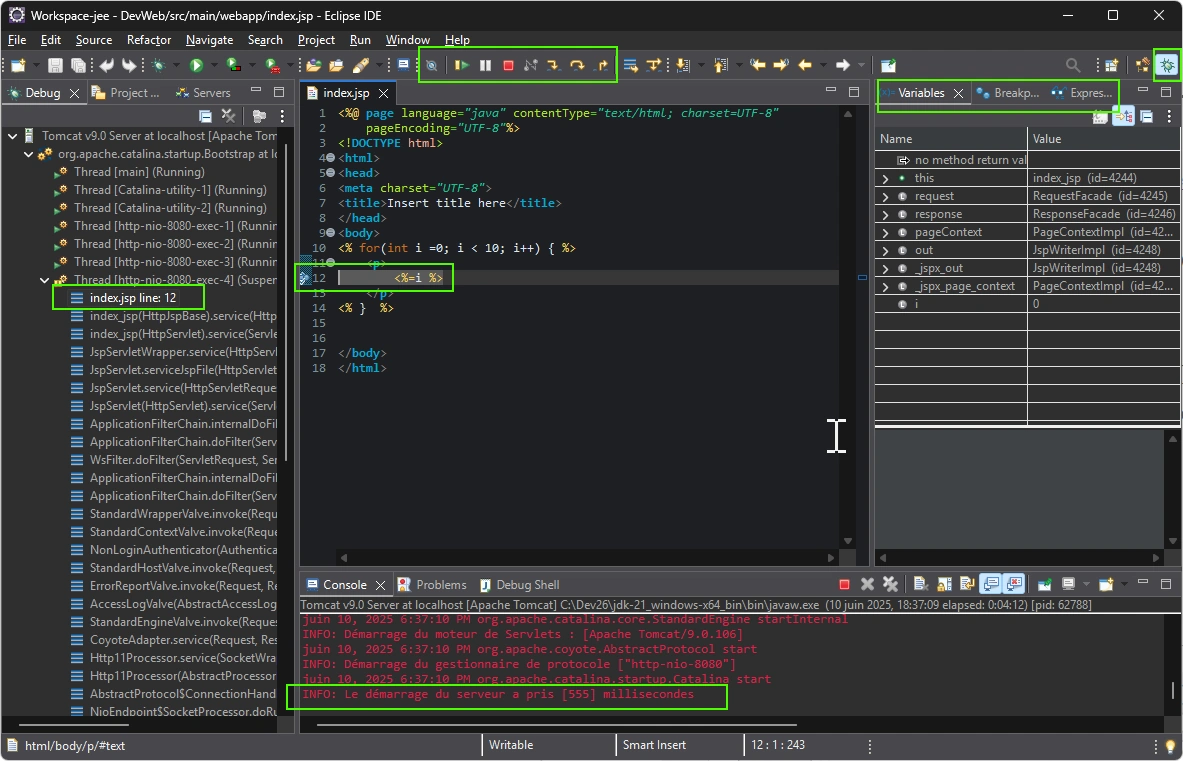
Please find a short descriptions of area and important informations:
- At the top menu, some icons to Debug from left to right:
- Enable/disable all breakpoints
- Resume the debug process ie: go on to the next beackpoint or finish execute the page
- Pause: never used
- Stop: Stop the server and the debug process
- Disconnect: never used
- Step Into (F5): debug and enter into any methods
- Step Over (F6): debug and execute methods without entering inside
- Step Return (F7) : debug until next breakpoint or go out the active method
- At the Left area « Debug »: one thread is paused at line 12 of the index.jsp file
- At the center area « index.jsp »: the active line is before execution of line 12
- At the right area
- « Variables »: shows all variable at the moment
- « Breakpoints »: list all breakpoints, you can disable/activate individual breakpoint here
- « Expressions »: check a value to understand the thread
Press F6 key to step over, or F8 key to Resume to the next break point.
You can find more details about Eclipse Debug with « Eclipse debogage et points d’arrets« .
The next step is to create sub folders « css » and « img » to the webapp folder and place contents and find URLs to locate thoses contents.
You can define a default browser as Chromium, with very helpful settings for development only Menu Windows > Preferences, then General > Web Browser
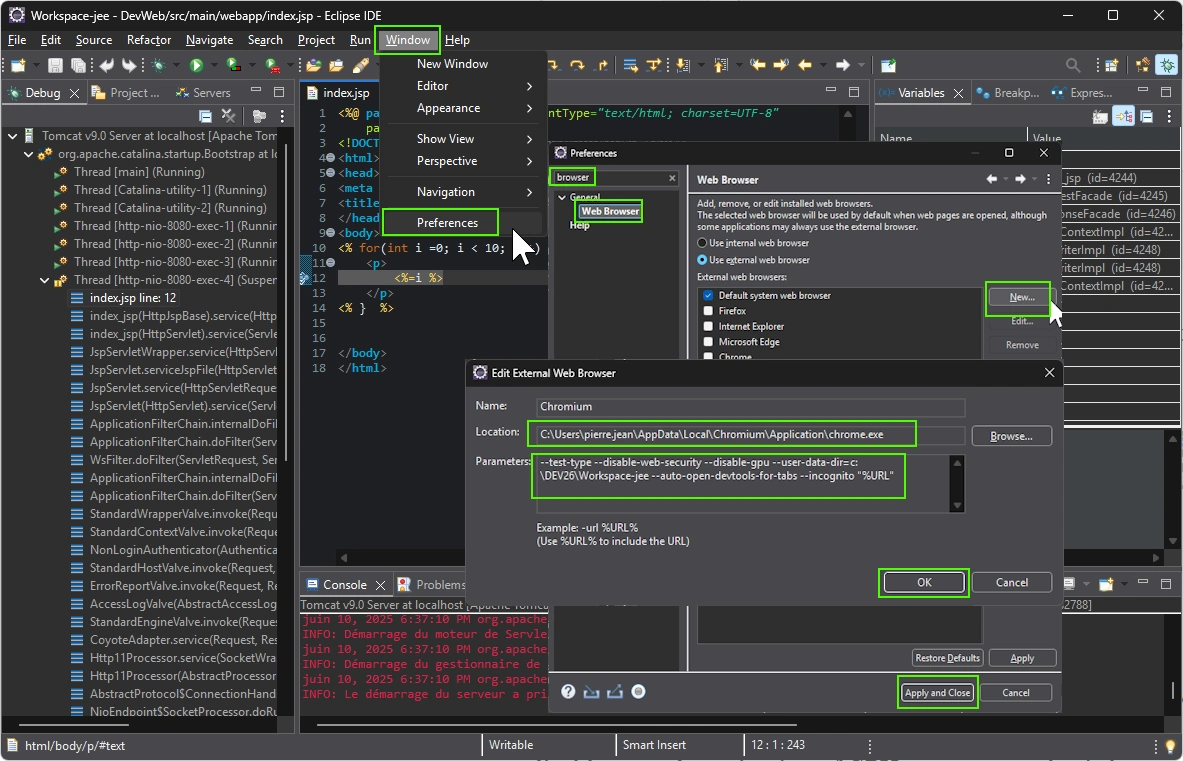
I use options for this specific Chromium browser dedicated to Web Development only :
--test-type --disable-web-security --disable-gpu --user-data-dir=c:\DEV\worskpace --auto-open-devtools-for-tabs --incognito "%URL"
- test-type: do not check default browser settings
- disable-web-security : allow to open contents from severals web server for Framework development as Node.js and tomcat
- disable-gpu: desactivation of GPU to test a very basic browser
- user-data-dir : provide a folder to edit CSS and Javascript from Chromium
- auto-open-devtools-for-tabs: open DevWeb tools by default (important for Javascript)
- incognito: default incognito browser mode
IMPORTANT
It will be realy important to understand how to debug a JSP/Servlet/Java code, so please take a moment to understand the debug process with Eclipse.