Time to time WordPress change double quote into a nice quotation mark, so I use single quote because it is more common, but you should use double quote instead.
1/ JavaScript
JavaScript is a programming language at first dedicated to be executed inside the internet browser. To start a JavaScript piece of code (usually a function), you should create a link between an HTML event and JavaScript. Classical events are onload white loading an HTML page, onclick while ckick on an HTML button, onchange if text is added/suppressed into a text field <input type=’texte’ />.
You can find online, for example on Mozilla website, classical events : https://developer.mozilla.org/fr/docs/Web/Events.
Very basic sample to trigger a dialog box windows while counting plus one each time the button is pressed :
<html>
<head>
<script>
   // By the passe var count = 0;
   let count = 0;
   function clickHandler() {
      count = count+ 1;
      alert("Hello, World! " + count );
   }
</script>
</head>

<body>
<span onclick="clickHandler();">Click here</span>
</body>
</html>
You can try inline with https://jsfiddle.net/ and press « Run » button top left.
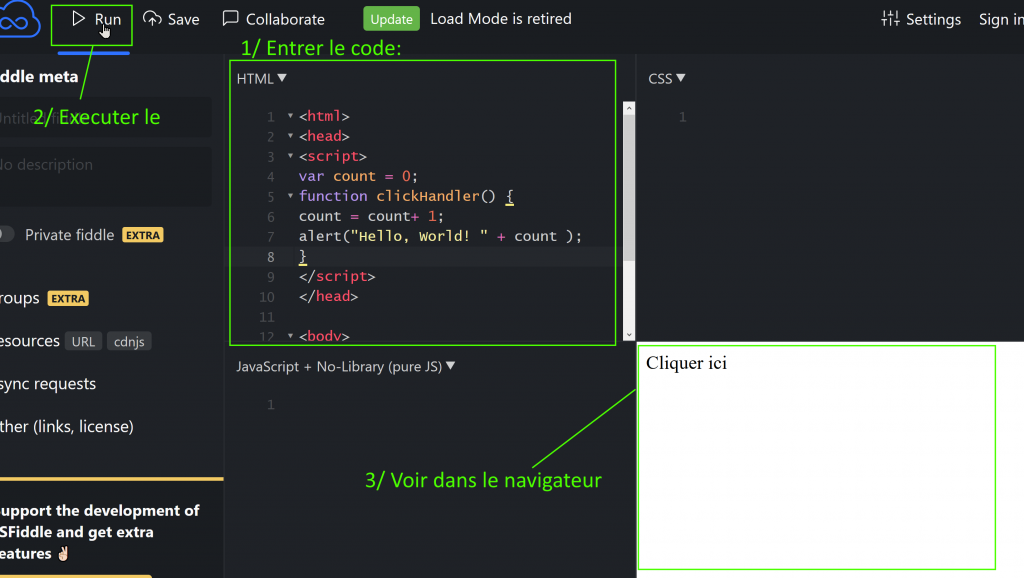
When you click on the span area (add green border with CSS) then test your JavaScript.
But JavaScript is time to time not so compatible depending on browser constructors and mobile/desktop version, so try and test a lot.
A classical HTML form validation before submit content, it is classical feature with JavaScript :
<html>
<head>
   <script src="js/script.js"></script>
</head>
<body>
  <form id="the_form" method="get" action="./Control">
    New Todo: <input type="text" name="todo_text" id="todo_text">

    <input type="button" name="bouton" value="Add Todo"
        onclick="checkTodo()">
    <input type="hidden" name="action" value="Add Todo">
  </form>
</body>
</html>
Ok in this situation, JavaScript code is inside a separate file script.js include into the folder js. Browsers will load the external JavaScript file, as we saw for a CSS file.
We can see we remove the <input type=’submit’ /> button and replace by a standard <input type=’button />. Why, because HTML submit button will submit HTTP GET request and trigger JavaScript function and we want only submit HTTP GET request only if the JavaScript function validate the form.
So we must add a hidden field to send the field action to the Servlet Control.
So the script.js will check is there is some text into the field todo_text (and no jusst empty spaces) :
// Form button trigger checkTodo method
function checkTodo(){
   // Variable to reference a field by the ID todo_text
   let todo_text = document.getElementById("todo_text");

   // content of the text field value
   let todo_textValue = todo_text.value;

   // Remove addition space at the beginning and the end of the value
   todo_textValue = todo_textValue.trim();

   // If not text is present, change the text into the field as a warning message and do not submit the form
   if ( todo_textValue === "" ){
       todo_text.value = "Mandatory!";
    }else{
       // Store a reference on the HTML form
       let form = document.getElementById("the_form");
       // Trigger the submit event on this HTML form as usual
       form.submit();
   }
}
This is a very classical way to work with JavaScript, check fields before sending form. It could be more classical to display the « Mandatory » message just right of the incorrect field.
NOTE: there are regularly evolutions for JavaScript, so function should be write a different ways :
// Classical wat
function a_sum(a,b){
  return a+b;
}

// Create a const variable to reference the function
const a_sum = function(a,b){
  return a+b;
}

// Anonymous function but store the reference into const variable
const a_sum= ((a,b) => a + b );
New operations on array elements also are created :
[1,2,3].map( x => x * 2 );
   [ 2 , 4 , 6 ]


[1,2,3,4].filter( x => x > 2 );
    [ 3 , 4 ]


[1,2,3,4].indexOf( 2 );
  1

[1,2,3,4].reduce( (x,y) => x + y );
  10

[1,2,3,4].find( x => x > 3 );
   4

[2,4,6].findIndex( x => x == 3 );
   -1

[2,4,6].findIndex( x => x == 4 );
  1

[2,4,6].some( x => x == 5 );
  false

[1,4,6,7].some( x => x%2===0 );
  true

[1,3,5,7].some( x => x%2===0 );
  false

[1,3,5,7].concat( [1,4,6,7] );
   [ 1, 3, 5, 7, 1, 4, 6, 7 ]

[1,3,5,7].push( 9 );
   [1,3,5,7,9]

[1,3,5,7].join( ";" );
  1;3;5;7

[1,2,5,8].forEach( x => {
  if ( x%2 == 0 ) console.log( x )
  }
);
     2
     8


[1,2,5,8].every( x => x%2==0)
   false


[2,4,8].every( x => x%2==0)
  true
You can also test inside the JavaScript console of Dev Web browser tools :

For decades, JavaScript additional functions create features as the classical calendar field https://jqueryui.com/datepicker/ or slider https://jqueryui.com/slider/
Group of functions will also became so structured and importants, that we call them Javascript Framework.
2/ jQuery a JavaScript Framework
Vanilla JavaScript (=classical JavaScript) missing so a good deal of syntax flexibility, high level function, libraries and framework was created to manage large number of code in JavaScript.
jQuery is an important one and stills be present or keep and influence on a bunch of JavaScript modern framework. The classical jQuery function to search an HTML tag is really common now : $(‘img’)
With jQuery and JavaScript we want to strike out text if the checkbox of a todo item is checked.
NOTE: You will find JavaScript debug in chapter 3
To strike out a text, we create a new CSS rule into style.css :
.strike{
    text-decoration: line-through;
}
This video displays the Dev Web Tools to understand how to manage HTML, CSS and JavaScript relationships (The video is slow).
You can test CSS and JavaScript directly into the browser to check and test.
Suppose, we have got this HTML code at start created by JSP :
<p>
<input type="checkbox" name="checkbox_chocolat" > Chocolat
</p>
At first, we need a span tag to manage the text displayed at the right of the HTML field.
<p>
<input type="checkbox" name="checkbox_chocolat" >
<span id="checkbox_chocolat"> Chocolat </span>
</p>
We want to link a click event on the checkbox to trigger an HTML modification adding a new class strike.
<p>
<input type="checkbox" name="checkbox_chocolat" >
<span id="checkbox_chocolat" class="strike"> Chocolat </span>
We need to import jQuery inside our JSP page from a CDN server with this additional HTML tag to load a JavaScript library.
<script
 src="https://ajax.googleapis.com/ajax/libs/jquery/1.12.0/jquery.min.js"></script>
We can also download the jquery.min.js and place it into webapp folder to be independant from jQuery server and avoid bugs from jQuery updates.
<script src="js/jquery-latest.min.js"></script>
Now we can us jQuery and JavaScript into our HTML page and start with a basic initial code :
<script language="javascript">

 $(document).ready(function() {
    $("input[type=checkbox]").click(
         function(event) {
            let name = $(this).attr("name");
            let checked = $(this).prop('checked');;
            console.log( $(this).attr("name") );
           // ... go on woth javascript
         });

 });
//
</script>
Close lookup :
$(document).ready(function() {
    // This JavaScript is trigger when the HTML page is loaded
});
jQuery uses a function named $ to search inside the HTML DOM page on or severals elements/tags, for example :
$("h1") // search h1 HTML tags
$("#header") // search HTML tags with id="header"
$("input[type=checkbox]") // search <input> tags input with attribut input egual to checkbox
So we can add a click event on all checkbox easily :
$("input[type=checkbox]").click(
    // JavaScript Code
 );
You can find the starting of the code to create and debug the strike out of the text if a checbox is checked :
        function(event) {
            let name = $(this).attr("name");
            let checked = $(this).prop('checked');
            console.log( $(this).attr("name") );
           // ... go on with JavaScript
         });
The console.log method display information into JavaScript console tab into the browser.
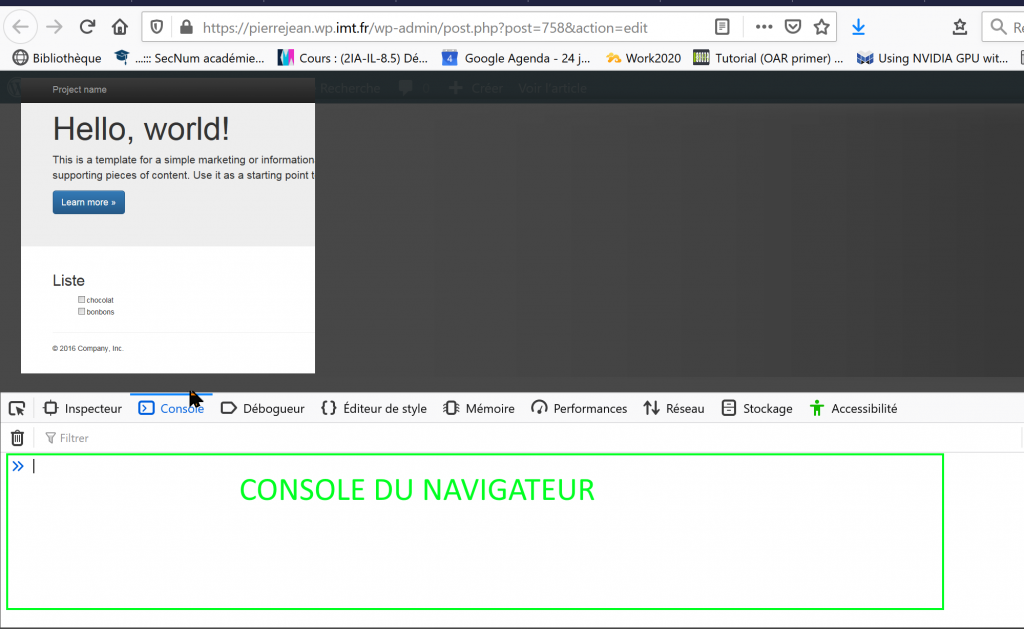
Now using functions to search tag from its ID and using method addClass(‘strick’), you can add a class to the correct text :
$("span#checkbox_chocolat").addClass("strike");
So try to find by yourself before read the solution…
$("input[type=checkbox]").click(
        function(event){
            let name = $(this).attr("name");
            let checked = $(this).prop('checked');
            $("span#checkox_"+name).addClass("barre");
        });
Of course, you should only strike text if the checkbox is checked and unstrike it if checkbox is not checked. So try to look .toogleClass() function in jQuery to manage nicely.
3/ JavaScript debug
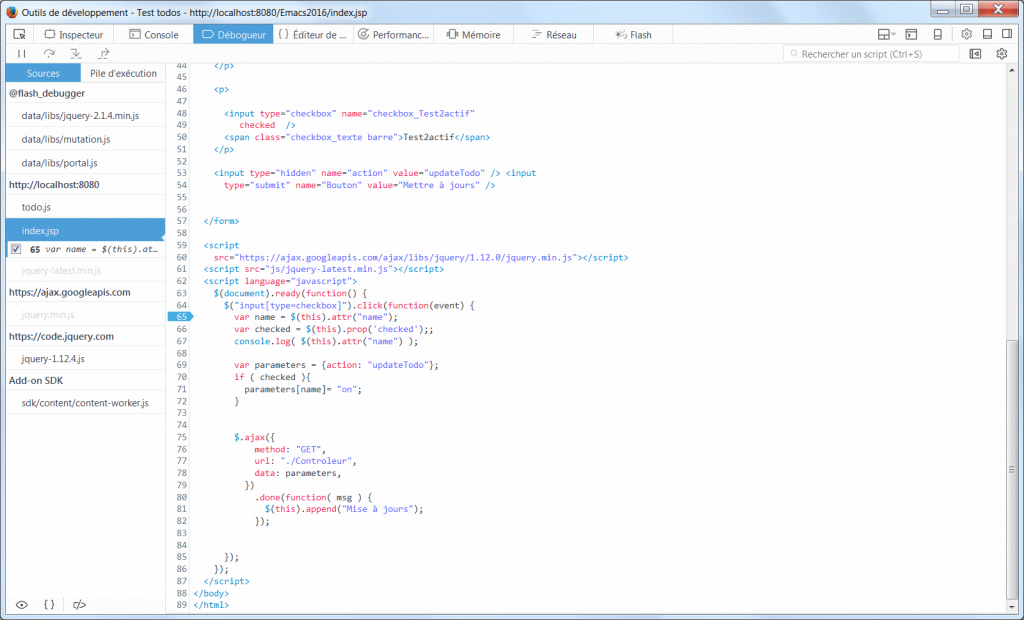
Our browsers are capable to debug JavaScript , just open Dev Web Tools.
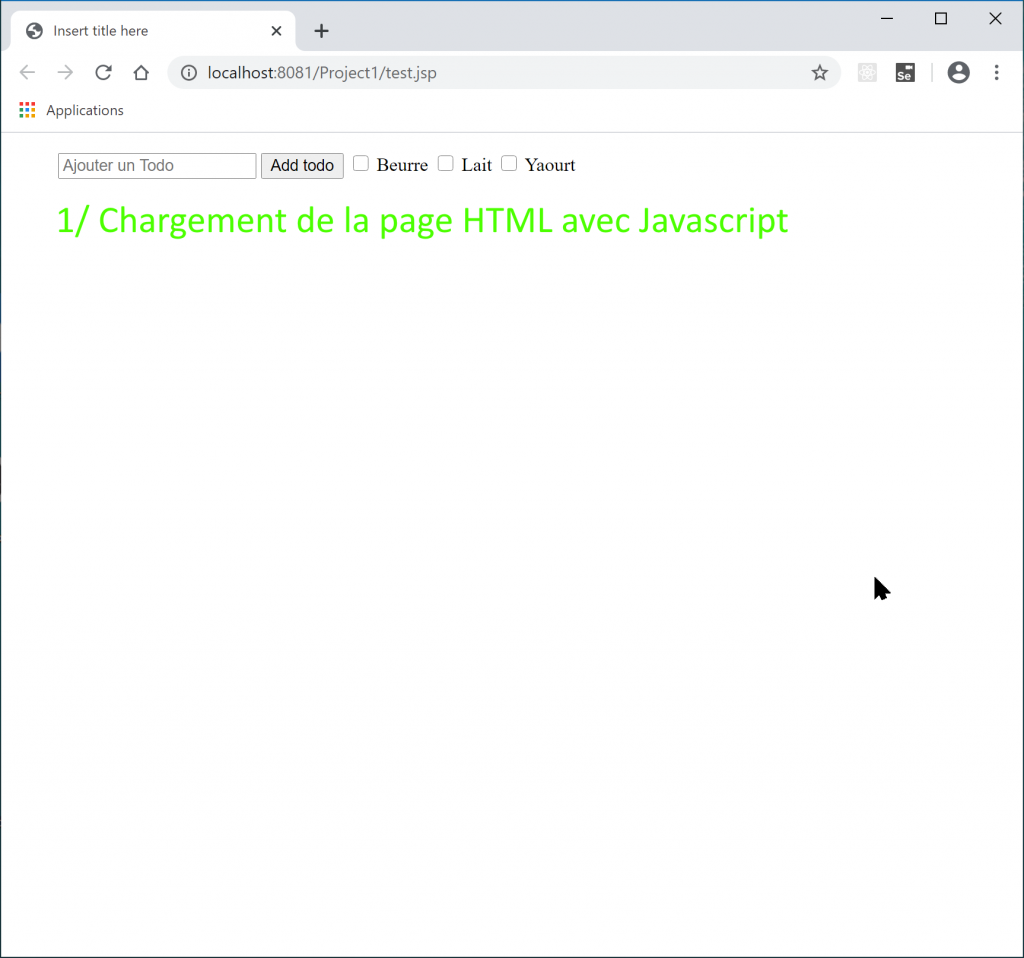
Open this image into a separate tab to see the animation :
Firefox version, check the breakpoint at line 65 with the blue arro :
JavaScript allows to create a breakpoint with a line of code :
debugger;
This option is really powerful to use with advanced JavaScript frameworks which generate a lot of JavaScript and lost time to time the link between the initial code and the generated one.
NOTE: some framework needs also a $ function so you can also use the jQuery function name as an alias :
jQuery(document).ready(function(jQuery){
            // do not use $() but jQuery()
        });
jQuery allows also to use for each function with jQuery HTML DOM objects :
 $( "p > span" ).each(function() {
         $( this ).removeClass("strike");
   });
4/ React
React is more than a JavaScript library with massive Facebook contributions and a component way of thinking. The main idea is a state variable of a component is modified, then React has to render it to refresh display of this component.
React is a Framework using file extension .jsx using JavaScript to link with. Usually, you can use NodeJs to use React but there are a more simply way to understand. At first, install for Chrome browser family extension for React developer tools.
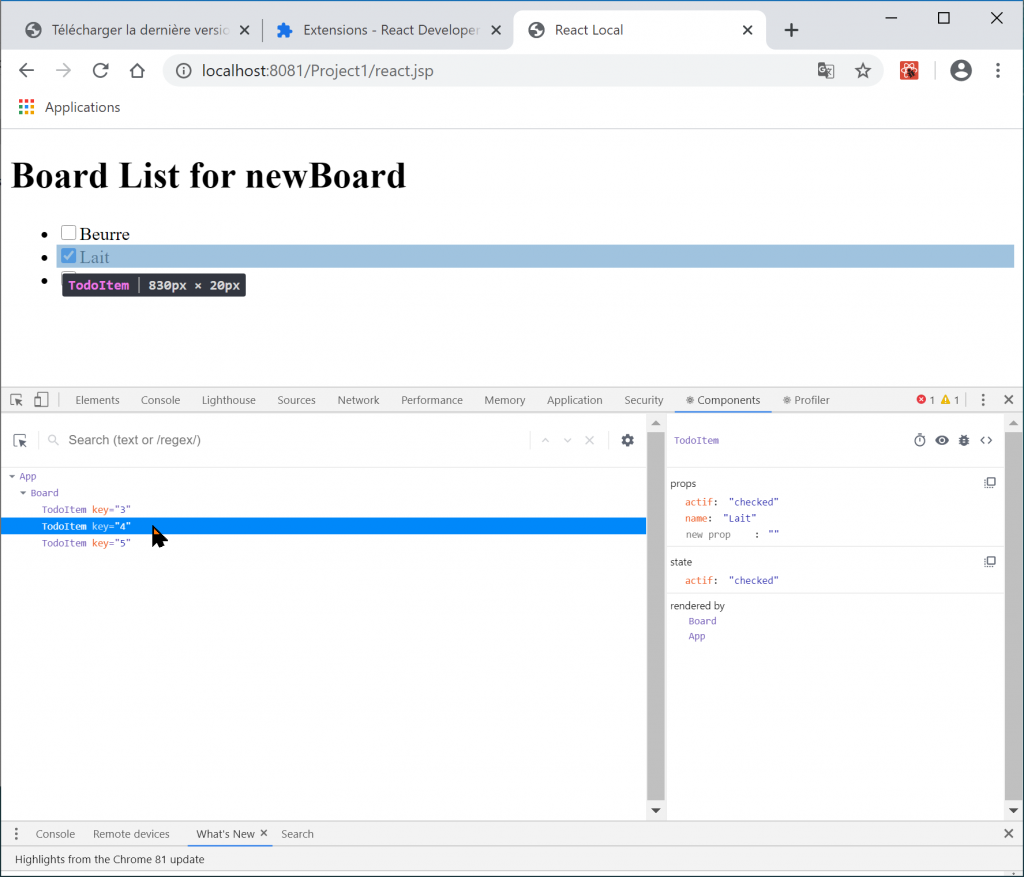
You have to switch from Developer Tool tabs : console, debug and components.
At first, create a simple react.jsp page to receive this code and using React:
<%@ page language="java" contentType="text/html; charset=UTF-8"
pageEncoding="UTF-8"%>
<!DOCTYPE html>
<html lang="en"><head>
  <meta charset="UTF-8">
  <meta name="viewport" content="width=device-width, initial-scale=1.0">
  <meta http-equiv="X-UA-Compatible" content="ie=edge">
  <title>React Local</title>
  <script crossorigin src="https://unpkg.com/react@16/umd/react.development.js"></script>
  <script crossorigin src="https://unpkg.com/react-dom@16/umd/react-dom.development.js"></script>
  <script type="application/javascript" src="https://unpkg.com/babel-standalone@6.26.0/babel.js"></script>
</head><body>

<div id="main"></div>
<script type="text/babel" src="js/react.js" />

</body></html>
You can see we are using the development library of React, in production we should use the minified production version and a library named babel for transcompilation process.
NOTE: you can use the Eclipse plugin React from Codemix available from the Eclipse Marketplace : https://marketplace.eclipse.org/content/codemix-3. To install, just drag and drop as Log Viewer and validates some dialog windows.
Then you should create a JavaScript file with the sub menu from Codemix as :
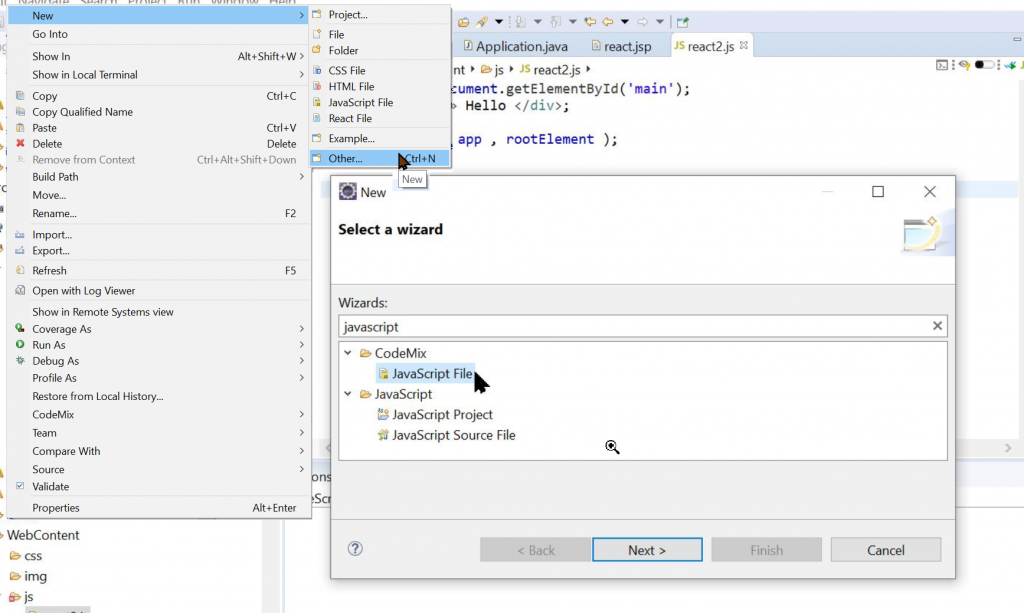
Into the HTML page, we will have to create a <div id=’main’> as the top level node component for React. Hierrachy of component will be (don’t forget single quote => double quote) :
- Page HTML
- <div id=’main’>
- App
- Liste
- Todo
- Todo
- Todo
- Liste
- App
- <div id=’main’>
Our first piece of JavaScript will be inside react.js, but in fact this file will be created by concatenation of several jsx files. But to begin, let starts in JavaScript/Babel code react.js :
const rootElement = document.getElementById('main')

function App(){
   return( <div> newApp </div> )
}

ReactDOM.render( <App />, rootElement )
React first line set the top level element will be the div identified by ID main (the jQuery notation should be $(‘div#main’) ).
The first React component created by App or called by React <App /> tag to be closed to the HTML style of writing code. This component included a hidden method call render. This method is called and create the <div> newApp </div> part.
The last line create the link from the rootElement from HTML page and the first component.
Try this code :
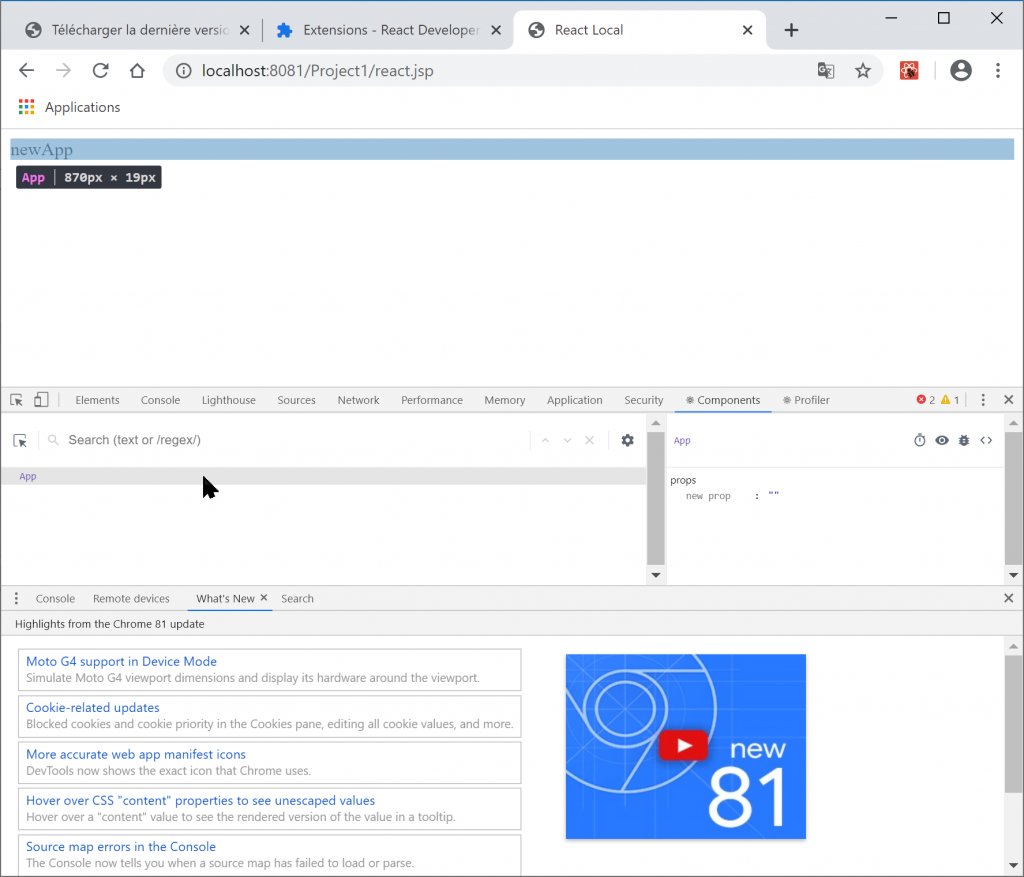
It is important to understand that we are inside a React component with React notation not so close time to time from HTML notation include trouble with double quote.
Then we will create a second component List called by component App. List will be managed component TodoItem :

The link will be from App component :
function App(){
  return( <div> <Liste name="liste1" /> </div> )
}

ReactDOM.render( <App />, rootElement )
Then we will create 3 jsx files for 3 different components installed into a folder jsx inside the webapp folder.
Here the beginning for each React component :
App.jsx
function App(){
   return( <div> <Liste name="liste1" /> </div> )
}

ReactDOM.render( <App />, rootElement )
Liste.jsx
class Liste extends React.Component {
        // state variable store the fact to refresh react component
        //
	constructor(props) {
		super(props);
		this.state = {
			error: null,
			isLoaded: false,
			todos:[{"key":15,"texte":"Beurre","actif":"" },{ "key":16,"texte":"Lait","actif":"checked" },{ "key":17,"texte":"Yaourt","actif":""}]
		};
	}
    // Called when component is ready to display into the DOM
    componentDidMount() {
      this.setState({
          isLoaded: true
        });
    }
   // Called when component display is trigger
   render() {
	const { error, isLoaded, todos} = this.state;
	if (error) {
	  return <div>Error: {error.message}</div>;
	} else if (!isLoaded) {
	   return <div>Loading...</div>;
	} else {
	   return (
		<div className="list">
		<h1>List for {this.props.name}</h1>
		<ul>
		{todos.map(todo => (
		  <TodoItem key={todo.key} name={todo.texte} actif={todo.actif} />
          	))}
		</ul>
		</div>
		);
	  }
	}
}
In this example, loading data from JSOn is not created from componentDidMount() function, I let you find the code to trigger an Ajax request to laod data. In the same way, you have to send back information from TodoItem to the web server to complete the update cycle of informations.
TodoItem.jsx
class TodoItem extends React.Component {
// add actif variable and record method checkboxHandler on the button
constructor(props){
   super(props);
   this.state = { actif: props.actif };
   this.checkboxHandler = this.checkboxHandler.bind(this);
}

// Method called from the checkbox click
checkboxHandler(){
    // Use console to display information
    console.log("Event");
    // A breakpoint for debug
    debugger;
    if ( this.state.actif == "checked"){
       this.setState( {actif: ""} );
    }else{
       this.setState( {actif: "checked"} );
    }
}

 // Render the component when needed
 render() {
  return (
   <li>
     <input type="checkbox" name={this.props.name} checked={this.state.actif}
onChange={this.checkboxHandler} />
         {this.props.name}
   </li>
   );
  }


}
At present each React component is inside a separate file, now we need to combine files, and it is possible to trigger from Eclipse to combine those files (and if need to minify content).
We will use a langage created for Java project called ANT by creating into the src folder a build.xml file :
<?xml version="1.0" encoding="UTF-8" standalone="no"?>
<project default="concat_react" name="Concat several babel/react files into an unique file">
<property name="dir.workspace" value="${dir.buildfile}/.."/>
<target name="concat_react">
<concat destfile="${dir.workspace}/main/webapp/js/react.js" append="false" >
const rootElement = document.getElementById('main');
</concat>
<concat destfile="${dir.workspace}/main/webapp/js/react.js" append="true">
<fileset dir="${dir.workspace}/main/webapp/jsx" includes="**/*.jsx" excludes="App.jsx"/>
<filelist dir="${dir.workspace}/main/webapp/jsx" files="App.jsx"/>
</concat>
</target>
</project>
This ANT script will combine reacts files with APP.jsx at first into a new file, webapp/js/react.js.
To let Eclipse calls the file build.xml, right-click on the Projet > Properties > Builder:

Press « New… » button, select « Ant Builder ».
You nee to set a task name, the localtion of the build file should be ${workspace_loc:/DevWeb/src/build.xml} and the directory base ${workspace_loc:/DevWeb/src}.
Open the Refresh tab, set the folder to refresh with the generated file react.js inside webapp/js/ folder :
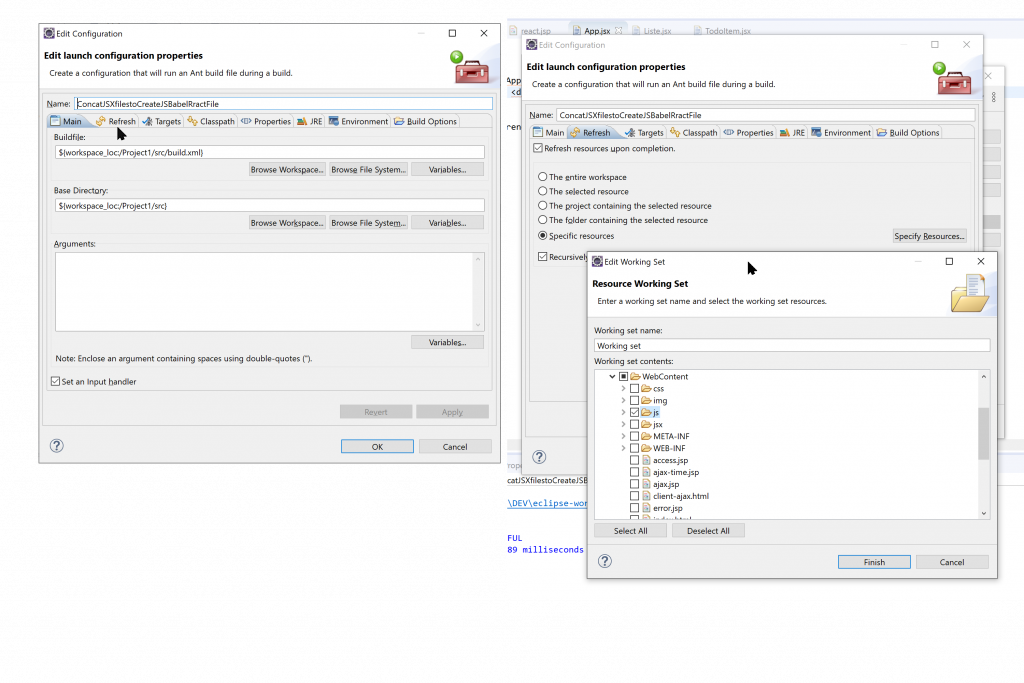
Each time one of 3 React components will be changed inside jsx files, you can force to Build via CTRL+M shortcut (or Menu Project > Build All) and then create the new js file.
If you want an automatic building (I think not really useful), open third tab « Target » into the Ant task and after « Main » and « Refresh », in front of « Auto Build » click on « Set Targets… » button and tick the default task (the only one you have).
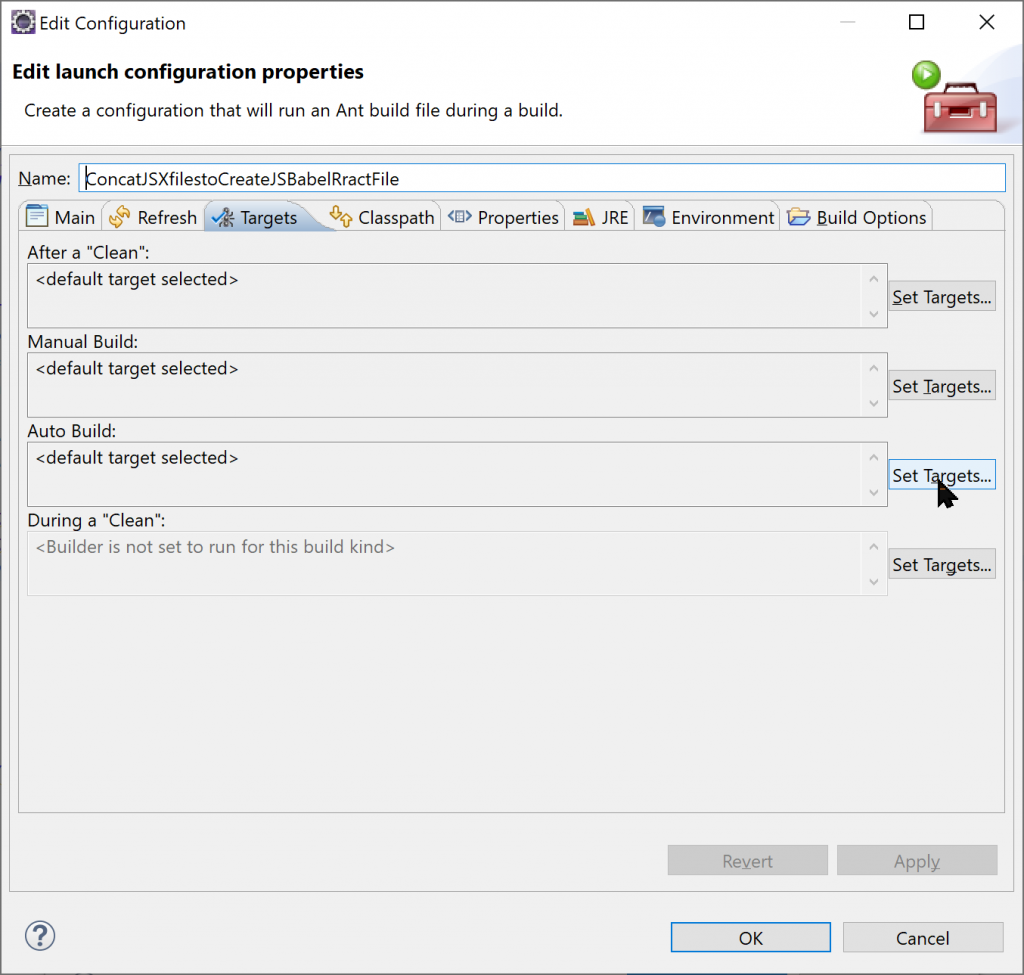
We can also think about an ANT task to trigger a group of unit test or a minification of files removing comments.
You can debug ANT script as any kind of Java program, just Right click menu Debug as …> Ant Build.
5/ Tomcat rewrite mode
From many years, Apache Web Server used a module calle « Rewriting » whiwh allows to change URL from :
http://website.com/2018/02/27/
to
http://website.com/index.php?year=2018&month=02&day=27
Usually, a rule rewrite an URL from one forme to an other using Regular expression, with our example :
RewriteRule ^[^/]*/(.*)/(.*)/(.*)$ index.php?year=$1&mont=$2&day=3 [L,QSA]
Tomcat could use rewrite rule if you modify 2 files :
At first, open server.xml file into folder « Servers » ( to display code, change tab at the bottom of the main windows from « Design » to « Source », used « Source):
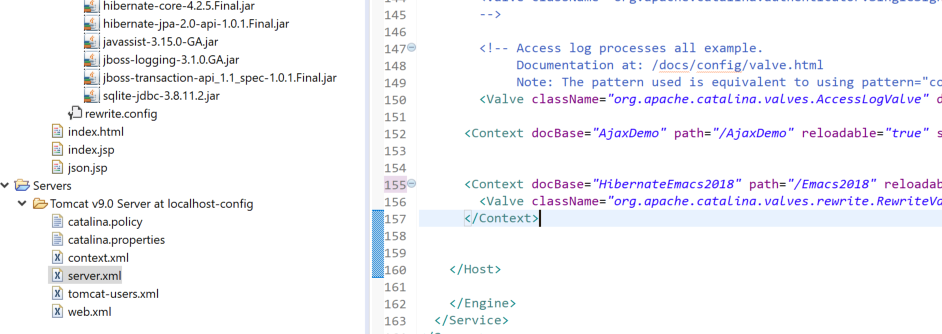
Inside tag <Context> of your application, here my application is called HibernateEmacs2018. Change the individual tag <Context /> into an open/closed tag <Context> </Context> then insert a new line with settings to activate RewriteValve:
<Context docBase="HibernateEmacs2018" path="/HibernateEmacs2018" reloadable="true" source="org.eclipse.jst.jee.server:HibernateEmacs2018">
   <Valve className="org.apache.catalina.valves.rewrite.RewriteValve" />
</Context>
The, you will have to create rewrite.config file into WEB-INF folder with one or severals rewriting rules:
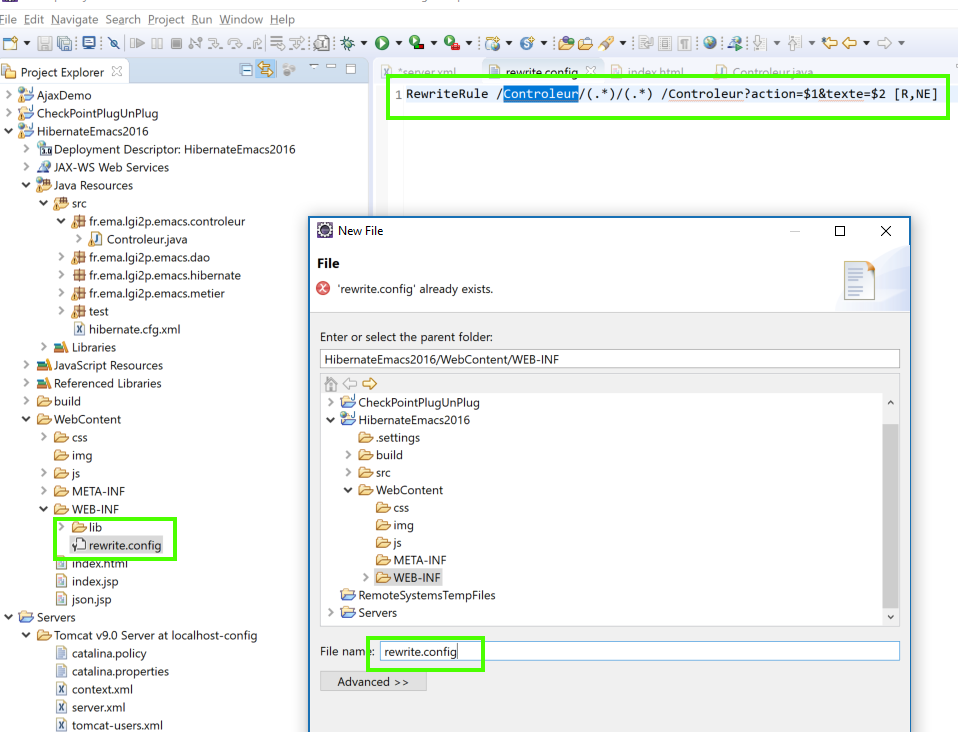
The first rule will be to detect /Control/ and convert to the URL Control?action=getLesTodos to display by default all the todo items :
RewriteRule ^/Control/$ /Control?action=getLesTodos [R,NE]
The second rule will convert URL from /Control/delTodo/chocolat/ to /Control?action=delTodo&texte=chocolat :
RewriteRule /Control/(.*)/(.*)/ /Control?action=$1&texte=$2 [R,NE]
You can then add rules to improve visibility of URLs, using rewrite mode to use RESTful web services, improve search engine indexation, etc.
6/ Using a Java Record instead a Java POJO
A new type of class is available at present is the record type. Ours Java class Todo could be rewrite as a record :
public record TodoItem(int id, String texte, boolean actif) {
}
This record class TodoItem will manage all getters (no setters see below), constructor and classical methods toString() and hashCode(). We can so create a very simple instance as :
TodoItem todo1 = new TodoItem(0,"chocolat",false);
System.out.println(todo1.texte);
You can overwrite a method equals() with our specific business requirement to compare only texte property:
public record TodoItem(int id, String texte, boolean actif) {
	@Override
	public boolean equals(Object obj) {
		if (this == obj) return true;
		if (obj == null) return false;
		if (getClass() != obj.getClass()) return false;
		TodoItemother = (TodoItem) obj;
		return Objects.equals(texte, other.texte);
	}
}
The main information about record compare to POJO class, is all properties are considerate to be final as this code should be :
public record TodoItem(int id, String texte, boolean actif) {
    private finale int id;
    private finale String texte;
    private finale boolean actif;

}
So you can absolutely not make a modification on the instance, this code will not work :
void changeTodoItem(String oldTexte, String newTexte) {
  TodoItem findedTodoItem = Appplication.getInstance().findAfaire(oldTexte);
  findedTodoItem.texte = newTexte;
}
The way to use in this case the record it to copie the old record into a new one :
public void changeTodoItem(String oldTexte, String newTexte) {
 TodoItem findedTodoItem = Appplication.getInstance().findAfaire(oldTexte);
 TodoItem newTodoItem = new TodoItem ( findedTodoItem.id, newTexte, findedTodoItem.actif);
 Appplication.getInstance().removeTodoItem(oldTexte);
 Appplication.getInstance().addTodoItem( newTodoItem );
}
Using a record could be useful for convert data from a JSON to record and exchange data between layer without modification.

