
Using green resources of the computer
At first, to preserve resources, close any other applications except web development browser, eclipse and tomcat server.
You can decrease the CPU frequency by change the level of power save, reduce temporary the light of the screen at a comfortable level for your eyes. Also, please reduce the number of tabs and windows from your browser.
1/ Description Application Todo
Our main application will be to manage a list of thing to do, as for example the shopping list :
The Model part of the MVC will be simplest to let us work on the MVC with Web Development tools. Only one business rule is provided « no double entry », for example if someone try to add again « chocolat » at the list, there are no error but only one « chocolat » will stay into the list (case-insensitive). This is the unique business rule or our simple model layout.
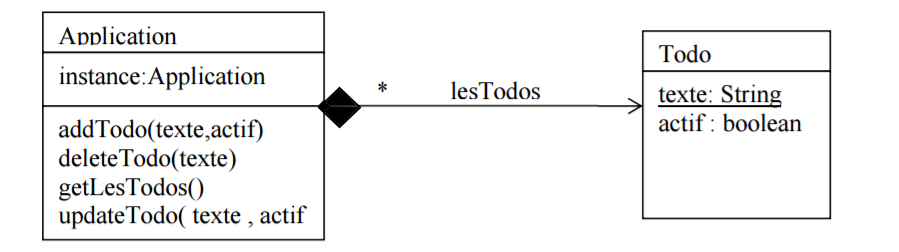
Please find below a « very very » simple Class Diagram at starting point, you will have to add content and improve it :
To manage easily one unique instance of the application, a Singleton Design Pattern is provided as this draft :
public class Application {
   private static Application instance = null;

   public static Application getInstance() {
      if (instance == null) {
           instance = new Application ();
      }
      return instance;
     }

  private Application() {
    // Initialization of the List
  }

}
So please think about to instanciate a new application without access to the private constructor ?
How to initialize the list of todo items call « lesTodos » with the draft code
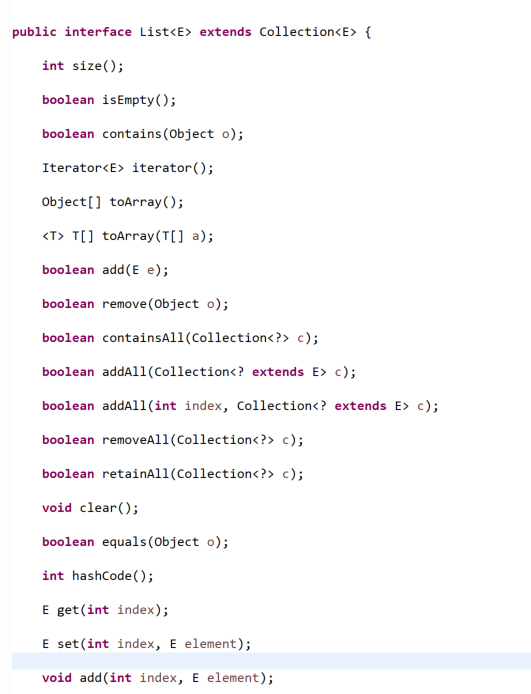
Could you please use the Interface List from java.util.List for futur integration and evolution.
NOTE: une interface do not provide all the code only signature of methods as show into the code :
Do not hesitate to open Java code by CTRL+left click on a class of a function, to study the difference between ArrayList and List.
Keep in mind that a future evolution of the project could use a LinkedList or a Stream result as we will see later.
Please study mainly methods contains, get and indexOf into ArrayList class.
2/ Project creation with only business/model part
Create a new project « Dynamic Web Project » ( File > New > Dynamic Web project), then deploy your project into Tomcat 9 installed previously with righ clic > « Add and Remove … » to add this project to Tomcat.
Create a new package into the « Java Ressources » part of the project :
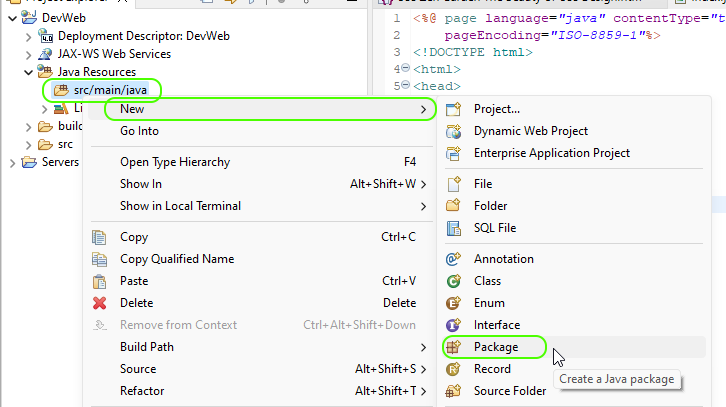
We need a top package call main (name of package must be in lowercase at the opposite for class with the first capital letter) with insides packages model, control and test.
Code classes Application and Todo with additional methods depending your need withe righ clic on the package model and menu New > Class, you can tick to implement « public static void main (String[] args) » to test the class as a simple Java program.
You can generate Getter and Setter with right click mouse on the code and Menu Source > Generate Getters and Setters…
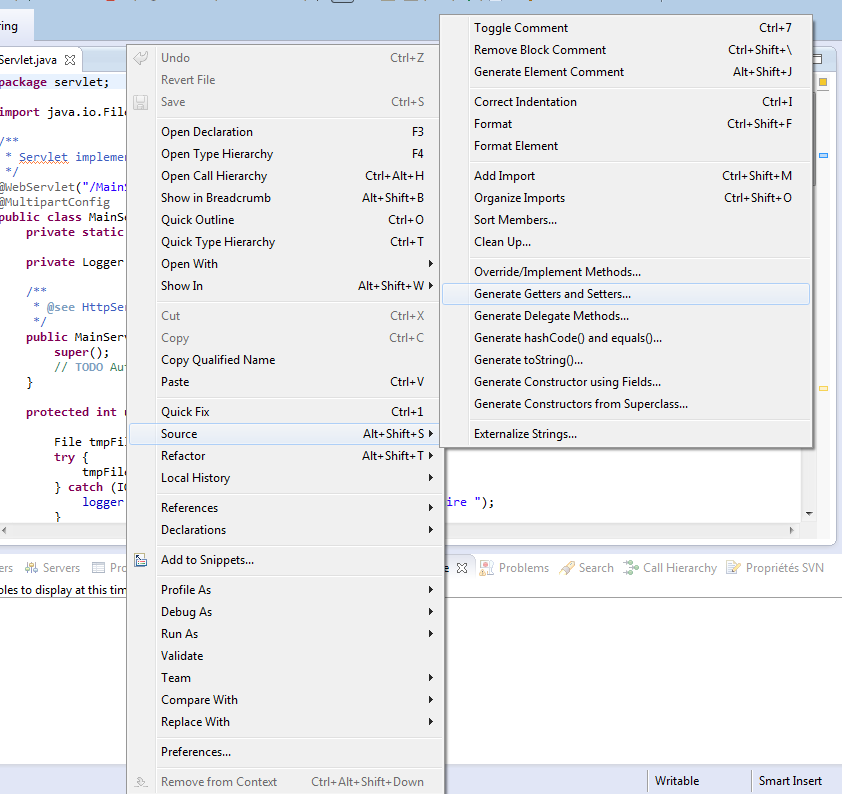
Use the generation of method hashCode() and equals() using only the field « texte » because comparing 2 instances of todo only this field is mandatory (business rule).
You can also generate the method toString() on the class Application but I recommend to you to learn to debug this class.
Create additional constructors with all fields, only texte field and with no fields with the Menu Source > Generate Constructor using Fields.
Please consider test comparing class with the main method :
public static void main (String[] args){
  Todo todo1 = new Todo( "lait", false );
  Todo todo2 = new Todo( "beurre", true);

   if ( todo1.equals( todo2 ) ) {
    System.out.println(" lait equals beurre ");
   }

   todo2.setText( "lait" );
   if ( todo1.equals( todo2 ) ) {
     System.out.println(" lait equals lait ");
   }
}
To test a class, just right-click on the code and choose Menu > Debug As > Java Application, output is displayed in « Console » tab, or you can add breakpoint to understand features of equals() method.
NOTE: hashCode() return a value to organize instance of the same class by order. In our application the information will not be used but in case of extreme large number of instance, it could be useful to group instance for speed up processing.
Again, use the « public static void main (String[] args) » method to debug call of Application singleton by using this code:
public static void main(String[] args){
  Application.getInstance().addTodo("lait");
  Application.getInstance().addTodo("beurre");
  Application.getInstance().addTodo("lait");

}
Then you can also try to add additional method to Application for example several methods call findTodo() should be very useful.
3/ Unit Test with Junit4
In fact, the calling on « public static void main (String[] args) » method to test our program is not the best way to test the model part. We will use a Test Framework call JUnit to test Application class.
By the past, I let students start by testing Todo class first, but they find testing getters and setters less interesting, so let’s start with ApplicationTest. You will find an example of basic TodoTest application below, you could study particlary the testEqualsObject() method design to check the model business rule :
class TodoTest {
	@Test
	void testTodo() {
	    Todo todo = new Todo("chocolat" , false);
	    assertNotNull( todo );
	}
	@Test
	void testTodoNoParameters() {
	    Todo todo = new Todo();
 	    assertNotNull( todo.getTexte() );
	}
	@Test
	void testGetTexte() {
	     Todo todo = new Todo("chocolat" , false);
	     assertEquals ( todo.getTexte() , "chocolat");
	}
	@Test
	void testSetTexte() {
	    Todo todo = new Todo("chocolat", false);
	     todo.setTexte("ananas");
	     assertEquals ( todo.getTexte() , "ananas");
	}
	@Test
	void testSetActif() {
	     Todo todo = new Todo("chocolat" , false);
	     todo.setActif(true);
	     assertTrue( todo.isActif());
	}
	@Test
	void testIsActif() {
	     Todo todo = new Todo("chocolat" , false);
	     assertFalse( todo.isActif());
	}
	@Test
	void testEqualsObject() {
	     Todo todo1 = new Todo("chocolat" , false);
	     Todo todo2 = new Todo("chocolat" , true);
	     assertTrue( todo1.equals(todo2));
	}
}
On the class Application, right click to open Menu « New > Other > Junit Test Case » then fill the windows by providing the package model to store this new ApplicationTest class.
Please check methods @BeforeAll @BeforeEach, @AfterAll, @AfterEach and on the next windows, check method you want to test, obviously all method your create into Application.

One dialog will ask you to « Add Junit 5 library to the build path », please confirm by pressing OK to download and install Junit library to create test.
NOTE: if you forget one step, just delete the ApplicationTest class and start over.
NOTE: if for any reason, the ApplicationTest class is stored into the wrong package, just move into the package test.
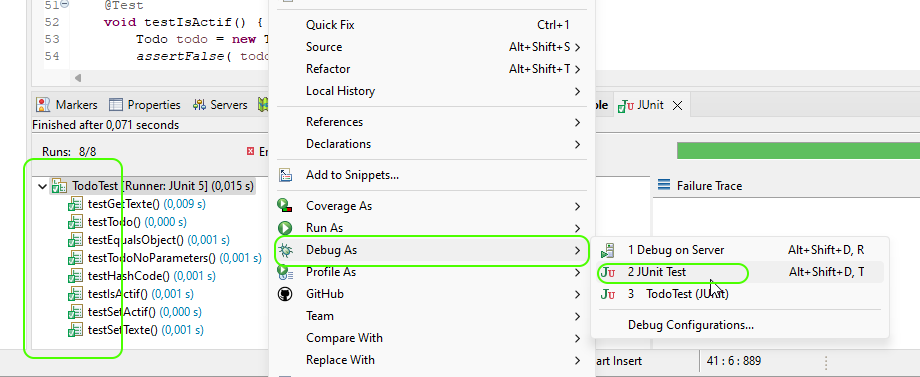
To execute a Unit Test Case, just right-click on the code and chose Menu Debug As > Junit Test and you can check un green bar to display if all tests pass:
If a test fail, you will find a red bar, the console message, the number of failure test and of course which test fail :

You can debug with a breakpoint any test to understand why this test failed as any other Java code. Keep in mind, the writer of the code is not usually the person who writes the test code.
NOTE: a different way of wriing code is to write test code then write the missing code so in our case writing ApplicationTest then writing Application class.
Now we want to test at least :
- Singleton is never null
- 2 references of Application are equals
- list of todos is empty at start
- add a todo to the list and that the list increase by one
- add a todo and find it
- add a todo and it is the last todo of the list
- delete a todo and do not find it into the list
You should discover that the order of executions of each of the test methods are not in the same orders and are not independent. It could be useful to empty the list before each test with the method setUp().
So please code and test everything to check tat the model part is working perfectly. Each time, you will add a new feature, consider adding a new test and check there is no regression.
NOTE: setUpBeforeClass() is trigger before starting all test methods, tearDownAfterClass() is trigger after passing all test methods, setUp() is trigger before each test and tearDown() after each test method. Those methods are useful to configure a test by creating a context with data or in the opposite, no data.
4/ Link between Model Part et one view/JSP
At first, create a JSP page to display 4 todo items :

This is an example of code to create Application with data and avoid an empty list. You can note the building of the list is made into the constructor method :
private Application() {
     lesTodos = new ArrayList<Todo>();
     create4TestTodos();
 }
 private void create4TestTodos(){
     addTodo( "Test1" , false );
     addTodo( "Test2" , false );
     addTodo( "Test1actif" , true );
     addTodo( "Test2actif" , true );
 }
Create a JSP page todos.jsp and import the package model into, you will find an example of code to start :
<%@ page language="java" contentType="text/html; charset=UTF-8"
pageEncoding="UTF-8"%>
<%@ page import="main.model.*" %>
Foreach list of todo itemps :
<%
for(Todo todo : Application.getInstance().getLesTodos() ){
%>
<p>
   <%=todo.getTexte() %>
</p>
<%
}
%>
This is very basic JSP to rescue from Application each todo item and display then into <p> tag for learning purpose, of course checkboxes are missing.
Start the JSP as we did into TP 0 to check everything is OK, but it is not a classical way to call directly a JSP with MVC design pattern
NOTE, you can create an index.jsp with auto redirection to call the futur Control Servlet:
<%@ page language="java" contentType="text/html; charset=UTF-8" pageEncoding="UTF-8"%>
<%
    response.sendRedirect("./Control?action=list");
%>
NOTE: to remove 404 error and debug console information on the downloading favinco.ico, you can add this tag to <head> HTML part :
<link rel="icon" href="data:,">
5/ Servlet as the Control part of design pattern MVC
Calling JSP pages as a spaghetti chain of application make web application complex to improve and debug. We will use the idea of state transition diagram instead direct calling from one JSP to an other.
Suppose un application to display email, the call from the list of emails to a detail of one email should be with MVC design pattern with an intermediary call to Servlet Control :
The URL to the Servlet pass one parameter call action to ask the controller if it is possible to transit to detail-email.jsp page with an additional parameter to identify the email :
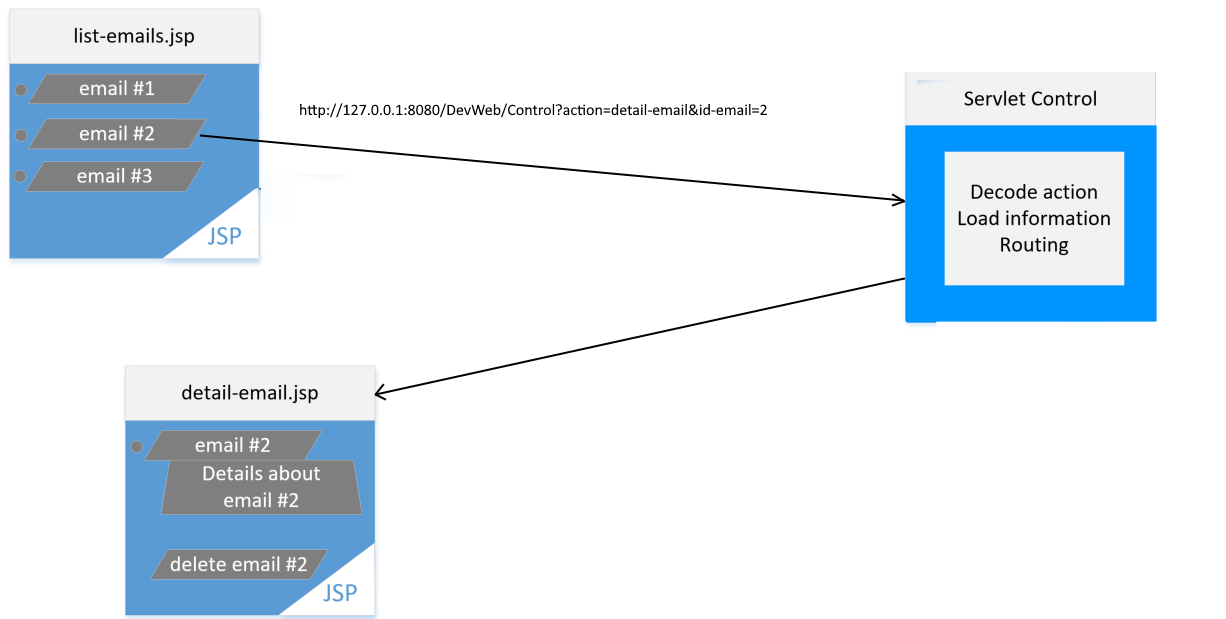
Why using a controller, because we can load information, check information, logs the transit and even redirect to a different page according to routing requirement of our web application.
Create Servlet by right-clicking on the package control then Menu New > Servlet, please provide the name of the Servlet Class, check the java package if necessary and check also the URL mappings /Control and click button Finish
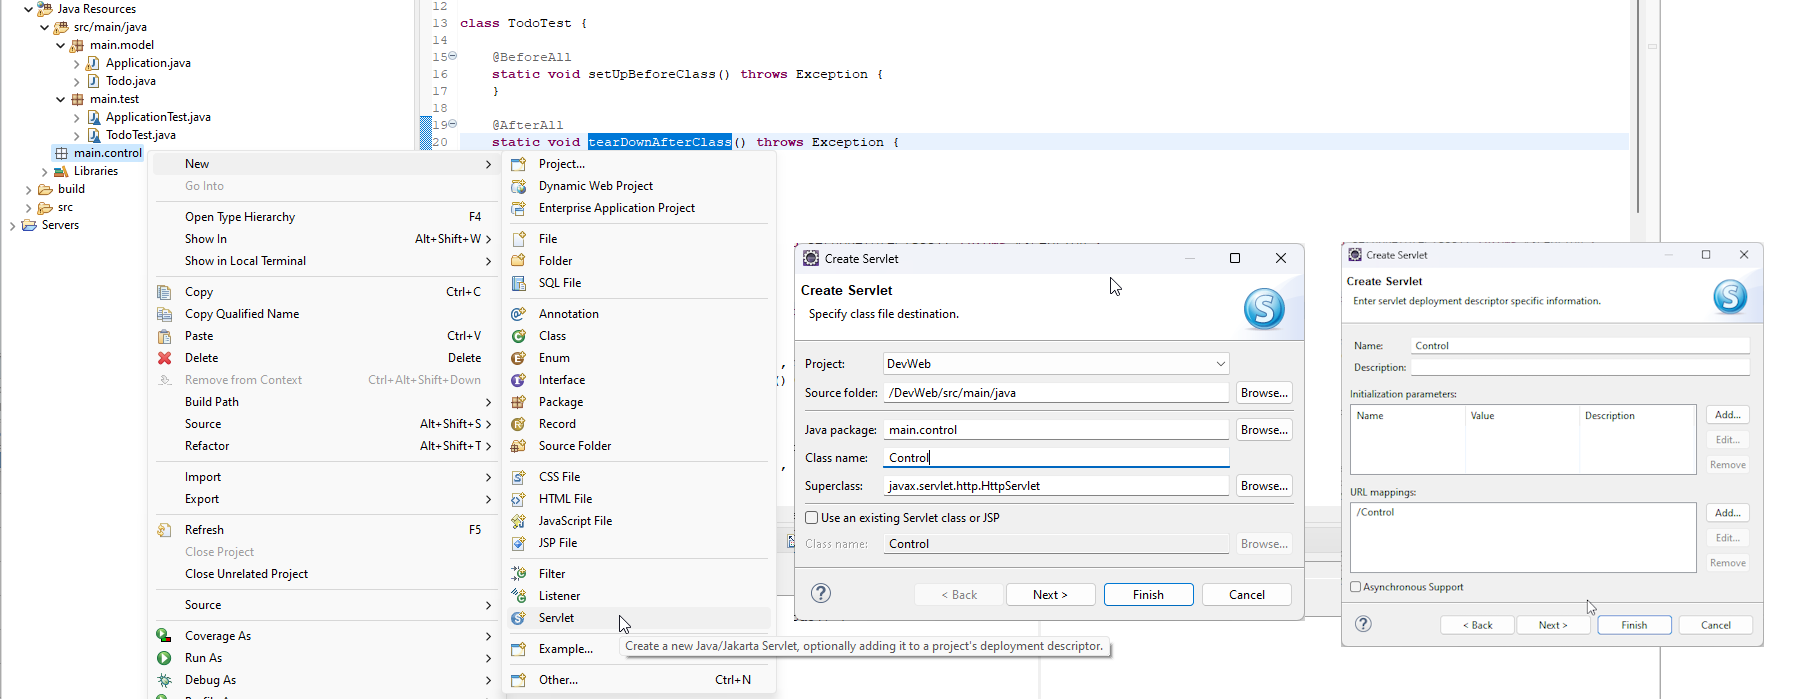
IMPORTANT NOTE: the mapping is the URL routing information if Tomcat find into URL /Control it will call the doGet() or doPost() method of this Servlet Class.
It is possible d’add several mapping et event use joker mapping as for example *.pdf to call a Servlet on every .pdf URL.
It is also classical to create a new servlet class as Control2 and change only the mapping to make an evolution on the web application.
We will modify the doGet() method with this piece of code :
protected void doGet(HttpServletRequest request,
HttpServletResponse response) throws ServletException, IOException {

String vueFinale = "todos.jsp";

// TODO: a future doAction() method will be call from here to choose which JSP page to display

request.getRequestDispatcher(vueFinale).forward(request, response);

}
The purpose of vueFinale variable is to store the final JSP name as view to display using the getRequestDispatcher. We create route from information receive from doGet() parameters and the redirection will ne manage into this place.
We can image maybe display an error.jsp page if the program needs to route the user to an error page.
Into the Control class we will code a method call doAction() with request parameters and mainly the parameter action. Using the value of this parameter action, the code will check informations receive from GET/POST forms, manage operations on the model classes and return the value for the next JSP page to display.
private String doAction(HttpServletRequest request) {

  String vueFinale = "erreur.jsp";

   String action = request.getParameter("action");

   // Action1 addTodo
   if ("addTodo".equals(action)) {

       String texte = request.getParameter("todo_texte");
       Application.getInstance().addTodo(texte, false);

       vueFinale = "todos.jsp";
    }

     // Action2 Update list ...


    // ...
    return vueFinale;
}
So calling this URL ./Control?action=addTodo&todo_texte_chocolat should trigger the piece of code to add a new instance of todo into the model. Then the control servlet class redirect the user to display the view todos.jsp listing all the todo items (inclus the new one).
This code is really partial and you should understand it by implement and debug the core of MVC Web application.
NOTE: if you need to rescue a list of parameters name from this kind of URL http://127.0.0.1:8080/Control?nom=jean&prenom=pierre&civilite=Mr as a list [ nom , prenom , civilite ], try :
List<String> keys = Collections.list(request.getParameterNames());
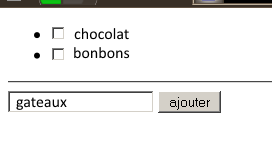
The next step is to develop a JSP and add features to the servlet to present a todo item list, un HTML horizontal bar (with tag <hr />) and un form to add new todo as :
NOTE: You should know a checkbox input feald is only trigger if the checkbox is check
You can read the following diagram showing sending data from HTML form, viewing information into the URL (the GET method is wonderful for this feature) , then data are send to the Servlet with the submit button and then you should debug the Servlet :
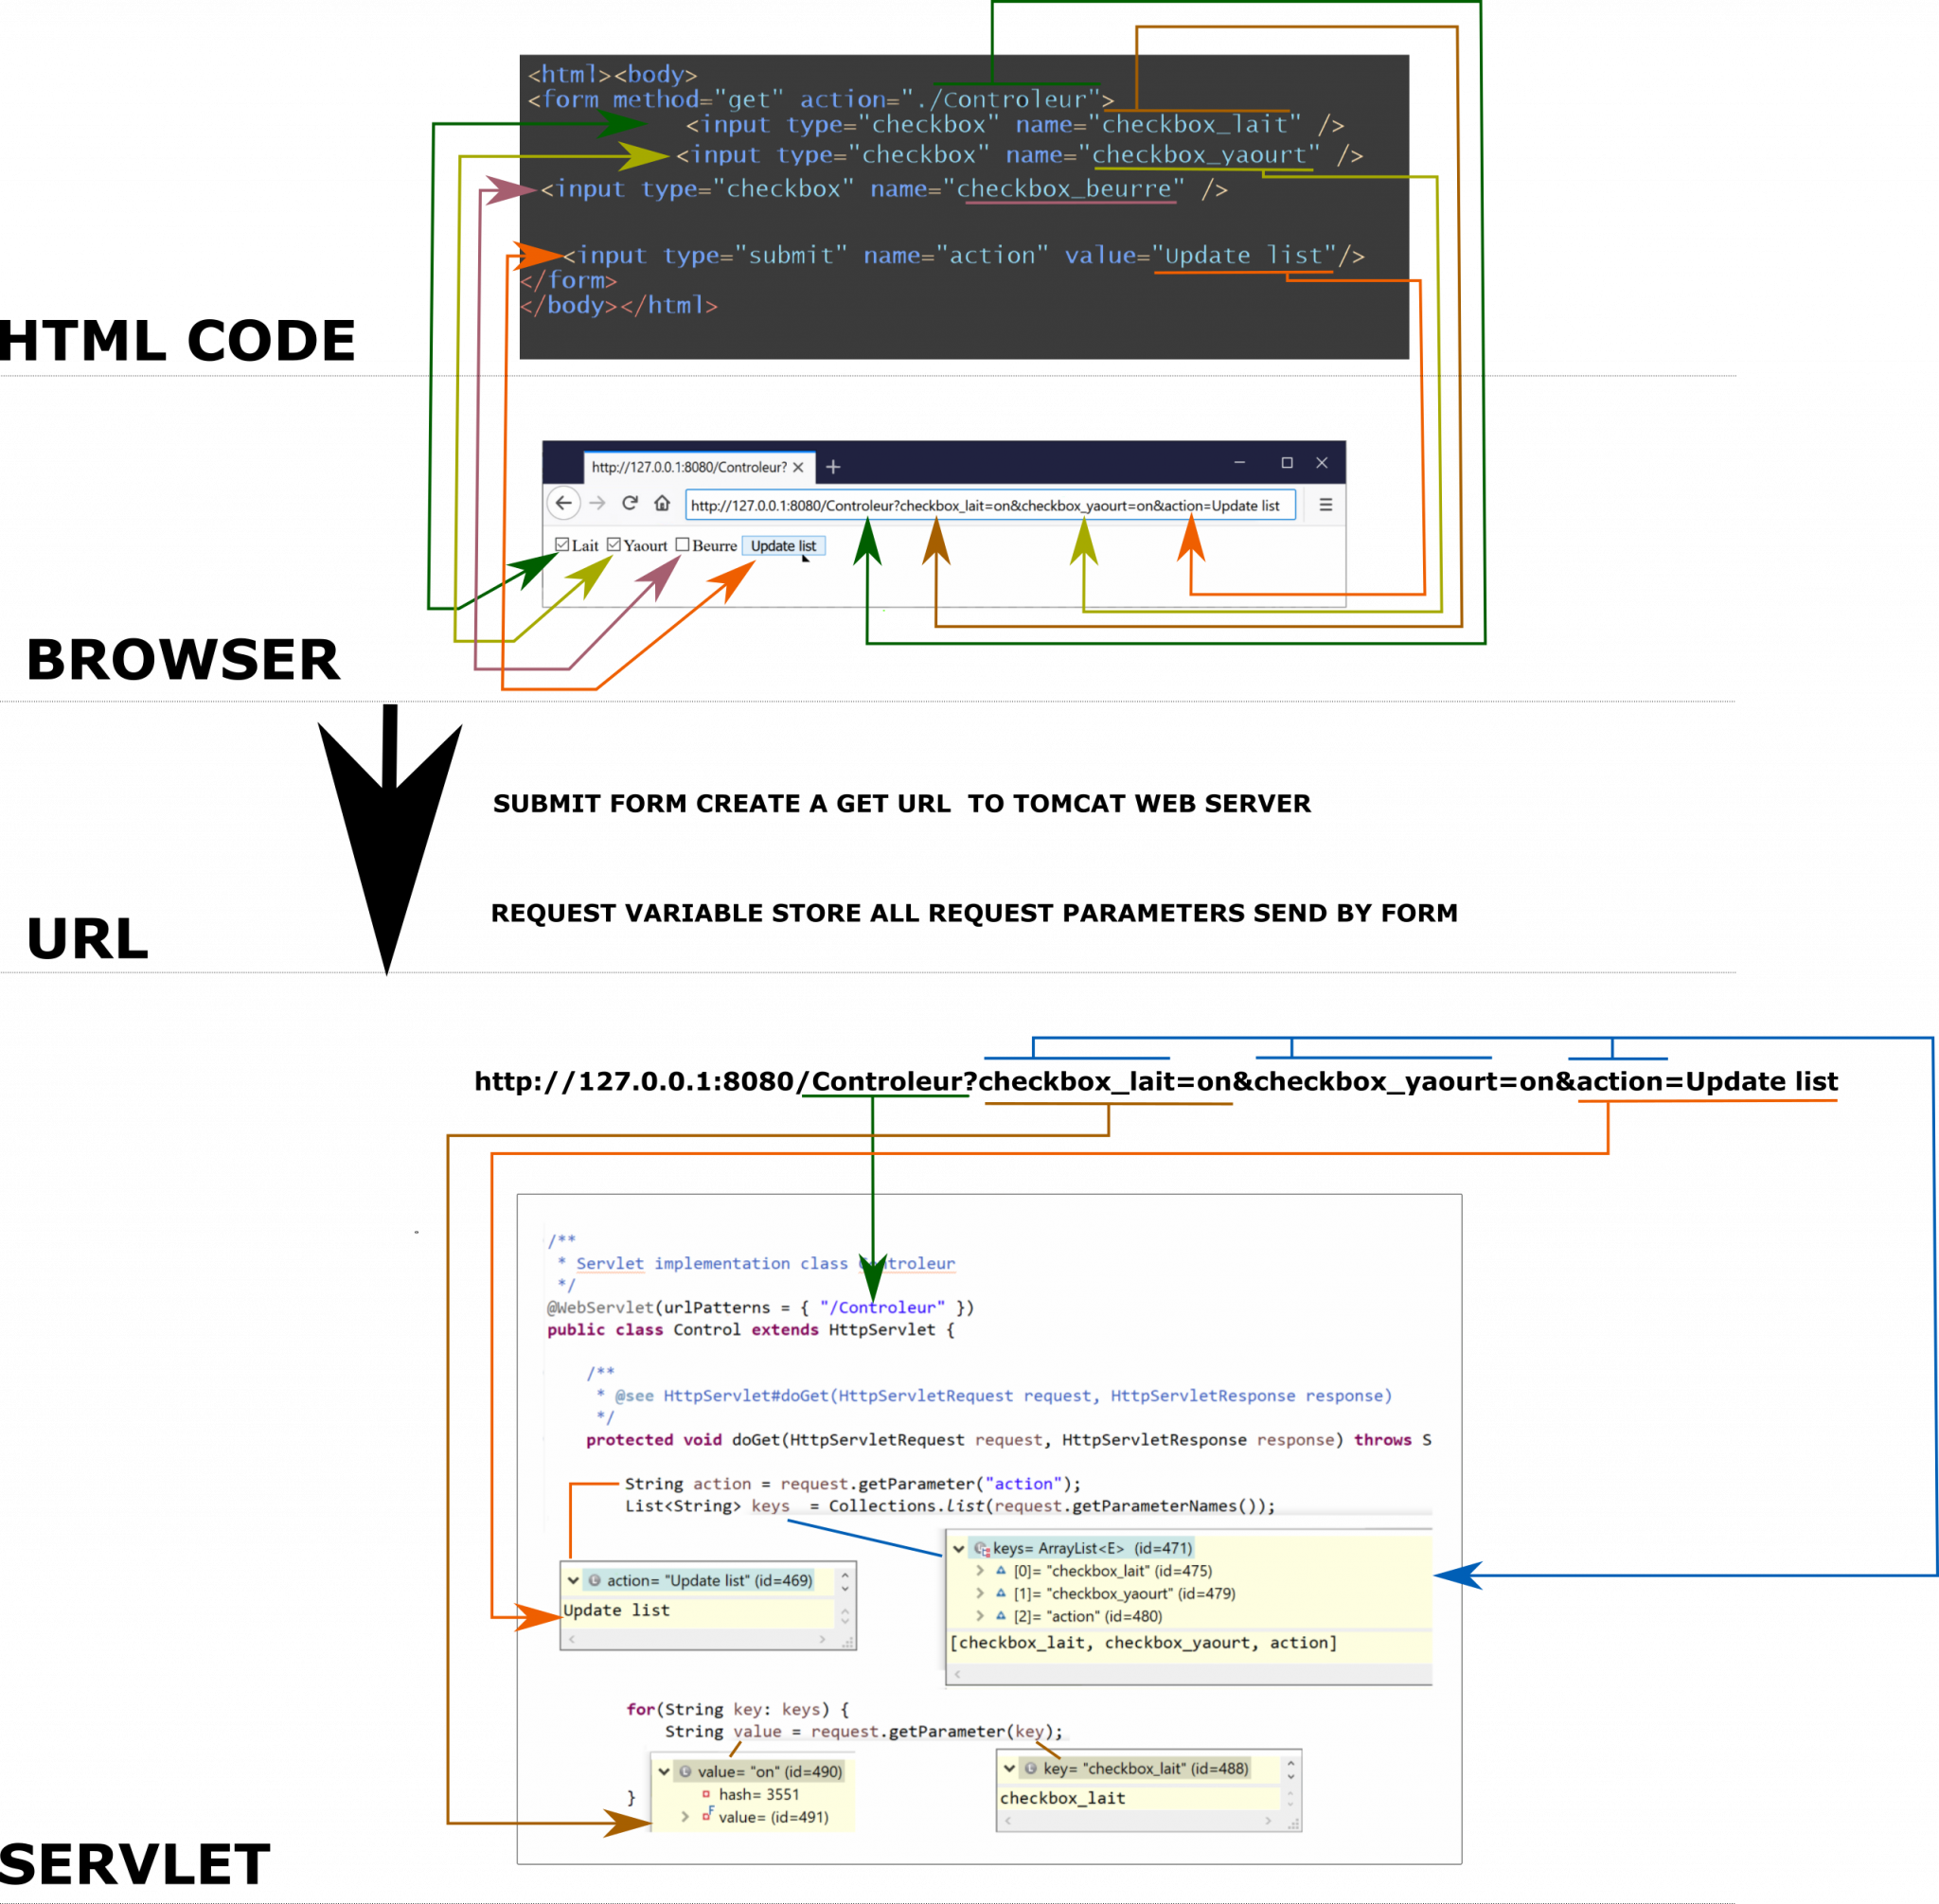
You can open into a separate tab this image to understand links between the HTML form and then Servlet variables.
Add a form to update the checkbox status if some todos are checked or not :
To create n HTML list please use this HTML :
<ul>
<li>chocolat</li>
<li>ananas</li>
</ul>
And to give you some code about tags with HTML form :
<form method="get" action="./Control">
<ul>
<li><input type="checkbox" name="checkbox_chocolat" /> chocolat</li>
<li><input type="checkbox" name="checkbox_ananas" /> ananas</li>
</ul>
<!-- missing some part about submit -->
</form>
You should know to tick the checkbox by default you should add an checked attribut as :
<input type="checkbox" name="checkbox_chocolat" checked />
or not checked by default with nothing :
<input type="checkbox" name="checkbox_chocolat" />
Of course you should code something like this code :
<%
for(Todo todo : Application.getInstance().getLesTodos() ){
%>
<p>
   <%if ( todo.isActif() { %>
      <input type="checkbox" name="checkbox_" checked />
    <% } else { %>
       <input type="checkbox" name="checkbox_" />
    <% } %>
</p>
<%
}
%>
But maybe there is a way to merge the two part of if/else block to simulate a HTML tag construction with a new checked variable ?
Cliquez ici pour afficher une proposition de solution pour gérer checked:<%@ page language="java" contentType="text/html; charset=UTF-8" pageEncoding="UTF-8"%>
<%@ page import="metier.*" %>
Parcours de la liste des Todos de type « foreach » :
<% for(Todo todo : Application.getInstance().getLesTodos() ){
String checked="";
if ( todo.isActif() ){
checked="checked";
%>
<input type="checkbox" name="checkbox_" <%=checked%> />
<% } %>
6/ New controller action: update todo
Usually, it is better to try to code your own personal way to update todo status. Please, consider only as basic structure and make your own version.
We can image 3 different strategies with the HTML part :
- First is to consider a form for a whole list of todo items and a separate form to add new todo :
<form method="get" action="./Control">
<ul>
   <li>
      <input type="checkbox" name="checkbox_chocolat" />
      chocolat
   </li>
   <li>
     <input type="checkbox" name="checkbox_ananas" />
      ananas
    </li>
 </ul>
 <input type="submit" name="action" value="Update list" />
</form>

<hr />
<form method="get" action="./Control">
   New Todo: <input type="text" name="todo_texte" />
   <input type="submit" name="action" value="Add todo" />
 </form>
- The second solution is also possible to use a form for each item list
<form method="get" action="./Control">
<ul>
  <li>
   input type="checkbox" name="checkbox_chocolat" />
   chocolat
   <input type="submit" name="action" value="Update liste" />
  </li>
</ul>
</form>

<form method="get" action="./Control">
<ul>
  <li>
   input type="checkbox" name="checkbox_ananas" />
   chocolat
   <input type="submit" name="action" value="Update liste" />
  </li>
</ul>
</form>

<hr />
<form method="get" action="./Control">
   New Todo: <input type="text" name="todo_texte" />
   <input type="submit" name="action" value="Add todo" />
 </form>
- A third choice is to create a hyperlink to simulate the form to update status
<ul>
   <li>
      <input type="checkbox" name="checkbox_chocolat" />
      chocolat
      <a href="./Control?action=Update%20liste&checkbox_chocolat=on">update</a>
   </li>
   <li>
     <input type="checkbox" name="checkbox_ananas" />
      ananas
      <a href="./Control?action=Update%20liste&checkbox_ananas=on">update</a>
    </li>
 </ul>
 <input type="submit" name="action" value="Update list" />
Any kind of solution is valid, some are easier to maintain in time.
Server side with the servlet, the action part code Update list, I recommend you to think about uncheck all the todo items then update the list of items send by the form as this way :
if ( "Update list".equals( action ) ){
  // TODO: you should create this function is needed and the Junit test
   Application.getInstance().uncheckAll();
   List<String> keys = Collections.list(request.getParameterNames());
   for(String key: keys) {
      if ( key.startsWith("checkbox_")) {
          String todoTexte = key.replace("checkbox_", "");
          Application.getInstance().updateTodo(todoTexte, true);
       }
    }
}
By the way why this line of code should be better than the second one :
if ( "Update list".equals( action ) ){

// Or

if ( action.equals( "Update list" ) ){
You should also improve your code with this version :
if ( "Update list".equals( action ) ){
   // TODO: create a method to invalid the todo items and then update according parameters
   Application.getInstance().updateListTodo( Collections.list(request.getParameterNames() );
}
But it is more important for me to first extract list of parameter into the Servlet and give to Application only verified data. It is just a way of thinking, not a mandatory way of coding.
Another way to improve is to change the checkbox name as :
<form method="get" action="./Control">
<ul>
  <li>
     <input type="checkbox" name="todo" value="chocolat" />
     chocolat
   </li>
   <li>
      <input type="checkbox" name="todo" value="ananas" />
       ananas
    </li>

  <input type="submit" name="action" value="Update list" />
</form>
The URL created by the form submit action will be
http://127.0.0.1:8080/DevWeb/Control&todo=chocolat&todo=ananas&action=Update list
You should rescue the whole list of checkbox parameters with GetParametValues() as :
String[] valuesCheckboxTodo = request.getParameterValues("todo");
7/ Delete todo item
Please provide the last action to delete and item and delivery the code by email. It is not and evaluation, just a milestone of the project before go on.
8/ Add action JSON
Could you add a new action on the controller as the action=json to create a different JSP page not into HTML but in a format exchange to another program.
By the past, we use XML format as this way :
<?xml version="1.0" encoding="utf-8"?>
  <todos>
    <todo id="1" texte="chocolat" actif="false" />
    <todo id="2" texte="ananas" actif="true" />
    <todo id="3" texte="kiwi" actif="false" />
  </todos>
But this format is less and less used despite the JSON format :
{
 "todos":
  [
   {
      "id": "1",
      "texte": "chocolat",
      "actif": "false"
    },
   {
      "id": "2",
      "texte": "ananas",
      "actif": "true"
    },
    {
       "id": "3",
       "texte": "kiwi",
       "actif": "false"
     }
   ]
 }
This format is also used with JavaScript code to communicate with the web server with AJAX request.
Please code the JSP page and change the content type from text/html to :
<%@ page language="java" contentType="application/json; charset=UTF-8" pageEncoding="UTF-8"%>
You can use an online tool to check JSON format as Online JSON Viewer. Some browser could reject JSON file using single quote instead of double quote or extra coma.
The evolution of the project will create more and more action values to check. It will be wize to split the main controler into several differents servlet controler. All actions based on JSON content return could then be put together into one different controler.
9/ Optional: write a client to use your JSON as an API Restful service
You can develop a Java (or if you like a Python) client program (called a desktop client program or a rich client) to rescue the data via JSON. This program is a simple Java project to develop independently as the Dev Web Tomcat project.
This program is as a rich client provide by OneDrive/DropBox/GoogleDrive/etc. whih call the API to receive only data. We can also use wget/curl command to simulate access to an API with and HTTP GET request.
We can also imagine an IOS/Android application which make HTTP GET request and receive JSON list of items from your DevWeb application.
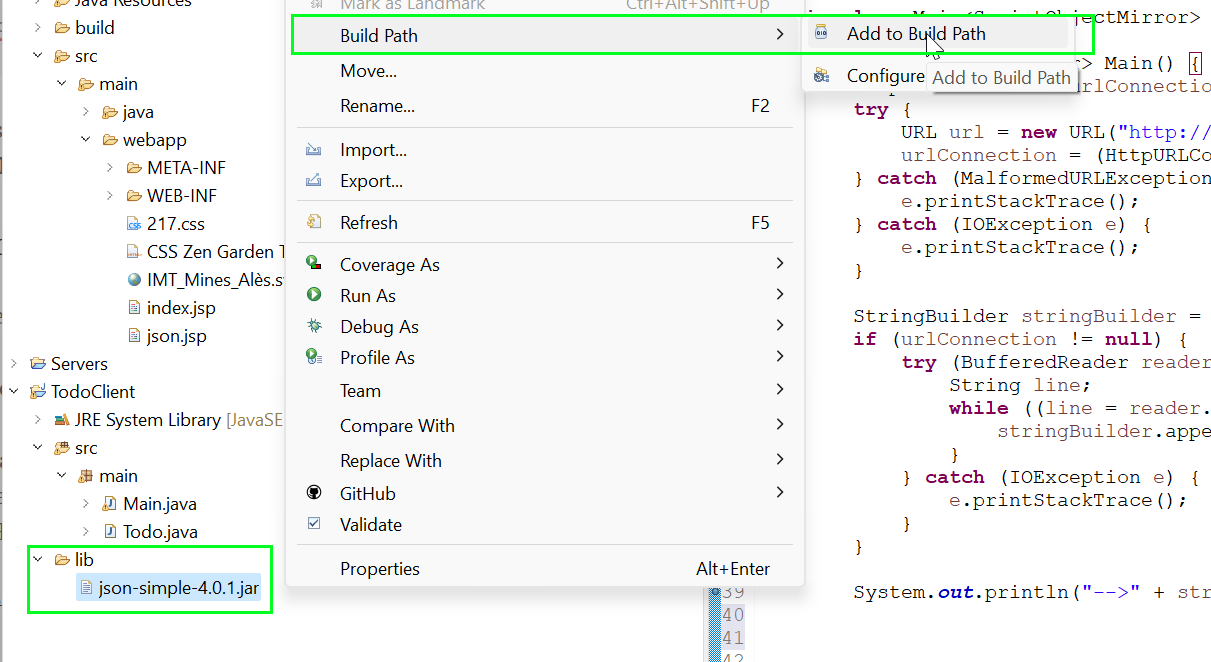
In Java, we can use one of many libraries to request a JSON and create instances (Google Gson, Jackson, Json-Lib, etc.). I find easier to use json-simple from https://cliftonlabs.github.io/json-simple/, download the JAR from the website and add it to the project (json-simple-4.0.1.jar is copy into a lib folder) :
First step if to create a valid URL for our JSON page
HttpURLConnection urlConnection = null;
try {
     URL url = new URL("http://localhost:8080/DevWeb/json.jsp");
     urlConnection = (HttpURLConnection) url.openConnection();
} catch (MalformedURLException e) {
	e.printStackTrace();
} catch (IOException e) {
	e.printStackTrace();
}
Then a script to read line and regroup them into a stringBuilder variable :
StringBuilder stringBuilder = new StringBuilder();
if (urlConnection != null) {
  try (
     BufferedReader reader = new BufferedReader(new InputStreamReader(urlConnection.getInputStream())))
     {
          String line;
          while ((line = reader.readLine()) != null) {
               stringBuilder.append(line);
          }
      }catch (IOException e) {
           e.printStackTrace();
      }
}
At least, we will use json-simple JAR classes to parse JSON node elements and create Todo new instance :
JsonObject  deserializedObject = Jsoner.deserialize(stringBuilder.toString(), new JsonObject());

JsonArray todos = (JsonArray) deserializedObject.get("todos");

for(int i=0; i < todos.size(); i ++) {
   JsonObject todo = (JsonObject) todos.get(i);
   String texte = (String) todo.get("texte");
    boolean actif = ( "true".equalsIgnoreCase( todo.get("actif").toString() ));
    Todo newTodo = new Todo( texte , actif );
}
This way is far from very verbose way to code, just to have a view of serialization/deserialization of instance, but other libraries hide all the complexity make the code more readable.
10/ Optional: using a JSP Tag
To be clear, this is a new template language named ‘Expression Language’ or EL. This language use a simple expression to call getters and setters as {todo.texte} to call todo.getTexte().
Suppose we want to improve the item todo part of the JSP page managing the checkbox and the text display into the <il> HTML tag.
First create a folder WebContent/WEB-INF/tags/, then create a new file « JSP tag » named todo.tag as :

The content of todo.tag will be a short part of the HTML/JSP :
<%@tag language="java" pageEncoding="ISO-8859-1"%>
<%@tag import="main.model.Todo" %>
<%@attribute name="todo" required="true" type="main.model.Todo"  %>

<li>
	<input type="checkbox" name="todo_${todo.texte}" value="${todo.texte}"/>
${todo.texte}

</li>
A todo item is required to use this JSP Tag is the type main.model.Todo is import into the JSP Tag.
Return to the todos.jsp listing item todo, add the import of the JSP tag with :
<%@taglib prefix="projetDevWeb" tagdir="/WEB-INF/tags" %>
Using a prefix is a way to avoid tag name conflicts if you import many tags, the inside you loop on all item todo, you should call the tag with the variable storing item todo information :
<projetDevWeb:todo todo="${currentTodo}" > </projetDevWeb:todo>
But the variable currentTodo must be backup explicitely into the page context (or into the session context if you want to), because the execution content of the JSP tag is different than the contexte of the JSP page. Variables create into the JSP page are not visible by default into the JSP tag to avoid conflict. So adding this liste will create a variable stored into the context page :
pageContext.setAttribute("currentTodo", todo , PageContext.PAGE_SCOPE);
Our final code should be close to this example :
<%
for(Todo todo : Application.getInstance().getLesTodos()){
   pageContext.setAttribute("currentTodo", todo , PageContext.PAGE_SCOPE);
   %>
        <projetDevWeb:todo todo="${currentTodo}" >
	</projetDevWeb:todo>
   <%
}
%>
You have to understand that the EL language use the coding way ${instance.property} as a simple way to call getters and setters. This simple version of using taglib and JSTL is really basic way to divide the rendering of the HTML page into several sub files.
One more advanced way to use EL language is to add JSTL libraries to Tomcat 9 : jakarta.servlet.jsp.jstl-1.2.6.jar et jakarta.servlet.jsp.jstl-api-1.2.7.jar
Then you can add a new tags’ library by default by add this line of code at the beginning of your JSP page :
<%@ taglib prefix="c" uri="http://java.sun.com/jsp/jstl/core" %>
The using the foreach JSTL tag to iterate on the application list of todo items :
<c:forEach
    items="${Application.getInstance().getLesTodos()}"
    var="todo" >
    	<projetDevWeb:todo todo="${todo}" > </projetDevWeb:todo>
</c:forEach>
Using Application singleton allow us to work with the variable into the JSP context page and into the JSP tag.
